
"Wish List"
Many Eastern philosophies extol the virtue of "not wanting", so this cover is evidence of my contrariness :-)

"Inside is a note pad and pencil"
The inside has a note pad, so I needed a thicker spine to accomodate the extra dimension. A tutorial follows describing how this is achieved.
This design follows on from the previous two posts where I shared some cards made using Jim the Gentleman Crafter's Hinged Card design. I like to make dimensional cards, and wanted to be able to add more dimension to the inside of the design, so set about coming up with a way to make a bigger gap between the covers. I'd recommend you make a couple of cards using Jim's tutorial to get used to the hinge mechanism before attempting this one!

1. Start off by cutting two 5" x 7" pieces of card for the covers (I use strong card recycled from dog food nuts packaging).
2. Cut two bamboo skewers to 7" long (to match the longest side of the card covers) and sand the cut ends to get rid of any splinters.

3. Colour the skewers black (I use the chisel end of a black promarker pen).

4. Decorate the skewers with gilding wax, dry and buff with kitchen roll. I love the look you get using this technique; it looks like gold leaf that is wearing off.

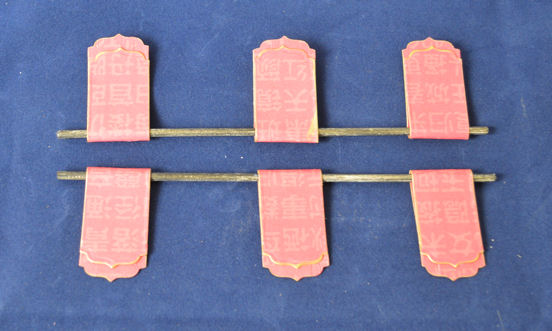
5. Next cut three strips 2 and a half inches wide from A4 patterned paper. (I found the Papermania Oriental Treasures patterned paper perfect for this, the Graphic45 is too thick).

6. Make six hinges using Jim's method. I cut each of mine to length (3 and 3/4") then fashion each of the ends with a Spellbinders Labels 4 die.

7. To diecut the end of each hinge, thread the hinge through the die leaving the tail free over the top of the die. This way you can cut one end without cutting the hinge in half.

8. Once you've done one end, switch it round and diecut the other end.

9. Repeat for the rest of the hinges until you have six. Colour the cut ends with a gold aquamarker to cover up any white edges.
10. Fix three hinges to each skewer using Jim's method, matching the hinges to the same position for each skewer and making sure they can turn freely around the skewers.

11. Make another two hinges, this time make each hinge 2" long and fold both ends in towards the middle.
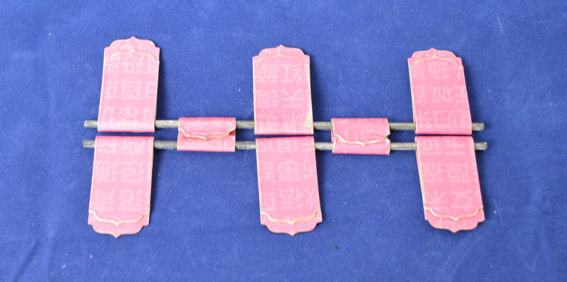
12. Glue the two smaller hinges in place to join both skewers together. It doesn't matter if they become fixed to the skewers in the gluing process. Put the assembly to one side to dry while you cover the covers.

13. Cover both sides of each cover with your choice of patterned papers.

14. Glue the outside of the covers to the hinges, three hinges to each cover, leaving a 1" gap between the covers and set aside to dry. Then you can add whatever decorations you like.

15. If you want to know how I made these outside covers, come back tomorrow ;-)
Well, that's the basic technique. All you need to do is decide what to put inside and provide a closure if you want one. The note pad at the top of this post uses a pencil in place of a skewer for a thick closure.
Ingredients
2 x 5" x 7" pieces of thick card (I used the packaging from a box of dog food nuts!)
Graphic45 Birdsong 8" x 8" paper pad
Papermania Oriental patterned paper pad A4
Papermania Oriental tags
metallic embroidered ribbon
metallic embroidered ribbon
large bamboo skewers
black promarker
gold aquamarker
adhesives: PVA
Entered for the following challenge:
Simon Says Stamp and Show - Inspired By (Jim the Gentleman Crafter!)
Maddy...thanks so much for your sweet comment you left on my blog. I really appreciate your time and thoughts as I am such a fan of your work. I love this style of card! I saw it on Jim's blog a while back and have created one for a future post. Your Asian theme one is so lovely. Aren't they totally fun to make? <3 Candy
ReplyDeleteA Bank Holiday, huh? That gives you time to make more hinged cards and notebook holders! haha I'm really curious how you did a notebook holder out of this pattern. Mine lay flat...and not enough room for a notebook of any thickness at all to be tucked inside. Did you somehow build up the sides or something to give it some depth? <3 Candy
ReplyDeleteYou are so clever! I need to go back and reread your post again. Thanks for the inspiration, Maddy. I can just see you cutting away at those dog boxes! haha You'll be cranking out skewer cards from now to next week! haha <3 Candy
ReplyDeleteWOW!! This is stunning Maddy, such a fabulous design and gorgeous detailing.
ReplyDeleteYour tutorial is wonderful, you explain everything so clearly.
I hope you are having a good day
Sue xx
Wow Maddy, this notebook cover is stunning, thank you so much for the tutorial too, it is excellent! Hugs, Anne x
ReplyDeleteWow, that's a gorgeous project.
ReplyDeleteThis is amazing Maddy, the colours are beautiful and I love how you adjusted Jim's design to make your hinges wider. One of the first books I ever made was doing a similar technique like this. I wasn't the best book in the world but in my defence it was one of my first books, lol. I have some oriental paper knocking about that I won't use, so I'll dig it out for you here. No point it sitting looking at me doing nothing, lol. And I know you'll do something amazing with it. Lee x
ReplyDeleteIt is really difficult not to be able to find the right Words to describe what I feel after having seen what you have made. It is so fantastic.
ReplyDeleteFabulous creation and great tutorial, thank you
ReplyDeleteI love your hinged piece Maddy, such a clever idea and looks fantastic. The front cover is amazing, the texture looks wonderful. Love the step by steps to create such an inspiring piece. Thanks so much for joining in the Simon Says Stamp and Show Challenge. Tracy x
ReplyDeleteAnother beautiful book! You are rocking these clever makes! Glad for your inspiration! I love the cover! Thank you for sharing your inspiration with us this week here at Simon Says Stamp and Show!
ReplyDelete