Friday 28 June 2013

The Beehive

Hubby is a beekeeper and I've been meaning to make him a beehive card for ages, but this week it finally came together. The third challenge for Craft Stamper magazine is to use the "Embossing Powder technique demonstrated so beautifully by Birgit Koopsen on pages 30-31 of the July 2013 issue". The hard part is that they would like ALL of the colour on your project to come from embossing powder! Now I love embossing powder, but I would normally use some distress ink with it to add extra colour, and really had to resist that big box on my desk.

"The Beehive - Front Cover"


This card has the same structure as the screen card tutorial I shared earlier this week. Rather than dry embossing, each of the frames is heat-embossed. Usually I make the inside of the card more highly coloured and decorated than the cover because I like a contrast, but this card has the opposite approach. I wanted to fill the card with "frames" of bees such as you would get in a real beehive, so I made the cover more colourful.

"Colour Detail"

Every bit of colour comes from embossing powders. These are nothing special, just a cheap set bought from Ebay when I first started heat-embossing a few years ago. The background uses Birgit Koopsen's technique, but I wanted the more detailed images in the foreground to have some colour too, so the beehive itself is stamped onto scrap white card and the stamp used as guidelines for colouring with the embossing powders, before heating, cutting out, shaping and sticking onto the background using Pinflair for extra dimension. The flowers are diecut from white card and also decorated with heat-embossing. I really had to stop myself reaching for the inks to decorate the edges of the diecuts as I would normally do. I hate those white edges lol!

"The Beehive - Inside Panels"

The inside panels are also decorated solely using embossing powders. The frames use a bronze-coloured cheap powder, which is used patchily to create lots of texture (hopefully it looks like beaten metal). The panels are all joined together using bailer twine. Bailer twine is a magic item on the farm. Historically, it was used in the hay bailer machinery to tie the bails of hay, although these days they don't make much hay any more (it's all gone over to great big tractors making silage wrapped in black plastic). But bailer twine has a million and one other uses too - repairing all sorts of things, tying farm gates to broken gateposts (usually broken by those big tractors!), makeshift leads for the dogs, etc. Today I found another use for it - joining screen card panels together. It seemed apt somehow :-)

"Individual Panel"

The background is made by dry embossing white card using a Darice embossing folder rubbed with versamark, then colouring with "honey" coloured embossing powder and a sprinkling of light brown (real honeycomb always has bits of bee poo in it lol!). I added more of the light brown to enhance the outline of individual cells using a versamark pen.

"Another Individual Panel"

This panel has more of the brown colour. In a real hive, older frames are darker than newer ones. If you want to produce honeycomb to eat, it has to be made from scratch in the year it is produced so that it is a nice, clean, light colour. It's obviously more work for the bees because they have to make the wax as well as the honey, whereas they prefer to reuse wax they made in previous years.

"Bee!"

These fat-bottomed bees are bumblebees rather than honeybees, but you'll just have to allow me a little artistic license :-) The bees are stamped onto spare white cardand heat-embossed in gold. The individual stripes are made using a versamark pen and heat-embossed in honey colour. Finally, the bees are individually cut out, shaped and mounted onto the frames using Pinflair for extra dimension.

"The Back"

Even the back is decorated with heat-embossing, but has been left much plainer to allow the future addition of sentiment panels if required.

"Bee Charm"

These little bee charms are hung from the bailer twine for a finishing touch.

Well, I hope you enjoyed this card and glimpses of a rural life today. The weather here in Northern Ireland is cold, windy and frequently wet, but life is good here.

Ingredients
Sizzix Bigz Vintage Cabinet and M&S Cabinet dies
Spellbinders Die D-Lites - Floral Border
Chocolate Baroque stamp set: Honey Bee
Artemio stamp sets: Butterflies, Bugs and Insects, Wild Meadow
Crafty Secrets Stamp set: Queen Bee
IndigoBlu stamp: Honeycomb Background
Cardstock: brown 300gsm, white 160gsm & 220gsm
Embossing folder: Darice chicken wire
Embossing Powders: Imagepac set of 12 colours, Stampendous Pirate Gold
Ink pads: Balck Archival, Versamark Clear
1/8" Brass Eyelets
Bailer Twine
Bee Charms

Entered for the following challenges:
Craft Stamper Take it Make it Challenge 3
Simon Says Stamp and Show - Stripes

Tuesday 25 June 2013

Tuesday Technique - Screen Card Tutorial

I love to use the matching large and small Sizzix Movers and Shapers dies to make screen cards and I thought you might like to see some step by step photographs of the process. The dies I use the most often are the Ornamental and Vintage Cabinet dies, but you could use any matching pair of dies of different sizes. Steel rule dies are best for screen cards because you want to be using really good, strong card and that can be more difficult to cut with thinner dies. However, if you only have thinner dies, you could use thinner card and stick it together after cutting to make a thicker layer.


1. Start with 3 sheets of A4 strong card (at least 300gsm) and cut each in half (at 14.8cm along the longest edge) to make 6 x A5 pieces.


2. Set the smaller Movers and Shapers die inside the larger one to cut a frame.


3. By carefully lining up the card near the cutting edge on the die, you can get two cuts from each piece.
N.B. I use a Sizzix Big Shot for diecutting. If you have a Cuttlebug, you will need to cut each of the A5 pieces of card into A6 and make one diecut from each piece of card because the Cuttlebug does not have as wide a cutting area as the Big Shot.

4. Cut 8 frames in total.


5. Remove the smaller die and replace with a magnetic release block.


6. Cut four of the larger shapes out whole to make four panels.


7. Now each panel has two matching frames, one for each side.


8. Decorate the frames and both sides of each panel before sticking the frames to the panels.


8. Stick the frames to the panels, one on each side of each panel.


9. Make two holes in one side of two panels, add eyelets if required. These will be the panels at the left hand side and the right hand side once they are all joined together.
N.B. It's important that the holes match up for joining the panels together, so make them the same distance from the top and bottom edges for all the panels.


10. Make two holes in both sides of the remaining two panels, add eyelets if required. These will be the two middle panels once they are all joined together.


11. Join the panels together using the holes and book rings or lengths of string or ribbon


12. Decorate with extra embellishments as required.


13. I always like to add some extra dimension to the front cover. Here I've used some Wild Orchid flowers which were part of a brilliant birthday pressie from my bessie mate Lee. Another part of my pressie was the most amazing mini and it's well worth a look at Lee's blog to check it out.

Please pop back later in the week when I'll be sharing another screen card. You can also see some more examples of my screen cards in the following posts:
What Are You Known For?
Christmas Screen Card
Tropical Travelogue Screen Card (see Project Six)
Birthday Screen


Ingredients:
Sizzix M&S Vintage Cabinet & mini vintage cabinet
Hunkydory vintage patterned papers & toppers
Cuttlebug embossing folder - Script
Spellbinders - Rose Creations, Carnation Creations
Cheery Lynn mini Fanciful Flourish die
lace
pink brads
leaf gem stalk
gilding wax, enchanted gold
cardstock: brown 300gsm
gold string
Wild Orchid Crafts flowers
adhesives: PVA, Pinflair

Entered for the following challenge:
Hobby House Challenge - Anything Goes
CountryViewCrafts - Diecuts

Saturday 22 June 2013

Simon Says Stamp and Show... Kraft!

Surprisingly for a vintage lover, I'm not a big fan of kraft card. It's because I love my colours and of course, they are always somewhat muted on kraft card. I do, however, use a lot of recycled packaging. Often, as with the notebook covers from last month, the card is covered with patterned papers. But another way I like to use it is with diecutting.


In this card, the weathered clock, gears and hands are all diecut from recycled cat food box before decorating with metallic distress stains. The clock is stuck onto the card using Claudine Hellmuth matt multi medium, whilst the gears and clock hands are adhered with a decorative screw brad through the centre. This is attached to the panel before sticking to the rest of the card, so the hands of the brad are hidden.


This card started out with the egg timer which is a Hunkydory topper. I chose some inks to match (Pumice Stone and Milled Lavender), and set about making an inky background on A4 stamping card. Plenty of picket fence distress stain was used to mute the colours and also for some of the ghost stamping to add interest. Once dried, the master sheet is cut into an A5 piece for the main card background, and an A6 piece for the top panel, and each of these is matted onto grey card along with the topper. The washers came from Tom's toolbox. I asked if he had any washers and he made the mistake of saying "help yourself", so I did :-)

Ingredients:
Sizzix Bigz Tim Holtz dies: Weathered Clock, Gadget Gears
Tim Holtz stamp set Time
recycled cat food box
metallic distress stain
screw brad
adhesives: Claudine Hellmuth matt multi medium, PVA
distress inks: Milled Lavender, Pumice Stone
distress stain: Picket Fence
archival ink: Jet Black
Hunkydory vintage topper & tickets
washers
cardstock: grey 200gsm, white 160gsm & 300gsm

Entered for the following challenge:
Simon Says Stamp and Show - Kraft

Tuesday 11 June 2013

Tuesday Technique - the Button Garden and how to make Button Flowers

First of all, I want to share my good news with you. I won the Craft Stamper magazine challenge 2 with my "Feather Your Nest" card, and one of the prizes is for the winning entry to be published in the magazine - woohoo!! Luckily, I kept the card lol!

Second, my dear other half has entered a photo in the Raspberry Pi competition and you can see me crafting away in the background! No, I'm not naked, it's just a skimpy summer top :-)) I really like the little Cartman peeping over his keyboard.


"The Button Garden Book Card"

OK, on to today's project. This week, Simon Says Stamp and Show...buttons! Oh, I love buttons!! I inherited the button boxes in my family, and save buttons from every old garment before it gets thrown away, but do I have enough buttons? Oh no, I still have to buy more. So this time last year, I was wandering around a craft shop and came across a packet of gorgeous mother of pearl buttons in the shape of flowers and there they have been in my button box, looking at me ever since. So when I saw the challenge was buttons, I decided to put them to use and came up with an idea to make a button garden. Of course, I also had to make a book card to house it.

"Left Inside Panel"

The sentiment stamp is from a set that came free with a magazine. They were meant to be used with card candi, but I think they work well with buttons too. The background for both inside panels was made using my new pan pastels with versamark + pan pastel stamping and a little masking (for the sun and horizon). I wanted the edges to be hazy, so smudged them all slightly after lifting the masks.

"The Button Garden"

The button garden is built into the aperture by gluing each of the button flowers in place between folds using glossy accents.

"Button flowers and leaves"

Each of the flowers and leaves in the garden is a button. Some of the buttons, like the flower-shaped mother-of-pearl buttons, are as they were bought, and others have been decorated using various techniques that I shared in an earlier tutorial. The "leaf" buttons have been decorated with scraps of patterned paper from Kaisercraft and Graphic45. The blue centres of the organza flowers started out life as cheap, plastic black buttons and have been decorated by dabbing with silver and blue alcohol inks.

"Cover of Book Card"

With such an intricate inside, I prefer my book cards to have fairly clean & simple covers. This one has a flower and sentiment stamped & heat-embossed in gold. I cheated a little since the stalk and leaves are from a different stamp set, I just covered up the flower that was originally on the stamp. A small mother-of-pearl button is added to the centre of the flower with a dab of Pinflair. The closure is made from a good length of lace coloured with pan pastels in sections to match the inside of the card.

Ingredients:
Artemio stamp sets: Hedgerow Plants, Silhouette Foliage
Candi stamp set, free with Simply Cards and Papercraft magazine
buttons!!
pan pastels & sofft tools
versamark ink pad
stampendous embossing powder, Pirate Gold
florist wire
paper-covered wire
distressinks: Victorian velvet, Bundled Sage
Tim Holtz paper stash: Vintage Shabby
Cardstock: white 160gsm & 220gsm, brown 300gsm
lace

Entered for the following challenge:
Simon Says Stamp and Show... Buttons!

Tuesday Technique - How To Make Button Flowers


1. Start off with a flower button (here I've used an organza flower with a button centre), a leaf button (anything green will do!), and a length of florist wire.

 
2. Poke the wire through the button from back to front and bend it to form a loop.


3. Poke the end of the wire back through the opposite button hole from front to back


4. Pull the wire through until tight against the front of the button.


5. Turn the button over and twist the wire around itself to lock in place at the back of the button.


6. Trim the end of the short length of wire flush with the stem using a pair of wire cutters.


7. Poke the other end of the wire through the leaf button from back to front, bend as before and poke back through the opposite button hole from front to back.


8. Tighten the wire against the front of the button as in step 4, then bend the wire into a loop and attach the end to the stem to make a leaf shape.


9. Here's some I made earlier :-) The mother-of-pearl buttons had fairly large button holes, so instead of florist wire I used paper-covered wire coloured with Bundled Sage distress ink. You can add more than one leaf to a stem as in the flower at the top right, and bend the leaves in either direction away from the stem for a little variety.


Friday 7 June 2013

Spooky Spiders

This week's Simon Says Stamp and Show challenge is brought to you by the letter "S". The idea is to be inspired by the letter "s" or to use a product that starts with the letter "s". As you have probably guessed from the title of this post, I've gone for a Hallowe'en theme with Spooky Spiders :-)

"Spooky Spiders"

I know, I know, the sun is shining and it's Summer and there are all sorts of other esses I could have chosen, but "Spooky Spiders" it is! Oh, and there's the Scary cat, the distress Stickles, the Stamping with Stampers anonymous Stamps, the black Soot distress ink edging, Stampendous embossing powder, Sizzix diecuts and Seasonal paper Stash too :-). Plus, I love that the background stamp has "spooky" written in it (does anyone else think "spooky Mulder" from the X-Files when they hear that word?) :-)

"Stamped and Embossed Panel"

The main panel is coloured with various red and orange distress inks, then overstamped with white brilliance ink. You could get a similar result with a resist technique if you preferred, but I like the grungy matt effect of the white stamping over an inked background. After stamping, I lined up the words with the matching embossing folder and embossed to raise the lettering, making the letters pop even more. The panel is matted and layered onto black, and placed onto a card blank decorated with patterned papers and more matting and layering. Then the whole thing is overstamped using the spiders' web stamp from the IndigoBlu stamp set to tie all the panels together.

"Spider diecut"

The scary cat and spooky spiders are diecut, coloured with distress inks and decorated with a good rubbing of black soot distress stickles. The eyes are added with white pen. The diecuts are shaped and adhered to the card with Pinflair for some added dimension.

"Sizzix Iron Gate diecut"

 This iron gate from Tim Holtz is one of my all time favourite dies, it's so versatile and can be used on cards with lots of different themes. Decorated all over with black embossing powder as it is here, it reminds me of the black iron railings that used to surround our school. They used to get the odd new coat of black gloss, but the rust would always come through. I've made as rough a job as possible of the black embossing so it would look like the paint was chipping off. The edges were gone over with a versamark pen before adding some rust-coloured embossing powder and heating again. The railings outside our school always used to bring to my mind impalings so they are quite appropriate for a Hallowe'en card. I blame it on all those gothic novels I read as a teenager, I never really saw anyone impaled  :-)

Well, the Sun is continuing to shine here in Sunny Northern Ireland and long may it continue. It was actually warm enough for shorts today - woohoo!!

Ingredients:
Stampers Anonymous Tim Holtz stamp set Halloween Silhouettes CMS115
IndigoBlu stamp set Hocus Pocus HP1
Sizzix Texture Fades Tim Holtz Halloween Background and Borders Set
Sizzix Bigz Tim Holtz Candlelight Fright
Sizzix Originals: Cat, Scary and Spider #2
Sizzix Tim Holtz On The Edge Iron Gate
Tim Holtz Seasonal 12" x 12" paper stash
Brilliance ink pad Moonlight White
Distress Ink pads (various oranges and reds plus Black Soot)
Versamark Ink pad
Versamark pen
Inkssentials pen White Opaque
Distress Stickles Black Soot
Stampendous embossing powder, black
Cheap embossing powder, earth colour
cardstock: 300gsm white (for card blank), 160gsm black (for matting & layering)
adhesives: PVA, Pinflair

Entered for the following challenge:
Simon Says Stamp and Show - brought to you by the letter S

Tuesday 4 June 2013

Tuesday Technique - A Simple Gift Box to hold A6 Cards

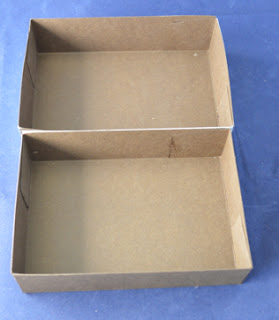
Like most cardmakers, I make lots more cards than I could ever use and one of the things I like to do with them is give them as gifts. This tutorial shows you how to make a simple box to hold half a dozen A6 cards and envelopes. It will accommodate cards with lots of embellishments, or if you prefer making flatter cards you could just put more in.

All you need is two sheets of strong A4 coloured card, glossy accents or PVA, a scoring board, a guillotine (or ruler and craft knife) and a pair of scissors. You can use the handle from a pair of scissors with a ruler to make score lines, but if you make a lot of boxes it's definitely worth investing in a good scoring board to get accurate lines more easily.

1. Start off with two pieces of A4 300gsm card. Cut one 8 " x 10" and the other slightly larger at 8 3/16" x 10 3/16".


2. Score both pieces all the way around 1 3/4 " in from each edge as in the photo above.


3. At each corner, cut a tab by cutting one score line and trimming one edge as above. You can see the cut lines better in the next shot.


4. Use a scoring tool to give a good, sharp crease to all the edges and bend into place.


5. Glue all the tabs inside the corners with glossy accents for nearly instant stick, or use PVA and hold in place with paperclips overnight until properly dry.


6. Finally, decorate with patterned papers and tie your cards and envelopes together with a generous length of satin ribbon. Here's a few I made earlier!

This simple box design is easily adapted to make different sized boxes, just make one sheet of card slightly larger than the other before scoring.

I leave you with some photos of the basic A6 cards I make. When I'm stuck for inspiration for a special card, I'll pull out my stash and make a pile of cards like these. It usually sparks some ideas.

stamped & coloured image, gilding wax on the diecut frames

flower moulded from Martha Stewart paper clay

string and wooden embellishments go with gardening theme

shrink plastic butterfly & fairy coloured with Derwent inktense pencils

alcohol ink background with tyre tread stamp and orange string recycled from clothes tag

handmade stickpins match the topper & ribbon

old lace and bits of broken jewellery make great embellishments for vintage cards