Wednesday 18 April 2012

Birdcage book card

Finally I can reveal my secret today. Those lovely people at Penny Black and More have chosen me to be one of their two featured artists this month!! This post is to say thank you so much to the design team for choosing me - it's been a real boost. Another piece of good news this week was that I found out I won the Sarah Hurley Challenge as well, so more thank yous are in order to you too!
So, on to today's card. I've been trying to get a bit ahead on my birthday cards and this one is for my mil. She's promised not to peep beyond the first picture :-).

"Birdcage book card"

The background panels for this card are all made using distress inks and a wonderful birdy stamp set from Crafty Individuals.

"Front panel"

A second Crafty Individuals stamp set with lots of trees was used to provide a backing with lots of Perfect Pearls in gold, and this was overstamped in Crimson Archival Ink using the bird stamps. A diecut birdcage and bird add some dimension, but I love the way the stamped birdcage bars show through the gaps in the birdcage die, like an old-fashioned double-layer cage.

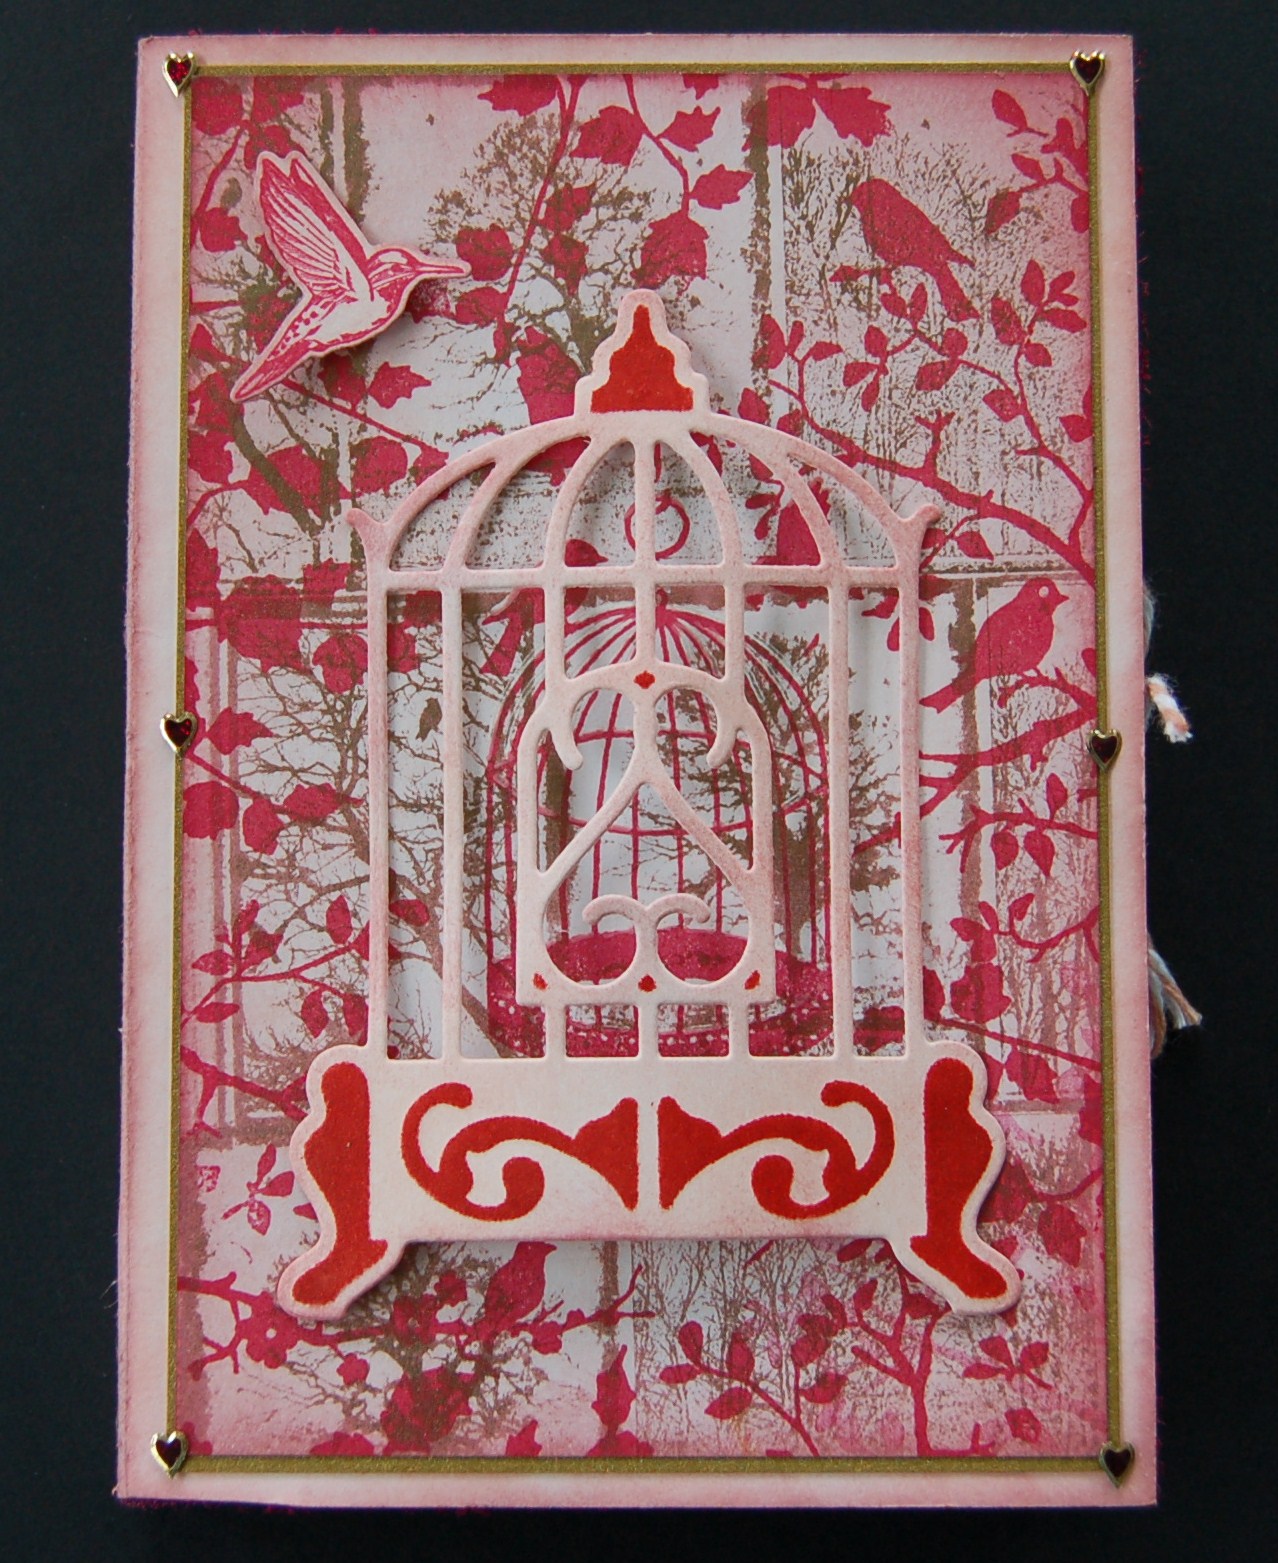
"Front panel - non shiny photo!"

This second photograph shows the stamping without the glimmer. You can see how I've stamped the tree panels in three rows, varying the order in each row to give some extra interest. The foreground stamping uses parts of the bird & branch stamps in different directions to give the effect of looking through all the layers of a woodland.

"Inside with tags"

Moving on to the inside of the card, the same C I birdy stamps were used on the background panels, this time with lots of gold Perfect Pearls for plenty of glamour. Various free Graphics Fairy images were used for the birds on the right and the birdcage on the left (just printed, cut out, shaped with fingers and stuck with Pinflair for some dimension).

"Right-hand side faux book panel"

Yay, I finally got hold of a Tim Holtz birdcage die! It was used here to diecut some gold, hammered card. Some lace was wound up the bars of the cage (the ends of the lace are secured out of sight with glossy accents). Jump rings are added to the top of the cage and glued into the folds of the book with glossy accents to allow the birdcage to hang freely in the book aperture. Lace is secured around the edge to make a decorative frame.

"Beads"

Small beads were attached to the bottom of the birdcage with pins and jump rings.

"Left hand panel"

The left hand panel features one of my favourite Graphics Fairy images - this old Victorian birdcage. Extra lace is added to the bottom of this panel to make a pocket for the tags (well, you need somewhere to write your message!).

"Tags"

The backgrounds are inked and stamped with C I stamps before dusting with Perfect Pearls and overstamping with a couple of Kaisercraft sentiments in archival. Matching lace is threaded through the tag holes.

"Back and sides"

Just to finish off the back and sides of the card, here's a good use for those peel-offs lying around forgotten in your stash.

Ingredients:
cardstock: white 300gsm, white 160gsm, hammered gold 200gsm
lace & bakers twine
Crafty Individuals stamp sets: CI-234, CI-287
Sizzix & Hero Arts stamp & die-cut set 657774
Kaisercraft stamp set: Life Sentiments
Sizzix Bigz dies: Tiny Tabs & Tags, Caged Bird
Spellbinders dies: Birdcage
Distress Inks
Archival Ink: Crimson
Perfect Pearls: gold heirloom
adhesives: Glossy Accents, Pinflair, PVA
peel-offs in geometric patterns for book cover
printoffs from the Graphics Fairy
beads, pins, jump-rings

Entered for the following challenges:
Crafty Individuals - Time for Summer
Craft Room Challenge - Ink It
Die-Cutting Divas - In The Garden
Bunny Zoe's Crafts - Ribbon or Twine
Craft Your Passion - Die Cuts and Punches
Simon Says Stamp and Show - Anything Goes

Monday 16 April 2012

Spring Dream - distress inks

Just a quick one today. We're still waiting in the UK for our suppliers to get hold of some of those full sets of distress markers, and I've been thinking about how I can use them if and when they ever arrive! Anyway, I fancy trying some fun stamping, colouring the stamps with different colours, and in the meantime I used distress inkpads to achieve the effects on this card. Hope you like it!

"Dream"

The back panel is inked using cut n dry foam, while the main image panel colouring uses inks, water mist & a non-stick sheet that you swoosh the cardstock around onto. After drying, the background panel is stamped and decorated with perfect pearls.

"Dream"

The meadow & butterfly stamps on the main panel are inked with different colours of distress ink using the pads (be careful not to contaminate your lighter coloured pads if you have a go at this - use the lighter ones first, being careful not to touch them to any areas on your stamps that are already inked). I really like the watery look of the meadow that was created using this method. Some water was added to the butterfly with a fine brush to spread the colour a little. Finally, I have gone over the edges of the butterfly with a fine promarker to give it more of a drawn look. The red of the butterfly really makes it pop forward from the blue-green watery background.

"Flower"

Three different types of lace are used in the background, coloured to match the crad using the same distress inks. The flower is one of my organza creations using the Tim Holtz Tattered Floral die, with a big Joanna Sheen jewel brad in the centre, just for a hint of bling!

Ingredients:
IndigoBlu stamp set Wild Meadow WM1
Sizzix Bigz Tattered Floral die
cardstock: red 300gsm, white 160gsm
Distress inks: Tumbled Sage, Pine Needles, Barn Door, etc.
Perfect Pearls: Green patina
Lace
White organza
Jewel Brad

Wednesday 11 April 2012

Men's Cards Can be Pink and Have Lace Too!

Another book card today. This one features the "Victorian Gentleman's Cabinet of Curiosities"! And just to prove that it can be done, this man's card is made with lace and a pink colour scheme :-)

"Front cover"

The map is stamped onto a distress-inked background and covered in Perfect Pearls powders before overstamping in Crimson Archival Ink. The ticket is stamped again onto a separate piece of card, cut out and distressed and a glaze pen used to raise the lettering on "Admit One". The ticket and sentiment were both raised with foam pads for some added dimension, and tiny circular metallic peel-offs added to the image panel to look like rivets on a box. More "rivets" were used to decorate the side and back of the cover.

"Inside"

Both decorative panels inside are decorated with distress inks. The butterfly image on the left is printed from the Graphics Fairy's blog and the butterflies on the right are from a Tim Holtz stamp set. It's amazing how well they match. I'm sure the images on the stamps are taken from a similar source. The closure is provided by Baker's Twine stuck in between the image panels and cover, and all the fabulous lace is from my friend Kathy (thank you again!).

"3-D Butterflies"

The Tim Holtz butterflies are stamped onto the back panel in distress ink and again onto acetate with crimson archival ink. The acetate butterflies are cut out, the wings bent and the centres adhered on top of the background stamping with glossy accents. The "Butterflies and Moths" part of the stamp is printed again on a separate piece of card and adhered over the lace border.

"Graphics Fairy butterflies"

This panel was coloured with distress ink before printing the Graphics Fairy image with an inkjet printer. This saves the printer ink from smudging. The lace at the bottom is glued just around the bottom and side edges, so that it acts as a pocket for the decorative tags.

"Tags"

The tags are coloured with distress inks, the butterflies stamped in archival, and the sentiments stamped in archival and heat embossed in clear. Bits of lace are added to match the card.

Ingredients:
Distress inks: Tattered Rose, Victorian Velvet
Archival Inks: Crimson, Jet Black
Embossing Powder: Clear
Lace
Baker's Twine
image from the Graphics Fairy
Stampers Anonymous stamp set: Papillon
Stampers Anonymous stamp set: Air Travel
Tim Holtz stamp set: Nature's Elements
Tim Holtz stamp set: Curious Possibility
Papermania clear stamp set Hampstead
cardstock: brown 300gsm, white 160gsm

Entered for the following challenges:
Joanna Sheen - It's a Man Thing
Simon Says Stamp and Show - Tim Holtz Technique
Bunny Zoe's Crafts - Challenge 23 Ribbon or Twine
Make My Monday - Vintage
Sir Stampalot - Happy Birthday

Monday 9 April 2012

Splendidly Dressed Alice & The White Knight

Oh, I've had some fun with this one! The challenge at the Altered Alice blog this month is "Splendidly Dressed!". I just had to use some more of the paper dolls cut from Dover Publications clip art and also introduce a bit of love interest (Lewis Carroll will be turning in his grave!).

"Alice meets the White Knight...Splendidly Dressed!"

"...Or Not!!!"

Does he look like Johnny Depp or is it just me?

The clothes are glued onto an acetate sheet fixed to cover the front of the card, and the paper dolls glued to the background beneath. When the card is closed, the dolls are dressed, but open the acetate and the clothes disappear :-).

The background is decorated with distress inks, post-it note masking and IndigoBlu stamps. The acetate wrap is fixed around the back of the card with strong double-sided sticky tape and the join covered with ribbon.

"Clothes back on again"

A glaze pen was used to add some metallic shine to all the buttons & straps on the white knight's armour & shoes and alice's fan & tiara.

"Lace"

Real lace ruffles are added to Alice's dress.

"Warning sign"

Did you notice the warning sign on the unclothed page?

"Nudity"

It's because of the rabbit's "Full Frontal" on the inside of the card. He has no shame that rabbit! He's raised off the page with some foam pads and the clothes are detachable so you can restore his modesty :-)

Ingredients
IndigoBlu unmounted stamp set Alice I
Distress Ink - Barn Door
Sakura Glaze Pen
images from Dover Publications
lace
Glossy Accents
PVA
acetate
cardstock: white, 300gsm

Entered for the following challenge:
Altered Alice - Splendidly Dressed
Hotshot Craft - Red
Oozak - Anything Goes

Saturday 7 April 2012

Vintage Easter Book Card

Anyone who follows my blog regularly will know that we have been hatching chickens for the last few months, and I just couldn't resist some gorgeous Graphics Fairy images when it came to making my husband Tom's Easter card. After decoupaging one of the images, I thought it was too nice to go on the front of an ordinary card, so I decided to make a book card.

"Easter Book Card"

This stamping idea from Tim Holtz made a glorious front cover using blues and purples to match the images inside the card.

"Front cover"

The background stamp is brushed over with Perfect Pearls for some extra glimmer, and the acetate butterflies are stamped with cobalt archival ink to match the Broken China & Dusty Concord butterflies stamped on the card.

"Book card view showing dimension"

There are plenty of tutorials on the internet for book cards, so I won't bore you with my version today, suffice it to say that I used 1/2" folds on the edges. OK, let's take a look inside...

"Inside of book card"

Tom likes a "Wow" on the inside of his cards, and he certainly got one today :-) Both these wonderful images are from the Graphics Fairy's blog and are therefore my favourite price, which is FREE :-)

"Graphics Fairy' image"

Four copies of each image were printed onto 160gsm white card and various portions cut out for decoupage. The top layer of the eggs & broken eggshell in each image was glazed to look like real eggshell, and the filigree work on the egg above was decorated with a gold gel pen.

"Side view of decoupage showing dimension"

After cutting, the layers were gently shaped and glued together with Pinflair dimensional glue. Some glaze was also added to the chick's eye & beak and over the letters of the sentiment. 

"Main image glued in place behind book pages"

The main image is glued into the back of the book pages before fixing to the cover with a small length of lace for a closure. The front of the pages are decorated with two different types of lace.

"Facing inside panel"

Another Graphics Fairy image is decoupaged for the inside panel, again decorating the top layer of the eggs with a glaze pen. The top layer of feathers on the hen is fringed with tiny snips of the scissors to make it look more realistic. The background is decorated with distress inks and a fabulous Indigo Blu swirl stamp, and the Tim Holtz sentiment is stamped with black archival and heat-embossed in clear. A second length of lace is stuck between the panel and front cover, providing the closure for the book card.

Ingredients:
Stampers Anonymous Tim Holtz stamp set Papillon CMS106
Indigo Blu stamp set: Wild Meadow WM1
Tim Holtz clear stamp set: Nature's Elements
cardstock: white, 300gsm & 160gsm, purple 300gsm
Distress Inks: Tumbled Glass, Broken China, Milled Lavender, Dusty Concord
Perfect Pearls: Blue Patina
Sakura Glaze pen: clear
Archival Ink: Cobalt, Jet Black
Embossing powder: clear
Acetate
Lace
Adhesives: Pinflair dimensional glue, Glossy Accents, PVA
free images from the Graphics Fairy's blog

Entered for the following challenge:
Joanna Sheen - It's a Man's World
Fairytale Challenge - Everything Goes
Glitter Geeks - Easter
Sarah Hurley - Easter
Just Inspirational Challenges - photo
Crafty Calendar Challenge - Egg-Stra Special
Secret Crafter Saturday Challenge - Easter

Friday 6 April 2012

Happy Easter Lee

I heard yesterday that my good friend Lee's card arrived, so I'm sharing it with you today. Lee makes the most amazing flowers and jewellery items and has loads of tutorials on her blog, which is well worth a visit.

"Easter shrine"

I think this looks kind of like a shrine. A shrine to Easter eggs! The background is done with dylusions sprays using some sequin waste for a stamp to get the honeycomb effect, then overstamped in a contrasting colour and edged with distress ink.The Spiced Marmalade distress ink is a good match for the Sunshine Dylusions ink. I've played about with applying the dylusions ink with cut'n'dry foam, but it doesn't stay wet long enough for the effects I like, so using a mixture of dylusions and distress works well for me.

"Woodgrain"

The tag and tree are both embossed with Tim Holtz' woodgrain folder using one of Tim Holtz' techniques, which is to ink one side of the folder with distress ink before passing through the machine, pushing ink deep into the recesses of the embossing.  Here, more colours are added with Dylusions sprays and distress ink pads before using a finger to apply a good smear of distress stickles. Lee gave me some fantastic findings and beads and I've used these to make some eggs to hang from the tree.

The lace & flower trim are coloured with distress ink to match the project and fixed in place with glossy accents. The rabbits are of course from the Graphics Fairy. A little clear glaze was added to the eyes and the eggshell before sticking the image in place with Pinflair for some added dimension.

The iron gate die cut adds to the quasi-religious feel with all those "Fleur de Lis" crosses. I don't want to go overboard explaining the rest of the religious imagery, but it's there if you want to see it!

Ingredients
Sizzix Bigz Tag (thanks Lee)
Sizzix Bigz XL tree pop-up
Sizzix On The Edge Iron Gate
Sizzix Embossing folder woodgrain
Meadow Stamp Set
Sequin Waste
Dylusions Ink Sprays
Distress Inks
Sakura Glaze Pen: clear
Adhesives: Pinflair, Glossy Accents
Findings & beads (thanks Lee)
Lace & flower trim (thanks again Lee!!)
image from the Graphics Fairy

Entered for the following challenge:
Creative Cutter Room - Easter and a Bunny!
Rainbow Lady's Challenge Blog - Happy Easter
Sarah Hurley Challenges - Easter

Thursday 5 April 2012

Men's cards don't have to be Sport or Transport

I won a gorgeous stamp set from Crafty Individuals last month and thought it would make a fantastic man's card when teamed with blues and greens.

"Be like the bird..."

The trees image was stamped twice with distress inks onto inked card and both the images decorated with Perfect Pearls, one in green patina and the other in blue patina. The blue central tree was cut out and mounted on the other image with foam pads to raise it up. The birds were also stamped and dusted, and the sentiment stamped in archival ink. All these stamps are from the same stamp set.

The main panel and a larger piece of blue patterned paper were both matted onto black card. Lace and black Elegant Flourishes were adhered to the larger panel, then the smaller panel glued on top.

"Flower"

Flowers were layered together with a blue brad to make a stylised blue daffodil. You see, even men's cards can be pretty! The men must get so bored with the sport or transport themes that seem to dominate the market; it's nice to try something a bit different.

"Trees"

Ingredients
Sizzix Bigz die - Elegant Flourishes
Crafty Individuals unmounted stamp set - CI-287
Distress Inks
Archival Ink: Jet black
Perfect Pearls - Green Patina, Blue Patina
Cardstock: black 160gsm, white, 160gsm & 300gsm
Patterned paper
Fabric & paper flowers
Blue brad

Entered for the following challenge:
Joanna Sheen - it's a Man's World
Crafty Individuals - Time For Summer

Tuesday 3 April 2012

Let's Go On A Egg Hunt

I cheered myself up recently by buying myself a present - yup, a Sizzix die! It's this Easter bunny & butterfly from Tim Holtz, and I thought you might like to see a couple of the Easter cards it's made already:

"Lets Go On A Egg Hunt"

The old see-d sentiment stamp on this card just made a great quote for the bunny rabbit to say to the butterfly (or was it the other way round?). "Lets go on a Egg Hunt" he says.

"Mr. Rabbit aka the Easter Bunny"

The bunny & butterfly were diecut from white card & empty cat food box. The card was sprayed with Dylusions ink, dried, embossed with a script embossing folder, then glued on top of the cat food box. Distress ink was used to highlight the embossed areas, and distress stickles applied before drying with a heat tool and gluing in place with Pinflair. Gems were added to the butterfly and to make the rabbit an eye.

"Stamped scene"

The decorated panel is made up from white card coloured with dylusions inks and dried, then some picket fence distress stain is applied in splotches to resemble clouds. Finally the Hero Arts meadow is stamped over the lot with black archival ink. The panel is matted onto orange card and glued to the background with PVA.

"The finished card"

Distress inks are applied to the card blank to make a background. After adhering the panel, orange string is tied around the card giving the vague impression of a scene seen through a window. The ends are glued with glossy accents. This particular string was scavenged from the labels attached to some men's clothes bought in the M&S sale! It's amazing what crafty stuff you can find for free if you keep your eyes open.

Ingredients:
Sizzix Bigz Die: "Easter Elements"
Hero Arts cling stamp: "Bloomin' Meadow"
See-D stamp set: Easter
Dylusions Ink Sprays
Distress Ink: Fired Brick, Tumbled Glass, Spiced Marmalade, Pine Needles
Distress Stickles: Fired Brick, Pine Needles
Archival Ink: black, crimson
Embossing powder: clear (for sentiment)
cardstock: white 300g & 160g, orange 160g
orange string
self-adhesive gems: green

OK, just for good value today, here's another card made with the same die cuts.

"Live Life to the Full"

This one uses slightly different colours and stamps, but the principles are much the same. There is some lace dyed with distress ink instead of string, and the birdcage has been highlighted with white inkssentials pen. I just love this Crafty Individuals stamp set, definitely a current favourite!

Ingredients:
Sizzix Bigz Die: Easter Elements
Crafty Individuals unmounted stamp set: CI - 234
Distress inks: Tumbled Glass, Spiced Marmalade
Archival Ink: Jet Black
Inkssentials pen: white
Dylusions Ink Sprays
Distress Stickles
Self-adhesive gems (these were clear and coloured with "Marine" promarker)
white lace

Entered for the following challenge:
Simon Says... Anything Goes
Hooked on Craft Challenges - Easter
Incy Wincy Designs - Easter and/or Pastel colours (Easter for me!)
Craft Spot by Kimberly - Easter
Paper Sundaes Challenge - Happy Easter
Sweet Stampin' Challenge - Easter
Polka Doodle - Easter