Saturday, 18 May 2013

Tim Holtz Hardware Findings Note Book Binding Tutorial

Making all those skewer bindings last week got me thinking there must be an easier way to bind the covers, and I came up with this. Hope you like it!


1. Cut 3 straps and one keyhole each from recycled card packaging and good quality black card.


2. Glue the black card pieces to the patterned side of the recycled packaging pieces using a good layer of PVA and leave to dry.


3. Pass all the pieces through an embossing folder the wrong (brown) side up.


4. Flip all the pieces over and dry emboss them again. This will help to break up some of the paper fibres and make the straps more flexible so they will bend without tearing or cracking.


5. Go over all the edges with the chisel end of a black promarker.


6. Bring out details of the embossed design by rubbing with gilding wax.


7. Use a thick pen to roll the straps around, giving them plenty of flexibility before fixing to the covers.


8. Cut two pieces of thick recycled card packaging 5" x 7"


8. Prepare two 5" x 7"covers using the gilding an embossed image technique and glue to the card pieces using a good layer of PVA. Leave to dry.


9. Layout the straps and keyhole on the covers and punch small holes in the covers to match the holes in the diecuts (I use an 1/8" eyelet punch), then attach the straps using brads.


10. Open out the brads on the wrong side to hold everything in place.


11. Cover the insides with patterned papers (hiding the brads) and add some gold thread to hold the contents in place.


12. I filled this one with a selection of A6 handmade cards and envelopes. Once they are used, the recipient can still use the cover for notes.


So there you have it, a Christmas present for an 18 year old boy!


14. And a matching one for his girlfriend (my niece) :-)

Ingredients:
Tim Holtz Sizzix Bigz Hardware Findings, Tag and Bookplates
Spellbinders Die D-Lites: Floral Border, Bluebells and Lily of the Valley
Spellbinders Butterfly
M-Bossabilities Large Folder: Venetian, Tweet and Twigs
Tim Holtz Sizzix Embossing Folder:
Cuttlebug Embossing Folder: Mesh
 Papermania Oriental Treasures A4 paper pad
recycled card packaging
cardstock: black 220gsm,
Creative Expressions gilding waxes: enchanted gold, patina
black promarker
gold aquamarker
selection of handmade C6 cards and envelopes
brads
gold thread
adhesives: PVA, Glossy Accents


Thursday, 16 May 2013

Double skewer hinged notelets set

This is a project using the double-hinged skewer binding to hold a set of stamped notepaper and envelopes. Another Christmas present for my shelf!

"Notelets Set"

The covers use the "gilding an embossed image" technique, and there are also gilded diecuts cut from black card. I love that vintage frame sepellbinders die and use it a lot. It's perfect for some of these Graphic45 images cut from the 8" x 8" patterned paper pad.

"Stamped Notepaper and Envelopes"

The notepaper and envelopes are held in place with some gold thread secured behind the patterned paper when it was stuck inside the covers.

"Patterned Paper Lining"

The Graphic45 8" x 8" papers are perfect for lining the 5" wide covers. Cut a sheet vertically in half to give two pieces 4" wide and that leaves a one inch border either side to fill up using any of their complementary patterns. I stick mine down with a good smear of PVA and leave to dry.

"Stamped Papers"

My friend Brenda was saying the other day that she wanted an excuse to get her oriental stamps out. It gave me the idea for the notepaper set! Hope to see your stamps get an outing soon Brenda :-)

Ingredients:
Graphic 45 8" x 8" paper pad: Birdsong
Papermania Oriental Treasures A4 paper pad
Spellbinders Vintage Frames
Spellbinders Die D-Lites: Floral Border, Bluebells and Lily of the Valley
recycled card packaging
cardstock: black 220gsm, white 160gsm cut into A6 (for stamping - take an A4 sheet, cut in half to make 2 x A5, then cut in half again to make 4 x A6), gold mirri card
black promarker
gold aquamarker
selection of stamps and inks to decorate notepapers and envelopes
C6 white envelopes
gilding waxes: patina, enchanted gold
brads
thick pencil
gold thread
decorative ribbon
adhesives: PVA, Glossy Accents

Tuesday, 14 May 2013

Tuesday Technique - Making Holes in Poured UTEE Shapes

While I had the melt pot to dip my bird into last week, I made some more UTEE embellishments and thought I'd share my method of making holes. As luck would have it, there are plenty of bits of bamboo skewer lying around here (now, I wonder why that could be lol!).

All you need is a melt pot, some UTEE, a skewer or cocktail stick, cookie cutter and versamark pen. Use the brush end of the pen to go over the inside & cutting edge of the cookie cutter and the blunt end of the skewer or cocktail stick. Working on a craft sheet over a heatproof surface, pour UTEE onto the craft sheet, push the cookie cutter down into the hot UTEE and quickly stand the stick into the hot UTEE, inked end down.

"Making a Hole in Poured UTEE"

Leave to stand until set (it only takes a couple of minutes). Check for a set with the edge of your spatula, not your fingers! Once set, pick up, remove the outside and push the shape out. Remove the stick, and this is what you get:

"UTEE Shape with a Hole!"

You can also drop charms and beads into the hot, poured UTEE for extra decoration...

"Charms Embedded in UTEE shapes"


I leave you with pictures of some of the other UTEE things I made in this mega melt-pot session.

"More Circles"

"Rectangles, Easter Eggs, etc."


"Shapes from my homemade moulds"

Loving the new UTEE colours, and as you can see I used up all my dregs of old pots of embossing powder to make some different colours. Hope you all have some crafting fun today! Maddy x

Sunday, 12 May 2013

Live Your Life in Colour

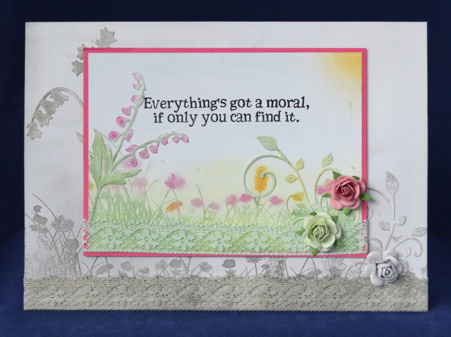
I have some more gilding wax projects to share, but thought we'd take a break today and have something colourful to celebrate the arrival (and departure!) of Spring :-)

"Live Your Life in Colour"

There's a new craft shop in Ballymena - wayhay! It's called Gemini Crafts and the lovely lady who runs it, called May, is as mad and enthusiastic about papercrafting as me! We could hardly stop talking long enough for me to buy some crafty stash, but this card has a few things on it that I bouight from her. Also, she sells Pan Pastels and IndigoBlu stamps, as well as loads of distress stuff, so you can imagine I am very happy about that! So, a big shout out to May and I wish you every success in your venture.

The background for this card is in monotone and stamped with the same stamps as the main panel.

"Pastels"


I love the IndigoBlu nature stamps, and reach for them constantly when stamping. This poppy meadow background stamp is just gorgeous. The scene is coloured with pan pastels, stamped in versamark and the ink rubbed with more pan pastels to get a soft, colouring effect. Diecuts and the grey lace are also coloured with pan pastels. The soft green lace is the colour that it was when my good friend Lee gave it to me - she scored some real vintage lace, and it's wonderful stuff!! Thanks Lee :-)

Ingredients:
IndigoBlu stamp sets: Alice II, Poppy Meadow
Pan Pastels
versamark ink pad
Cheery Lynn flourish (can't believe how easily this cuts out!)
Spellbinders Die D-Lites - Bluebell & Foxglove
Hobby House flowers
cardstock: white 300gsm & 160gsm, pink 160gsm
vintage lace
adhesives: PVA, Pinflair
 
Entered for the following challenge:
IndigoBlu Forever 21 - Challenge 3 Flowers

Wednesday, 8 May 2013

Feather Your Nest

Yesterday, I promised you another project using "gilding wax on dry embossing". This is my entry for Craft Stamper's blog challenge: Make it, Take it - Challenge Two. We had to use the "Ripping And Tearing technique, demonstrated so beautifully by Helen Chilton on pages 78 - 81 of the May 2013 issue".

"Feather Your Nest"

The background is dry-embossed black card rubbed with different colours of gilding wax to bring out the texture. The top layer has the centre cut and ripped open to reveal a second layer beneath. Gilded diecuts were added over the background using Claudine Hellmuth matt multi-medium, which adheres to the wax and dries without leaving any glossy streaks.

The bird is stamped using jet black archival ink onto card that was previously decorated with distress paints. After cutting out, the bird is dipped into molten clear UTEE in a melt pot. After setting but whilst it is still warm, Perfect Pearls is rubbed onto the UTEE to give a metallic sheen. Straw, eggs (some gorgeous turquoise beads I picked up at Belfast Craft Fair) and the bird are fixed to the card, and a beaded jewel hung from the bird's beak.

Now, it was a rare, Sunny day here in Northern Ireland yesterday, so I couldn't resist seeing what Mr. Birdy looked like perched amongst the apple blossom...

"Chirp Chirp"

The sunlight really brings out the shine from those gilding waxes.

"Apple Blossom"

Finally, some flowers for Tom's bees to feed on!

"Cute!!!"

I thought I'd leave you with a picture of some of the newest members of our family, who hatched over the weekend. No wonder I have birds on the brain today :-) Maddy x

Ingredients:
M-Bossabilities Embossing Folder: Tweet and Twigs
Sizzix Tim Holtz Embossing Folder: Wood Grain
Creative Expressions Gilding Waxes: Enchanted Gold, Patina, Amethyst
Martha Stewart stamp set: Birds
Ranger Archival Ink: Jet Black
Distress Paints
Clear UTEE
Straw
Beads & Findings
adhesives: Claudine Hellmuth Matt Multi-Medium, PVA, Glossy Accents

Entered for the following challenge:
Craft Stamper Make It, Take It, Challenge Two - Rip and Tear Technique

Tuesday, 7 May 2013

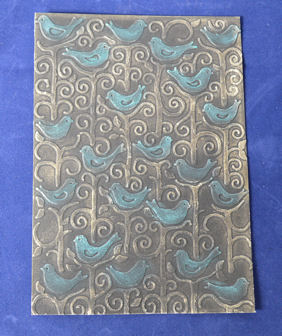
Tuesday Technique - Gilding an embossed image

You may have noticed  all the metallic-looking embossed covers I've been using lately. Today I thought we'd have a look at the very simple technique used to create them.


1. Start off with a piece of black card cut to size and emboss using an embossing folder and roller-type machine.


2. Choose a colour of gilding wax and gently rub onto a raised area, picking out an aspect of the design.


3. Colour similar parts of the design with the same colour


4. Continue until you have completed a section.


3. Repeat steps 2-4 using a different colour of gilding wax.


4. Rub some gold gilding wax around the outside of the card to create a frame.


5. Buff any excess wax with some kitchen roll, and here's the pair of covers from yesterday! It's hard to show the metallic shine from this technique in the photographs, but you should get the general idea. I stick them down with a layer of PVA to the patterned side of recycled dog food boxes to make good thick covers.

I hope you'll come back tomorrow to see one of my weird and wonderful creations made using this technique! Have a great day everyone. Maddy x

Ingredients:
cardstock: black 220gsm
gilding waxes: Creative Expressions patina & enchanted gold
Embossing folder: M-Bossabilities Tweets & Twigs

Monday, 6 May 2013

Oriental Hinged Note Pad Cover

Here's the front cover of a note pad to match yesterday's card

"Wish List"

Many Eastern philosophies extol the virtue of "not wanting", so this cover is evidence of my contrariness :-)


"Inside is a note pad and pencil"

The inside has a note pad, so I needed a thicker spine to accomodate the extra dimension. A tutorial follows describing how this is achieved.

This design follows on from the previous two posts where I shared some cards made using Jim the Gentleman Crafter's Hinged Card design. I like to make dimensional cards, and wanted to be able to add more dimension to the inside of the design, so set about coming up with a way to make a bigger gap between the covers. I'd recommend you make a couple of cards using Jim's tutorial to get used to the hinge mechanism before attempting this one!


1. Start off by cutting two 5" x 7" pieces of card for the covers (I use strong card recycled from dog food nuts packaging).


2. Cut two bamboo skewers to 7" long (to match the longest side of the card covers) and sand the cut ends to get rid of any splinters.


3. Colour the skewers black (I use the chisel end of a black promarker pen).


4. Decorate the skewers with gilding wax, dry and buff with kitchen roll. I love the look you get using this technique; it looks like gold leaf that is wearing off.


5. Next cut three strips 2 and a half inches wide from A4 patterned paper. (I found the Papermania Oriental Treasures patterned paper perfect for this, the Graphic45 is too thick).


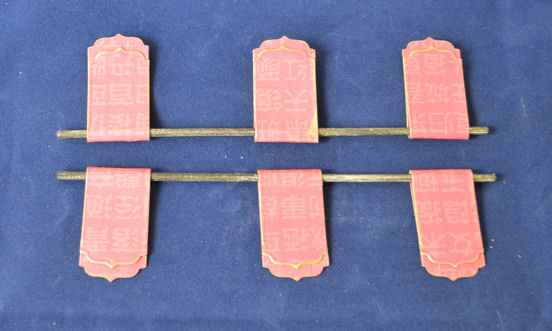
6. Make six hinges using Jim's method. I cut each of mine to length (3 and 3/4") then fashion each of the ends with a Spellbinders Labels 4 die.


7. To diecut the end of each hinge, thread the hinge through the die leaving the tail free over the top of the die. This way you can cut one end without cutting the hinge in half.


8. Once you've done one end, switch it round and diecut the other end.


9. Repeat for the rest of the hinges until you have six. Colour the cut ends with a gold aquamarker to cover up any white edges.


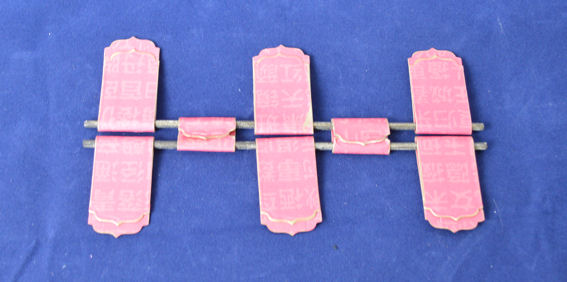
10. Fix three hinges to each skewer using Jim's method, matching the hinges to the same position for each skewer and making sure they can turn freely around the skewers.


11. Make another two hinges, this time make each hinge 2" long and fold both ends in towards the middle.


12. Glue the two smaller hinges in place to join both skewers together. It doesn't matter if they become fixed to the skewers in the gluing process. Put the assembly to one side to dry while you cover the covers.


13. Cover both sides of each cover with your choice of patterned papers.


14. Glue the outside of the covers to the hinges, three hinges to each cover, leaving a 1" gap between the covers and set aside to dry. Then you can add whatever decorations you like.


15. If you want to know how I made these outside covers, come back tomorrow ;-)

Well, that's the basic technique. All you need to do is decide what to put inside and provide a closure if you want one. The note pad at the top of this post uses a pencil in place of a skewer for a thick closure.

Ingredients
2 x 5" x 7" pieces of thick card (I used the packaging from a box of dog food nuts!)
Graphic45 Birdsong 8" x 8" paper pad
Papermania Oriental patterned paper pad A4
Papermania Oriental tags
metallic embroidered ribbon
large bamboo skewers
black promarker
gold aquamarker
adhesives: PVA
 
 Entered for the following challenge:
Simon Says Stamp and Show - Inspired By (Jim the Gentleman Crafter!)