
"Peace at Home"
I came across some blank Artemio frames in a local department store. They are probably the largest pieces I've worked on to date, and this first one to be finished is probably a bit full of small details, but it was great fun to do. I thought you might like to see some of the intermediate steps and some closeups of the details, so there are plenty of pics to follow.

The paste is layered through stencils a few at a time, leaving the project to dry between applications. I strated with the brickwork around the window and then built up the leaves and branches in layers, finishing with the largest leaves which are from a handmade stencil.

Bought stencils are great, and I've used a few in this project, but it's also easy to make your own from acetate by diecutting. The best dies to use to cut acetate are the steel rule type, such the Sizzix Bigz and Originals dies. Here, I've used the Tim Holtz Sizzix Bigz "Garden Greens". After diecutting the plastic, I like to spray the back with repositionable adhesive and this makes it easy to stick the stencil to your artwork while applying the paste, and to remove it when you're done.

Steel rule dies are best for cutting plastic, but you can use thinner dies to make temporary stencils from card, which is how my cat, birds on branches and these flowers were made.

Here's an intermediate view of some of the leaves on the brickwork. a little colour is added as the layers are built up so the finished project isn't too uniform. Living in Ireland makes me very aware of all the different greens!

More colour is sponged on using distress inks.
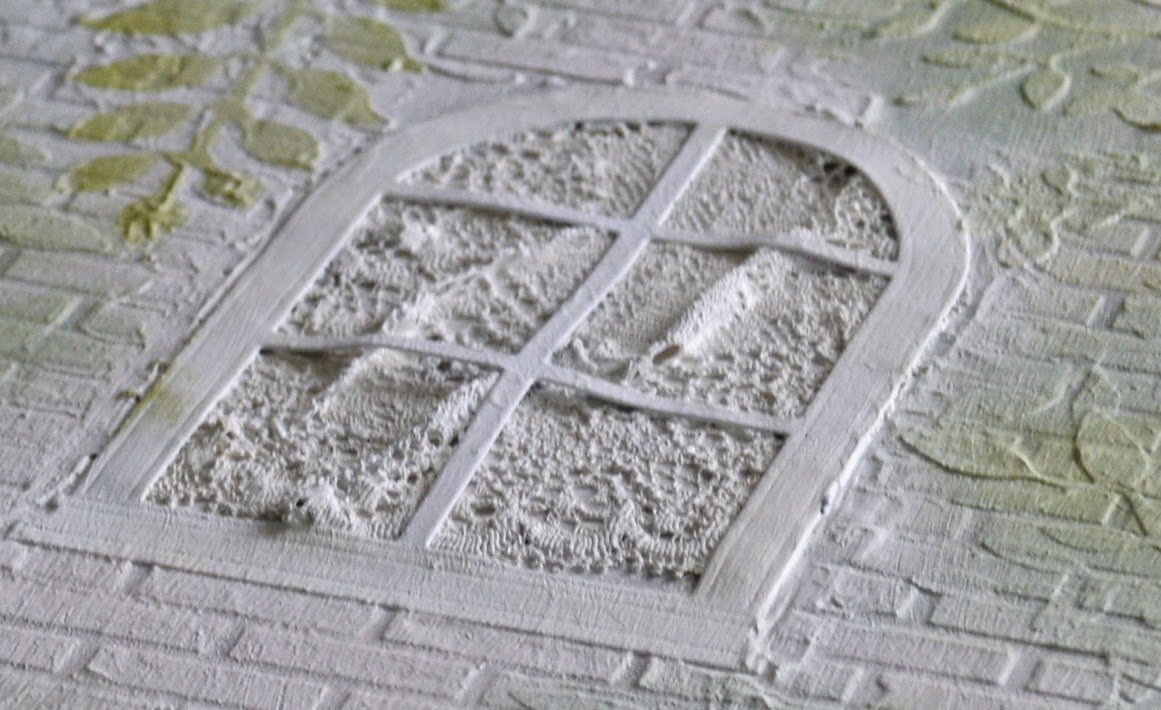
This window uses a diecut from white card with lace stuck on behind the diecut, and the whole thing is covered with a layer of white gesso.

Once the texture layers and sponging is complete, the board is fitted into the frame. The frame itself is decorated with diecut flourishes and given a good coat of white gesso at this point. You can see that I've also added a window box to the window, cut from plain, white card. (This is the same type of window box as the one I use for my cards).

The last few steps are to add the flowers, the clay and wooden embellishments and to spray the whole project with inks. I made my own spray inks for this project using a pipette of distress reinker in a mister pen.

To make kitty furry, I added some flowersoft to the texture paste while it was wet. he looked great white, but our cat is black aso I went over the whole thing with a black marker once it was dry. He's hiding near the gate eyeing up the birds :-)

The flowers are a mixture of paper and clay. Those ferns and butterflies are made from Martha Stewart white paperclay which picks up the colour of the spray inks beautifully.

Did you spot the little bird and his nest?

Or the one at the top of the gate? There are lots more birds hidden in the finished picture, but I'll leave them for you to find. I hope I've inspired you to get your stencils out and join in with the challenge - there's a fabulous prize on offer for the winner!
Dear Maddy. I have seen so many fantastic projects from you but this on are more than fantastic. I do not know whhich word to use. There are so many details that I do not know how you get your inspiration. I am sure of that thet are more than happy to have asked you to be guest designer. I wish you a fine weekend.
ReplyDeleteStunning work Maddy, so much detail.
ReplyDeleteThis is stunning Maddy, not only is it a fabulous example of our challenge this month but a beautiful work of art. The colours are delicate, the textures are terrific and it has been beautifully executed. Thank you so much for supporting Country View Challenges and guesting for us by sharing this beautiful project! Chris xxx
ReplyDeletewhat a wonderful project, I love it, there is so much to see, thank you for all the piccys, so we don't miss anything, well done, it is great xxx
ReplyDeleteWow Maddy! What a stunning project. I love every bit of it and I thank you for showing us each stage of gorgeousness...
ReplyDeleteWhat a wonderful piece of work with some much interesting detail - must have taken you ages to do!
ReplyDeleteOh my goodness, Maddy! This is amazing! I love the colours and the textures you have achieved are just wonderful! Gorgeous!
ReplyDeleteOh wow Maddy, this is gorgeous! You must have put an awful lot of work into this stunning and so detailed piece.
ReplyDeleteHeike xx
Congratulations - well deserved :) You've created a fantastic piece of art.
ReplyDeleteCongratulations. This is a gorgeous piece of work. Have a great week. Hugs Jackie :)
ReplyDeleteJust popped over from CVC to say how much I love this! Delicate, ethereal and so pretty, and with so much scrumptious texture too! Great to have you with us this month.
ReplyDeleteAlison x