Wednesday, 7 May 2014

Kanban bird topper pop-out cards


A friend from Docrafts sent me some of these bird toppers from Kanban. They are just beautiful and deserved some special cards. The first two are pop-out cards, made by diecutting half a square into the front of a card blank.

"Wren"

I love to use birds on my cards, well any sort of nature really. Our swallows are back on the farm busy building nests and it's such fun to see them swooping and diving winding up our cat, but to see a wren is very special. Such tiny, shy birds, they only come out from their hedges when we are very quiet although occasionally I might catch sight of one from a window.

"Blue Tit"

Many years ago, my Nan had a garden full of wildlife. She always had a blue tit box set up on a fence near the kitchen window where she could see the birds popping in and out of the hole while she washed clothes (before the days of washing machines) and cooked meals. She would hang tiny bacon scraps in the trees and any spare bread would go out to the bird table or barious feeders that were hung about the place. So we too have always had a blue tit box. Actually, I think we have half a dozen or more now! And there are boxes for robins, etc. Even a bat box or two. There's always plenty of food for the birds when you keep free range hens, so a lot of our small birds resemble flying tennis balls they are so rotund! I hope you'll pop back tomorrow to see another bird card. I'll leave you with a couple of pictures of the cards flattened out to show the construction...

 
"Front"

"Back"

Tuesday, 6 May 2014

A Dinky One

... following on from yesterday's post I was left with a pile of diecut arches. I used them to make another, even smaller screen card.


"A Dinky Screen Card"

I diecut frames using a smaller arch and joined the panels together in the same way as for the previous cards.


The panels on one side are covered with images from a Crafty Individuals paper pad.


The other side has panels made from scraps of my marbled paper and stamped with images from my favourite Crafty Individuals stamps.


I thought I'd finish up today with a display of the three cards showing their relative sizes. You can see how each of the smaller ones is made from waste from the larger cards. Even the boxes are made from just two sheets of A4!

Entered for the following challenge:
Natalie and Amy's challenge: Rubber Stamping

Monday, 5 May 2014

The Middle One

When making yesterday's screen card, I was left with the mini cabinet diecuts from the frames, so I used them to make another, smaller screen card...


Actually, you need twelve of the mini cabinet diecuts (I had more left over from another card - I'm terrible for not throwing things away!). Diecut an arch from eight of them to make frames, and the four whole ones are used as bases to attach the patterned paper and frames. The apertures are fairly small on this size screen card, so it's great for using up scraps of precious patterned papers.


The gilded images are made using double-sided adhesive paper, the screens are joined together with jump rings, and beads and charms are attached for a finishing touch.


I love the way these screen cards fold like a real screen.


Here's the other side. I do like that cat diecut on the front cover. He looks just like our Lucky, on the prowl, looking for birds. Hope he doesn't find any :-)

So, after making this card, I'm left with a pile of diecut arches. Hmmmm...

Entered for the following challenge:
Bastel-traum - Summer
Country View Crafts - Natures Glories
Crafty Hazelnut's Patterned Paper - Anything Goes


Sunday, 4 May 2014

Anything Goes... a Screen Card

This month at Stamping Sensations, we are asking you to show us what you've got. Anything goes, and there is a fantastic prize on offer as always, this month we have a mystery box of fantastic crafting goodies! So what are you waiting for, oh, hang on, let me give you a bit of inspiration with my screen card...


"Front and box"

Here's a little tease, showing the front and the box, both of which are embossed before rubbing with Pinflair Buff-it. If you want to decorate your box like this, you need to do the embossing before sticking the box together, while it is still flat. Ask me how I know :-)


"Inside"

The frames are made in the same way, with embossing and gilding. The background for the screens is done using a marbling technique. The stamping uses some of my favourite Crafty Individuals stamps and the same distress ink colours as used for the background. Finally, the gilded images are diecut from double-sided adhesive paper and covered in gilding flakes.


"Reverse"

This sentiment from Chocolate Baroque is a great fit with the Sizzix Cabinet die, and the birds are coloured with distress inks and a water brush for an ethereal look.


"Sentiment"

You can see my favourite Crafty Individuals stamp from CI-234 in this photo, around the outside of the sentiment. It's great to just ink up bits of the stamp and do random branches. Well that's it for today, if you're wondering what I did with the cutouts, please come back tomorrow and see :-)

Ingredients:
Crafty Individuals rubber stamps CI-234, CI-209, CI-287
Chocolate Baroque rubber stamps Live Out Loud, Fly Away With Me
A4 Embossalicious Embossing Folder Tumbling Leaves
Sizzix M&S dies: Cabinet & Mini-Cabinet, hole punch 1/4"
Marianne dies: tree, bird and branch large, bird and branch small, birdhouse
Memory Box die: birdcage
Pinflair Buff-it, Gold, Blue
Ranger Tim Holtz distress inks and markers, various colours
Archival ink, coffee
IndigoBlu gilding flakes, Morris Dance
large jump rings, beads, charms
lock and key brads
cardstock: brown 300gsm+, white 160gsm

Entered for the following challenge:
Artistic Stamper - in the Garden


Saturday, 3 May 2014

Shabby Chic Wedding Card

Someone on Docrafts was asking about shabby chic wedding cards the other day and it reminded me that I still had this card to share with you.

"Wishing you a special happiness..."

That big brown lace is just perfect for a vintage shabby chic look. The diecuts and embossed panels are all distressed using Antique Linen and Walnut Stain distress inks, and some flowers added to the window box. If you know the bride's colour scheme, you can change the flower and lace colours to match.

"Box"

I always like to make a matching box for these window box cards. For this box, I heat-embossed some stamps in gold. If you decorate a box like this, you need to do it before you assemble and glue the box together, and make sure you stamp the larger of the two box pieces (ask me how I know!).

Entered for the following challenge:
Stamplorations - Stamps and Flowers
Emerald Faeries - Flowers, Ribbon &/or Lace
A Little Bit Crafty - Flowers

Friday, 2 May 2014

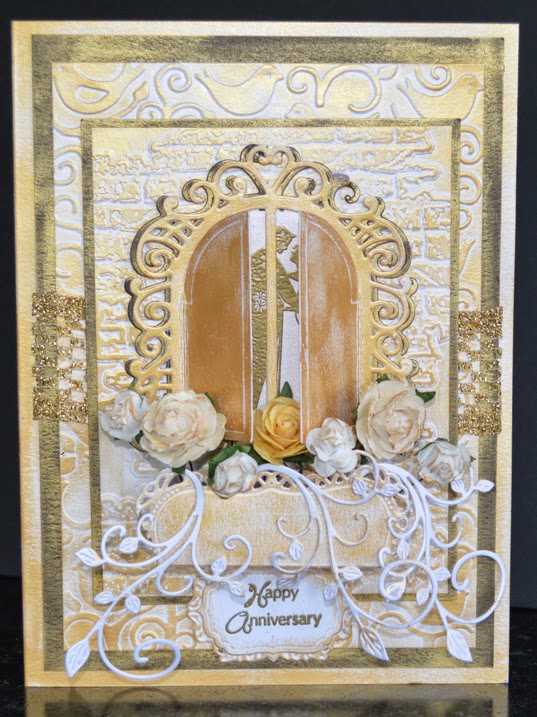
Golden Anniversary

This card is for relatives who are celebrating their golden wedding anniversary this year. It's made using my window box construction and the gilding uses Pin-Flair Buff-it gold.

"Happy Anniversary"

Thursday, 1 May 2014

Feathers Stamps

I bought this lovely little feathers stamp set a while ago and promptly lost it, so was so delighted when it turned up again in my stash lol! Does that happen to you too? I think it's something to do with quantum mechanics. Stuff is in two places at once and you just can't see it, then it suddenly resolves into one position and you find it again :-) So, I made the background for this card using colours to match the gorgeous ribbon, and the rest of the card just fell into place.

"Happy Birthday"

The background is white card inked with Seedless Preserves and overstamped in Chipped Sapphire. Inks are used to edge all the diecuts.

"Stickpins"

The stickpins are made with beads to match the background colours, and fixed into place behind the bow with a big dollop of Pinflair glue to protect the points.

"Carnations"

The flowers are diecut using the Spellbinders Carnation Creations dies; each of the diecuts is overstamped with the feathers stamp  and some of the edges are also decorated with a chipped sapphire distress marker. Tiny seed beads are added to the centre of each flower to match the stickpins.