Saturday, 7 September 2013

Stamping Sensations September Challenge - Poppy Inspired

I hope you'll join in with the theme this month at Stamping Sensations, which if you haven't guessed already is "Poppy Inspired". We want you to be inspired by poppies and as always there is a fabulous prize from our sponsor this month "Stamps by Chloe". We are giving away ***** to the top entry, so please have a go, and also check out the fab inspiration from my team mates!

I love poppies, so when I recently made a book card for a dear friend I thought they would be perfect!

"Live in the moment poppy card"

That sentiment is from Tim Holtz and is one of my favourites... "Live in the moment and make it so beautiful it will be worth remembering".


This particular group of friends is known fondly as "the bunnies", so I had to put a bunny in amongst the poppies...The poppies are made using my button flower technique, but with the addition of some red tissue paper flowers diecut from the Spellbinders Rose Creations die.


The front cover is stamped and heat-embossed in gold using the same IndigoBlu stamp set that I used for the inside.

Friday, 16 August 2013

Variations on a Theme - Window Boxes

You wait ages for a card, then two come along at once :-) I recently had to make cards for a couple getting married (congratulations April and Darren!) and a couple getting engaged (congratulations Abbi and Phil!) and thought it would be fun to adapt my window box design with a white and silver theme. Hope you like it!


..then I made another for one of Tom's nieces 18th birthday. It's amazing how different a card can look just for changing the colour scheme:
 

I just love the way that lady is peeping from the window (she is cut from a Graphic45 Birdsong paper pad in case you were wondering).


Entered for the following challenge:
Emma's Cards - Floral
Simon Says Stamp Monday Challenge - make the cut
Ladybug Crafts August Challenge - something floral

Sunday, 4 August 2013

Stamping Sensations Challenge - Wings & Things & A Touch Vintage

This month the Stamping Sensations team are challenging you to make a project which features wings and things and a little bit vintage. Our fabulous sponsor is CraftyDevilsPapercraft and they are offering a magnificent prize to the winner of a £35 gift voucher, so we would love to see lots of entries!


My good friends Lee and Kathy have given me quite a bit of gorgeous lace, but I had it stored in a couple of boxes and could never find the bit I wanted. Then I spied a plain wooden kitchen roll holder in a charity shop and thought it would make the ideal lace storage, once it was altered of course!


"Bespoke Lace Storage"

Here's what it looked like after I cleaned it, but before I started decorating...

"Charity Shop Bargain"
First of all, the knobs were all removed and the edges painted with black acrylic, then patterned papers were used to cover the wooden faces...

"Knobs removed and edges painted"

Some splodges of paint were added from distress stain bottles, along with some butterflies. The butterflies are stamped onto watercolour paper with coffee archival ink, then coloured in with distress markers and a detail water brush before cutting out, shaping and adhering with Pinflair.

"Box Mark 1"

Now, it should have been nearly finished at this point, but I decided I didn't like it! I removed the butterflies and repainted the whole thing using acrylic paints and my fingers (it was hot and I took the project outside and just got down right and dirty with the paints :-). Then I overstamped with coffee archival ink and added lots more butterflies. After it had dried, I wrapped all the longest lengths of lace around the spindle, securing each with a pin and filled the drawer with all the rest of the lace on wooden dolly pegs.


"Box Mark II"

Much better! Mixing distress paints with your fingers allows you to blend the colours and is lovely for giving soft backgrounds. I love the clouds. I also used some distress reinker to colour white paint because I only have a few distress paints and wanted more colours.

"Lots more butterflies and a diamond knob "

That gorgeous knob was another pressie from my bessie mate Lee aka craftyloops - thanks Lee!

Ingredients:
Crate Paper Maggie Holmes 12" x 12" paper pad
adhesives: PVA, glossy accents, pinflair
distress paints: Salty Ocean, Tattered Rose, Picket Fence
Bundled Sage reinker (used to colour the white acrylic paint)
Dayler Rowney Simply Acrylics: white, medium green, black
Cosmic Shimmer glue: teal (for the dots)
butterfly stamps from 7Gypsies, Graphic45 and Artemio
archival ink: Coffee
distress markers: worn lipstick, barn door, tea dye, tumbled glass, broken china, faded jeans, milled lavender, dusty concord, chipped sapphire, mustard seed, spiced marmalade, scattered straw, walnut stain
wooden kitchen roll holder from charity shop
diamond knob

Tuesday, 30 July 2013

Tuesday Technique - Textured Background with Tissue Paper Stamping

Here's a method for achieving a textured, stamped background, or adding stamped images to an uneven background.


1. Take a sheet of tissue paper and stamp all over using Ranger Archival ink.


2. Use a brush to cover your surface with Claudine Hellmuth matt multi-medium and press the tissue paper down, crumpling as much as you like to achieve folds and texture.


3. Trim excess tissue paper from the sides of your project using scissors.

Tuesday, 23 July 2013

Tuesday Technique - Embossing Paste and Glitter

A quickie technique today. Did you know that when you spread embossing paste through stencils, you can decorate it with glitter before it dries? It's a very easy way to produce some stunning effects, and the glitter sticks well.


In this card, the tree and butterfly are both produced using this technique with Dreamweaver stencils, embossing paste and sprinklings of different coloured glitter. I made a frame from blue holographic card using an old favourite Martha Stewart PATP set, cut out the inner rectangle, and added a peel-off border to the inside edge to disguise the cut marks.

Tuesday, 16 July 2013

Tuesday Technique - Monoprint Shaving Foam Backgrounds

I learned this technique whilst watching Sue Wilson on Create and Craft earlier this year and thought I'd do a step by step tutorial. Apparently, it's been around for a few years but I'd never come across it before and it's fun!


I used a cheap washing-up bowl from the poundshop that I keep just for this (99p) and the cheapest shaving foam I could find (26p from Sainsburys!).


1.Squirt a layer of cheap shaving foam into a clean washing up bowl, just enough to cover the base of the bowl.


2. Drip or spray ink onto the layer of foam. You can use any water-based ink. I found the concentrated Dylusions spray inks to be ideal.
  

N.B. You get different effects depending on which inks you use and how much you swirl. The rest of the pictures show you the results using just one colour...
 
 
3. Use a stick to swirl patterns into the ink. You can add more ink and swirl again if you need to. Try to get rid of any white patches, but don't overmix or you'll lose the patterns. What you see is pretty much what you'll get when you take the print


4. Take a sheet of cheap white card and press it onto the foam.


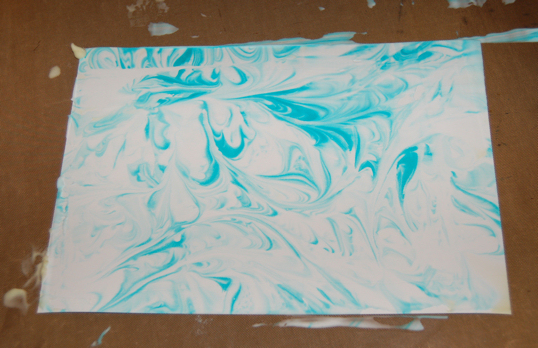
5. Remove the card from the foam and place face-up on a non-stick mat. At this point it looks a mess!


6. Use a plastic ruler to swipe the foam off the top of the card (I haven't got three hands, I asked Tom to take the photo :-)).


 7. And this is the end result! It dries very quickly and is ready for overstamping in a few minutes.
N.B. you can add more ink to the shaving foam left in the bowl and keep repeating as long as you want. It's great with different colours added on subsequent visits to get more depth in the backgrounds.

The "Coincidences" card uses this simple one ink technique to make the background, which is overstamped in archival ink and coloured with distress markers. The shaving foam background leaves a fabulous coating on the card over which distress inks blend beautifully!

Here's a card that uses the two colours I started the tutorial with, which are Dylusions spray inks:


Have a great day everyone! Maddy x

Saturday, 13 July 2013

Coincidences

Some months ago I was inspired by an article in Craft Stamper to make a romantic steampunk card. The article was "Pretty Punk" by Elizabeth Borer and it appeared on page 16 in the March 2013 edition. I loved the way the artist had overlayed the colours of acrylic paint to decorate a clock face, and wondered if I could achieve something similar watercolouring with distress markers on some backgrounds I had been making that week using the shaving foam technique. Here's the card I produced, using lots of different little stamps with masking techniques:


Now, I had fully intended to write up the shaving foam technique and share it with you some Tuesday, then post the card, but you know how it is, I forgot all about it until this week when I got my August copy of Craft Stamper, and I couldn't believe my eyes when I saw the article "Steampunk Romance" by Liesbeth Fidder on page 48. Now, the colours are brighter, and the stamps are different, but it's amazing how similar the cards are, even down to using exactly the same turquoise and purple mats and layers! What I'm dying to know is whether Liesbeth was inspired by the same piece that I was :-)

Ingredients:
Paper Artsy stamp set Hot Picks HP1106
Technique Tusday stamp set Get in Gear
various other stamps from IndigoBlu, Graphic45, Hero Arts, 7Gypsies & free stamps Craft Stamper magazine.
Distress Markers & detail waterbrush
Ranger archival ink pad: jet black
background prepared using the Shaving foam technique with Tattered Angels Glimmer Mist
cardstock: purple 300gsm, turquoise 160gsm, white 220gsm

Entered for the following challenge:
Simon Says Stamp and Show - A Little Stamping