Wednesday, 31 October 2012

Merry Hallowe'en

This is a two card post!

"woooooooooo"

For the first card, the background sentiment is stamped on patterned paper and coloured with distress markers, then matted and layered onto more patterned paper and purple cardstock. The leaves are those wooden elements from Kars coloured with distress inks and stuck onto the card with Pinflair. Little kitty is a smaller version of the free image I use a couple of days ago, and the spider is just diecut from black card.

Ingredients:
Tim Holtz Seasonal Paper Stash
Stampers Anonymous Tim Holtz Stamp set: Hallowe'en Silhouettes
Sizzix Original - Spider
Free vintage image from Magic Moonlight Studios
Kars wooden embellishments: leaves & mushrooms
Archival ink pad: Jet Black
distress ink pads
distress markers
Inkssential white pen
adhesives: PVA, Pinflair, glossy accents (for kitty's eyes)

This scarier card has a triple stepper design:

"mwahahahaha"

The hanging sign is diecut from foamboard and covered with patterned paper cut to size by hand to leave a border of foamboard showing. The card panels are covered in similar patterned paper and all the surfaces are overstamped with Hallowe'en images using black archival ink. The sign is positioned to cover the skeleton's modesty :-)

Ingredients:
Tim Holtz paper pad - Lost and Found
Stampers Anonymous Tim Holtz stamp set: Mini Hallowe'en
Sizzix Tim Holtz Bigz - Hanging Sign
foamboard
Archival ink: jet black
Distress ink pad - Walnut Stain
cardstock: grey 300gsm

As they said in Victorian times, "Merry Hallowe'en!".

Tuesday, 30 October 2012

Oriental Box and Frames Set

Here's the first of this year's Christmas presents, a dressing table set.

"Oriental Box and Frames Set"

These upcycled wooden items are all covered in papers from Graphic45's BirdSong collection using glossy accents. The edges are sanded then gone over with a gold aquamarker.

"Box"

The top of the box has diecut concentric layers of patterned papers and antique gold cardstock with an acetate frame in the centre. The edges are adhered with foam tape, but the top is left open to slide a picture or photo inside. I've added an image from one of the patterned papers. Some diecut flowers and a tiny butterfly are added, cut from scraps of the patterned papers.


The sides of the box are covered in antique gold cardstock and decorated with gold twigs and cherry blossoms diecut from the patterned papers, with tiny pale pink gems in their centres.

"Inside box"

Inside the box, the base is left fairly plain, with a lining of antique gold cardstock and just a couple of diecut papers adhered with mat multi medium. It needs to be left very flat so as not to catch on any of the contents.

"Inside lid"


The inside of the lid can have more decoration, and is layered with images cut from the patterned papers, with some diecut flowers edged in gold aquamarker and shaped with an embossing tool for extra dimension.

"Larger frame"

Both frames were charity shop finds that I paid £1 each for. The front of both frames has a base layer of patterned paper; the edges sanded and coloured to match the box.

"View showing sides"

The sides are coloured with gold aquamarker and rubbed to give a distressed effect..

"Swallows"

Images are cut from the patterned paper, shaped with an embossing tool, and stuck onto the items using Pinflair for added dimension.

"Hanging Frame"

The other frame is decorated in a similar way, but has a little butterfly in place of the swallows. The ribbon is coloureed with gold aquamarker to match the frame. Both frames have matching pictures inserted from the patterned papers.

I'm not sure who is going to receive this present yet. Of the ladies, I have older women, 40 something women, a 22 year old woman and teenage girls to make for. Who do you think??

Ingredients
Empty crystallised ginger wooden box
two old small picture frames from charity shop
Graphic45 8x8" paper pad - Birdsong
Spellbinders: Cherry Blossom, Decorative Labels One
antique gold cardstock
adhesives: glossy accents, Pinflair, Matt Multi Medium
small pale pink gems
gold aquamarker

Sunday, 28 October 2012

Scary Kitty... mwahahaha...

It's nearly Hallowe'en folks, so I need to squeeze a couple of Hallowe'en cards in before Wednesday.

"Scary Kitty"

The free "cat in a pumpkin" image is printed out four times and different parts cut out for decoupage. I especially like to cut out the eyes and teeth in the pumpkin in the top layer.  The background paper is cut to size with plenty of pumpkins on, then overstamped with more scary images in black archival ink. A couple of little blobs of glossy accents make those eyes really stand out. MIAOW!

"view showing layers of decoupage"


Ingredients:
free vintage image from Magic Moonlight Studios
free pumpkin images from the Graphics Fairy
Stampers Anonymous Tim Holtz stamp set: Hallowe'en Mini
Tim Holtz paper stash pad: Seasonal
ric rac
archival ink: Jet Black
orange & black cardstock for matting
adhesives: PVA, Pinflair
glossy accents


Saturday, 27 October 2012

The Birds and the Bees

A lot of my inspiration comes from nature and especially the wild nature of our garden that I can see through the window when I'm crafting. I've tried to capture some of the chaos of late Summer in this card, hope you like it!

"The Birds and the Bees"

There is a real mixture of stamps on this card from different manufacturers - I've put all the details in the ingredients list at the end for anyone who's interested. The background is done with lots of masking, stamping and sponging & colouring with distress inks. The bird is stamped in black archival and then given the colourings of a bullfinch using distress markers before cutting out and adhering to the background with Pinflair for dimension. The sentiment is stamped in archival and diecut before sponging the edges with distress ink. The flowers & lace are coloured with distress inks to match the rest of the project.

Ingredients:
Martha Stewart stamp set: Birds (thanks Lee!)
Chocolate Baroque stamp set: HoneyBee
IndigoBlu stamp set: Poppy Meadow
Artemio stamp set: Scrolls and Birds
Distress Markers: various
Distress Inks: various
Archival ink: jet black, olive
Stampendous clear embossing powder
Spellbinders labels one
lace
flower trim
adhesives: PVA, pinflair

Entered for the following challenge:
The Stamp Man - birds, bees & butterflies

Friday, 26 October 2012

Quick and Easy Hallowe'en Card

This one is quick and easy if you have a few last minute Hallowe'en cards to make.

"Quick and easy Hallowe'en card"

It's just a piece of black card, folded in half. One half is dry-embossed with a Tim Holtz folder, then the raised surface wiped over with a clear ink pad and various colours of Perfect Pearls brushed on to give some glimmer. Afterwards, the crow and bats are gone over in black promarker to help them stand out more. If you have some scary diecuts, you can add them over the top. I didn't have any, so stamped a couple of scary images onto card using black archival ink, gave them the Perfect Pearl treatment, and cut out with scissors before sticking on the bottom of the card using Pinflair for added dimension.

Ingredients:
Sizzix Tim Holtz Embossing folder: Hallowe'en Night
Stampers Anonymous Tim Holtz stamp set: Hallowe'en Silhouettes
Versamark clear ink pad
Archival jet black ink pad
Perfect Pearls set: patina
adhesive: Pinflair
cardstock: black 300gsm

Entered for the following challenges:
Craft Us Crazy - use the colour black as your dominant colour
Top Tip Tuesday - Hallowe'en
Loves Rubber Stamps - Get your spook on!
Try it On Tuesday - Hallowe'en

Tuesday, 23 October 2012

A Thank You Card with a Cat

This is a different type of easel card, another idea I "borrowed" from Sue Wilson who is a wizz with Spellbinders dies. Basically, you make a card front using a good, stiff piece of card as a backing, then make a little stand for the back so it stands up. Sue has a fab tutorial on her blog. The great thing about this method is that it frees you up completely to make whatever size card you like, as long as you can find or make an envelope to fit.

"Can you see little kitty?"

Two pieces of identical 6x6" backing paper are used, with the door cut out of one and that piece positioned on top of the complete paper using foam tape so the door appears inset. The whole section is matted onto a slightly larger piece of thick black card and the "easel" stand glued to the back. I diecut an extra label and stick on the back over the easel for somewhere to write a greeting.

"Here he is!"

This is one of my favourite little charms. He has an oriental look about him don't you think? He's waiting in the doorway for me to let him in and feed him :-)

"Sentiment"

The Justrite label is heat-embossed in gold onto dark patterned paper and fixed to the card with foam tape over some diecut flourishes. The "Thank You" sentiment is heat-embossed onto spotty paper and diecut into a circle shape, then fixed over the label with more foam tape for plenty of dimension. Tiny diecut cherry blossom flowers are added, with some little self-adhesive gems in their centres.

Ingredients:
BoBunny 6"x6" paper pad: Timepiece
Justrite stamp set: Thank You Labels Twenty
Spellbinders: Labels 20, Cheery Blossom
Sizzix Bigz Elegant Flourishes
Cat charm
Small yellow self-adhesive gems
Cardstock: 300gsm, black
Versamark clear ink pad
Stampendous embossing powder: Pirate Gold
Adhesives: foam tape, Glossy Accents, Pinflair, PVA

Entered for the following challenge:
Justrite Inspiration Friday Challenge 84 - Flower Power

Sunday, 21 October 2012

My favourites - a Birdie Book Card


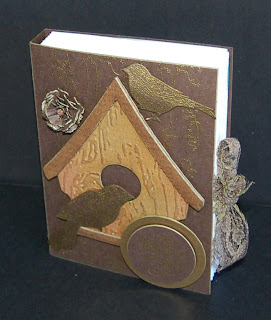
Simon Says Stamp and Show... Your Favourite this week, and you must all know by know that my favourites are 3d cards, vintage & nature. This card combines all three! First a little tease, just showing you the plain outside...


"Plain Outside"

This view shows off the 3-dimensional book, but the shadows make it hard to see all the embossed detail. The edges of brown card are all decorated with gold aquamarker.

"Front of book card"

The stamping is all done in clear versamark and embossed in gold, which shows up beautifully against the dark brown background. Some scrap cardboard diecuts into a great birdhouse, dry embossed with Tim Holtz' wood folder and inked with various brown distress inks to help bring out the detail. The lace closure is coloured with distress ink to match the rest of the card. OK, enough teasing, on to the inside...

"Inside of book card"

I like to make the outside of my book cards plain to contrast with the colour on the inside and give the recipient more of a wow factor when they open the card. It's been a while since I showed you a card made with Graphics Fairy images, so anyone new to my blog might like to check out her site for fabulous FREE vintage graphics.

"Left inside panel"

Some more of my favourites are here: making my own background papers and this gorgeous sentiment stamp from Chocolate Baroque. I chose the background distress ink colours to match the main image in the opposite panel, then overstamped with grass & swirl stamps from the Artemio set. The sentiment is stamped in black archival and heat-embossed in clear, then edged with distress inks and mounted using foam tape.

"Right inside panel"

The aperture in a book card makes a great space for decoupage. This graphic was printed four times and various pieces cut out, shaped, then layered using Pinflair. The frame is decorated in a similar way as the background panel for the opposite page.

Ingredients:
Sizzix Bigz Die - Birdhouse
Sizzix Framelits - Circles
Spellbinders - Labels 4, Carnation Creations
Artemio stamp sets - Bird Flourishes, Silhouette Foliage
Justrite stamp set - Large Fancy Sentiments
Chocolate Baroque stamp sets - Live Out Loud, Fly Away With Me
Papermania V&A background stamp
distress inks - various
archival ink - jet black
gold aquamarker
Stampendous embossing powders - clear, pirate gold
vintage image from the Graphics Fairy
cardstock - brown 300gsm, white 300gsm, 200gsm, 160gsm

Well, if you've read this far all I can say is well done! It's a gorgeous, sunny day here in Northern Ireland, and I hope the sun is shining on you wherever you are. xx

Entered for the following challenge:
Simon Says Stamp and Show... Your Favourite


Friday, 19 October 2012

Just Because... Easel Card

Birthday and Christmas cards are lovely, but sometimes you want to send a card "just because". The colour scheme for this one is a bit unusual for me so I hope you like it.

"Just Because... Easel Card"

The papers and chipboards are from one of those magazine free gifts, and I coloured the little wooden shapes, diecut flowers and paper edges with distress inks to match. A small chipboard with a wooden shape mounted on top makes an ideal stopper for the top part of the card to rest on.

"Sentiment"

I used crimson archival to stamp the sentiment onto a diecut label and embossed in clear. This was matted onto a second label which was actually cut to the same size, but cut in half horizontally and split apart before gluing to make a shadow effect. This is a trick I learnt from Sue Wilson - if you haven't checked out her blog then be sure and do so some time (but please leave me a comment before you go! :-)

"Cherry Blossom"

I can't get enough of my new Spellbinders Cherry Blossom die, it adds a great oriental feel! The branches are diecut from the same red card used for the base, the flowers from white card sponged with distress inks and tiny pale pink gems added to the centres. The larger flowers on the base of the card are diecut and layered from similarly coloured card.

Ingredients
Spellbinders: Cherry Blossom, Carnation Creations, Labels 20
Justrite stamp set: Large Fancy Sentiments
Prima Botanicals paper & chipboards from Simply Cards and Papercraft magazine
cardstock: red 300gsm, white 160gsm
distress inks
pale pink gems
wooden embellishments from Kars
lace

Entered for the following challenge:
JustRite Inspiration - Flower Power

Thursday, 18 October 2012

Fall

Here in the UK we call this season Autumn, but the US word for it, Fall, is very evocative of all the falling leaves from our deciduous trees. This last couple of weeks has seen the weather turn much colder and our leaves are coming down in barrow loads at the moment, so I thought this card was quite apt.

"Fall"


The bricks on the main stamped panel are coloured by sponging the whole panel with pumice stone distress ink, then the mortar lightened with a Picket Fence distress marker pen. The door is sponged with distress ink, then lines added using the fine ends of various brown and green distress markers to make a realistic looking wood. The hinges and knobs are coloured with gold aquamarker.

"Doors open"

The insert panel is stamped in archival ink and coloured by painting with distress inks diluted with a little water. The main panel is mounted over the inset panel with foam tape for depth and the diecut leaves are individually coloured by sponging with distress inks then fixed around the main panel with Pinflair to add some dimension.

More distress ink is sponged around the outside of the card to soften the edges and provide a "frame".

Ingredients:
Heartfelt Creations / Spellbinders die: Chateau Gate
Tim Holtz / Sizzix Decorative Strip Die: Autumn Gatherings
Heartfelt Creations stamps: Chateau Gateway
Papermania stamp set: Cottage Garden
Distress ink Pads & markers, various
Gold Aquamarker
foam tape
adhesives: PVA, Pinflair
cardstock: white 300gsm

Entered for the following challenge:
Joanna Sheen - Autumn Breeze

Wednesday, 17 October 2012

Vintage Christmas Card

Playing around with some of the new Spellbinders dies, I cut some shapes from Graphic45 papers and came up with this Christmas card:

"Vintage Christmas Card"

The cut edges of all the papers are coloured with distress inks to cover up any "white bits", and the edges are distressed in the usual way. The diecut poinsettias are made using the three smallest of the Spellbinders Poinsettia die set, shaped with an embossing tool and layered using a dab of PVA in the centre to hold each layer in place, then some tiny yellow seed beads glued in the centres. Both the centre strip and the bauble are mounted with foam tape for some extra dimension.

"Justrite Bauble"

You'll be seeing a lot of this JustRite stamp set over the next few weeks, it's my favourite for this year's Christmas cards. The bauble is stamped in black archival onto thick white card, heat-embossed in clear and cut out using the matching Spellbinders die. A gold aquamarker and Aged Mahogany distress marker are used to colour sections and distress ink sponged around the outside for an aged look. The matching lace bow is adhered with a dab of Pinflair.

Ingredients:
JustRite stamp set: Merry and Bright
Graphic45 8" x 8" paper pad: Christmas Emporium
Spellbinders dies: Holiday Ornaments 2010, Venetian Accents, Layered Poinsettia
Distress inks & Markers
Gold Aquamarker
Archival ink: Jet Black
Stampendous embossing powder: Clear
tiny yellow seed beads
lace
foam tape
adhesives: PVA, Pinflair
cardstock: white 300gsm, black 200gsm

Entered for the following challenge:
JustRite Inspiration - Three's Company

Monday, 1 October 2012

Three Dimensional Flowers Book Card

This card is for a nature-loving lady who is 85 years young today and has the standard book card construction..

"Inside Book Card"

 The lace for the closure is coloured with pink and green distress inks to match the papers and stamping, and glued inside the card between the outer card and the inner backing papers.

"Inside Front Cover"

The poem is from a Chocolate Baroque stamp set, stamped in archival and embossed in clear then diecut into an oval and the edge distressed with ink. Backing paper and sticker embellishments are from the Papermania Summer Bloom collection and just have a little ink sponged in around the edges.

"Book Card Aperture"

The three-dimensional flowers are diecut from thick white card using the Spellbinders Rose Creations die, then coloured with distress markers. The stamens are actually the tips of cotton buds coloured yellow witha promarker and glued through the holes in the centre of the flowers. Leaves are diecut, coloured with distress ink, and the veins drawn in with a white pen. The flowers and leaves are shaped and mounted into place using Pinflair dimensional glue.

After colouring with Bundled Sage distress ink, tiny Prima stamps are used to colour the edges of the top layer of "pages"using distress markers to match the backing paper. Small, matching stickers camouflage the joins at the corners.

"Front cover"

The front cover is decorated with stamping and gold heat-embossing. I wanted to make the cover neutral in tone to give the inside of the card more of a contrasting wow-factor. It's hard to bring out the subtle colours in this photo, but the stamped picture at the bottom is a skep (a type of beehive).

Ingredients:
Chocolate Baroque stamp sets: Honey Bee, Live Out Loud
Justrite stamp set: Large Fancy Sentiments
Sizzix / Hero Arts stamp & die set: Fern
Prima stamp set: Meadow Lark - birds
Spellbinders: Rose Creations, petite ovals
Papermania Summer Bloom paper pad & stickers
Distress Markers
Distress Inks
Versamark clear inkArchival ink: Jet Black
Stampendous embossing powder: Pirate Gold, Clear
Inkssentials pen: white
Lace
Adhesives: Glossy Accents, Pinflair, PVA

Entered for the following challenge:
Simon Says Stamp and Show - Leaf-spiration
Joanna Sheen - Down in the Garden
Paper Play - Flowers and Lace