Wednesday, 30 November 2011

A Tribute to Tim Holtz - 12 Cards of Christmas - Card 11

Card 11 was inspired by Tag 9 from 2009.  An A6 piece of white card was inked with distress inks and stamped with A Tim Holtz stamp in various orientations, leaving the word "Photographs" near the top of the card.

"12 Cards of Christmas - Card 11"

Tim's tag featured photos of real people, but I thought it would be great to have a strip of vintage Santa images from the Graphics Fairy.

"Filmstrip"

I've had this film strip stamp for a while and never used it. The filmstrip was stamped 3 times onto white card and again on acetate, joining the ends to make a longer strip. The centre rectangle of each cell was cut out from the card, and five Santa images printed onto white card, cut out, and stuck behind the holes. The card strip was then covered with the acetate strip (carefully lining up the stamps), using a strip of holographic glitter glue down each side to stick the acetate to the card (if, like me, you're old enough to remember film like this, you too may have marvelled at the way light shines through the holes, or was that just me?).

"Here's Santa!"

One of the "photographs" on the filmstrip was blown up to make this image (printed onto card and distressed around the edges with scissors and ink). The large "photo" was then pinned to the card with a large plastic clip, coloured to match the card by dabbing with blue & silver Adirondack inks, and fixed in place with a blue jewel brad.

"25"

A small rectangle of embossed, silver card was stuck to empty cat food box and die cut with an alphabet strip die to obtain the numbers "25". The numbers & filmstrip were stuck to the topper with PVA, then the topper glued to a blank blue pearlised card.

Entered for the following challenges:
City Crafter Challenge - Santa
Everybody Art - Nikolaus / Santa Claus

A Tribute to Tim Holtz - 12 Cards of Christmas - Card 10

Just a quickie this time, based on Tag 10 from 2010.

"12 Cards of Christmas - Card 10"

One of my favourite dies is "Reindeer Flight", and it was used to diecut a reindeer from cat food box with embossed silver card stuck on with PVA. The deer was decorated with a "Merry Chroistmas" stamp in archival ink, a length of red tinsel for a garland, and a tiny clear gem for an eye. I found the background card in my local craft shop - fab thick white card embossed with "MERRY CHRISTMAS". It was decorated with distress inks, and a white gel pen used to highlight one of the "Merry Christmas" sentiments. I drew some scribbles all over with a Quickie glue pen and added some flowersoft (a sachet from a magazine freebie!). I've never used flowersoft before, but this polar white makes fantastic snow.

"Acetate embossing"

A rectangle of acetate was embossed with a dotty folder (the dots were lined up carefully for the second and third passes so there were no obvious joins, since the acetate was much larger than my embossing folder). Lastly, the acetate was embossed with a Christmas Tree folder, carefully positioned to avoid the reindeer in the scene, and fixed in place with four jewel brads and washers begged from hubby's tool box!

My husband liked this one so much he's bagsied it for Christmas :)

Entered for the following challenge:
Deep Ocean - "C" for "Christmas" & "Christmas Tree"

Tuesday, 29 November 2011

A Tribute to Tim Holtz - 12 Cards of Christmas - Card 9

Just three more cards to go on this series, and plenty more empty cat food boxes to get through yet! Tag 9 from 2010 was the inspiration for this card:


"12 Cards of Christmas - Card 9"

The free images for the vintage music paper were printed from the Graphics Fairy's blog onto card and coloured by swiping through distress inks and perfect pearls on a craft sheet, then the edges were distressed further with a pair of scissors before inking with Walnut Stain. The background card was also coloured with distress inks and randomly stamped with a flourish.

"Rosette and Father Christmas Cameo"

The rosette was die-cut from some of the prepared music card and decorated with a ring of tinsel before fixing to the card. The image for the cameo was printed to size from the Graphics Fairy' blog and fixed in place with Glossy Accents before being given a coating of glossy accents to give a clear, glassy look.

"Vintage buttons"

A few buttons from my old button box were used for decoration.

"Peace on Earth"

Some Co-ordinations textured card was distressed by sanding and adhered to empty cat food box (told you it would be there somewhere!) with PVA before diecutting into letters and fixing in place on the card with PVA. Glossy Accents was used on the letters to make them glossy.

"Brads"

A ruler was used to measure 0.5cm intervals and an eyelet punch used to make small holes, then gold brads were pushed through the holes for decoration.

A tribute to Tim Holtz - 12 Cards of Christmas - Card 8

There are plenty more cheap substitutions in this card, based on Tim Holtz' tag 8 from 2010, but I must admit I really wished for the "On the Edge Townscape" die because his houses with the wire smoke were so cool :). 

"12 Cards of Christmas - Card 8"

A piece of strong card was used to diecut the Reindeer Flight die, and the negative used as a mask with distress inks to ink the reindeer onto white card, and with archival ink to stamp the snowflakes. Then the positive was used to mask the reindeer while the background was inked with distress inks. If you line the reindeer up carefully, you end up with a thin white line around the main image which helps it to "pop" from the background.

In place of the label machine & mini attacher, I used some sentiment ribbon from my friend Linda (thank you), cut into two pieces and stapled in place with an office stapler.
"Metal corners"

I had great fun coming up with this cheap alternative for the metal corners. One of the dies from Spellbinder's "Elegant Posts" sets was used to cut two layers of silver mirri foil at the same time. The top layer doesn't cut all the way through, so you can remove the outside edge but retain the inner pieces. Stick the two pieces together and cut into a suitable corner shape and it looks like silver embossing. I used the symmetrical post die, so that I could cut two corners that were reflections of each other for this project. All the swirly bits left over from my experimenting were used to make a background for the card topper.

"Iron Gate"

Guess what the iron gate was cut from? Yup, empty cat food boxes :). The die-cut was painted with green and white acrylic paint, then left to dry before decorating the top with holographic glitter glue for an icy look.

"Charms"

This little watch and key combo were a pressie from Lee (thankyou again :). I just attached them to a small key ring, added a piece of ribbon and threaded through an eyelet punched into the card.

Entered for the following challenge:
The Ribbon Reel - Anything Goes
Scrapmasters Paradise - Colour Combo
Truly Madly Craftly - Inspiration Picture
Panpastel UK - Animals

Monday, 28 November 2011

A Tribute to Tim Holtz - 12 Cards of Christmas - Card 7

Back to last year's tags and this card is based on Tag 7 from 2010. I'm getting through cat food boxes quicker than the cat now - but it's a great, free alternative to grungepaper for those of us who don't have deep pockets :-)

"12 Cards of Christmas - Card 7"

For the background, an A6 piece of card was embossed with a wood embossing folder and distressed with inks before coating in a smear of clear, holographic glitter glue (I just used my fingers for this - keep some kitchen roll handy to clean your hands).


Sheets of white pearlised card were attached to cat food box card with PVA, then coloured with distress inks, sanded, coloured again & embossed with a mesh embossing folder. A red sheet was die-cut with the Tattered Florals die, and the green leaves were cut with a pair of scissors (hopefully I'll be getting the Tattered Leaves die for Christmas :)). The petals were cut out and shaped, then individually stuck to the background with Pinflair dimensional glue. An old pearly button was used to make the centre of the flower.

"25 Cameo"

A "25" was cut from "Lost and Found" papers then cut to size and stuck to a cheap, Chinese cameo blank using glossy accents. Glossy accents was poured on top to provide a clear bubble coating.

"Joyful"

The lettering was die-cut from cat food box, coloured with distress inks, and stamped with a script stamp using Archival ink before sticking to the background.

Entered for the following challenges:
Craft Your Passion - Tis the Season
Stamps & Fun = Creativity - Distressing

A Tribute to Tim Holtz - 12 Cards of Christmas - Card 6

This card is based on tag 10 from 2009. I had to substitute almost everything today - but it turned out a very cheap version! It looks so American to me, the finished card will be sent to a friend of ours who is really into 50s America and drives an old Cadillac.

"12 Cards of Christmas - card 6"

The letters and shapes were die cut from an old cat food box, stuck onto another flat piece of cat food box with PVA, then covered in six sheets of tin foil from the kitchen and passed through a diecutting machine like an embossing sandwich to mould the foil around the letters. The foil was wrapped around the back of the piece and stuck down with a piece of card over the top to hold all the foil layers in place.


"Distressed numbers"

The foil was then coloured with promarkers, and a blending pen & kitchen roll used to remove the top layer from the letters and buff them shiny. Finally, the distressing on the letters was achieved with the use of a small tube of black acrylic paint, my finger, and a sheet of kitchen roll.


"Fake stitching"

A standard office stapler was used to make the fake metal stitching. The whole piece was matted onto a grey/silver rectangle then adhered to a blank card. A cog eyelet was punched into the right hand side of the card and a length of spotty ribbon added.

Entered for the following challenges:
Here come the boys - for the man / men in your life
Kenny K's Crafty Girls Challenges - stitching real or faux (bet you don't get any other stitching like this LOL!)
Speedy the Cat's Friends Challenge - Make it Masculine
Frosted Designs - Metal
Aud Sentiments Challenge blog - Any Winter holiday sentiments
Craft challenge #130 - unusual Christmas

Sunday, 27 November 2011

A Tribute to Tim Holtz - 12 Cards of Christmas - Card 5

Much more traditional colours are used on this card, based on Tim's Tag 5. I was missing most of the items used on the original tag so have made a few substitutes. As you've probably noticed by now, I don't have a Father Christmas stamp. I usually manage by substituting a vintage image, but today have used a snowman and a Christmas tree to go with the sentiment from an old Papermania set.

"12 Cards of Christmas - Card 5"

The edge of the background was created with a small tube of white acrylic paint and my finger instead of the paint dabber used by Tim. A similar effect is created of a snowy edge to the topper.  The large green ornate tag was cut from an empty cat food box (no grungepaper) using a Spellbinders label die (no ornamental die) and covered with a thick layer of green acrylic paint (no distress crackle paint) followed by a small amount of white mixed in with the paintbrush to create a marbling effect. The edges were sanded and stained with distress ink. Luckily, I did have some Tim Holtz music paper, which was torn and stained with inks before adhering with PVA.

"25"

The fake enamel numbers were cut from empty cat food box using a strip die, then heat embossed with alternate layers of hi puff and white embossing powder to build up a good, thick layer of embossing. Pretend nail heads were formed from tiny blobs of Liquid Pearls dimensional paint. The edges were inked with black promarker pen.


"Coloured enamelling"

Cheap Chinese charms were "enamelled" by heat embossing with different colours of embossing powders and stuck in place with Pinflair. The holly sprigs were decorated with green and red Papermania glitter glue.

Entered for the following challenge:
Truly Madly Craftly - Inspiration Photo

A Tribute to Tim Holtz - 12 Cards of Christmas - Card 4

Today's card is based on Tim's Tag 4 from 2010.

"12 Cards of Christmas - Card 4"

The background has been created from stamped and embossed snowflakes on inked card. The main feature of the original tag was a decorated Tim Holtz' facet. Not having anything like this, I popped into my local craft shop and came across a packet of "Tulip See-thru Stones" and duly followed Tim's  instructions to make a snowflake jewel.

"Snowflake Jewel"

After backing onto white card, the decorated jewel was stuck onto a flower wrap connector kindly donated by my friend Lee (thanks Lee) and hung from an eyelet with a small loop of silver thread. A little "handmade" brad was added to hold the thread in place.


"Wish & graphic"

The main image is of course another fabulous vintage freebie from The Graphics Fairy. Various layers were cut to add some depth, in particular an extra copy of the ship was used to give a real feel for a boat being tossed on the waves. The "Wish" adage ticket was coloured and angled to echo the ship, reminiscent of a sentiment for someone wishing for their husband/father to come home safely from the Sea, as well as the double meaning of wishing for good pressies from Father Christmas :).

"Lace and pearls"

The luxurious double layer of lace continues the "wave" theme along the bottom, and a row of pearls finishes off the card (treasure from the Sea).

Entered for the following challenge:
Simon Says Stamp and Show - some tickets
Stamptacular Sunday - anything Christmas

Saturday, 26 November 2011

A Tribute to Tim Holtz - 12 Cards of Christmas - Card 3

This card is my favourite of the series so far, based on Tim's Tag 3 from 2010. If I'm whetting your appetite, Tim Holtz announced on his blog this week that there will be 12 new tags for 2011 starting from December 1st - woohoo, I'll definitely be playing along since this will be the first Christmas I have a blog :).

"12 Cards of Christmas - Card 3"

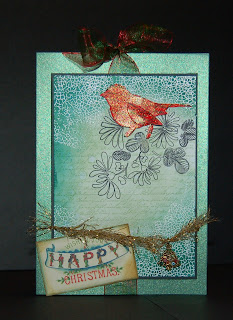
To start with, the card is inked and stamped with distress inks. Tim used a spotty stamp to make a snowy background on his tag; I used a fabulous crackle stamp from the Indigo Blu "Alice I" set with clear ink and white embossing powder to make an icy background, which you can see in the picture below:

"Tree charm"

The charm is a cheap one from China, decorated with seed beads held in place with tiny dots of Pinflair glue, and strung onto a length of gold, tinsel ribbon.

"Sentiment"

I love this sentiment with elves spelling "HAPPY". It was a free image printed from Magic Moonlight's blog onto cream card and the edges distressed with inks.

"Bird"

This is one of the birds from the "Caged Bird" die cuts that my good friend Lee sent me, coloured with distress ink, stamped with script stamp, and covered in holographic glitter glue, following the instructions exactly as for the one on Tim's tag. In the background, you can see the stamp I used from a Papermania set.

The topper was mounted onto a green, pearlised card blank with some gorgeous red & green shimmery ribbon tied around the card and into a generous bow for an extra bit of dimension.

Entered for the following challenges:
Simply Create - all about Christmas
Totally Papercrafts - Christmas

A Tribute to Tim Holtz - 12 Cards of Christmas - Card 2

Continuing the theme today, we have a card based on the second of Tim Holtz' 12 Tags of Christmas from 2010.

"12 Cards of Christmas - Card 2"

Today's A6 topper is decorated with red tinsel ribbon and mounted onto red foil and green sparkly card before adhering to an A5 card blank.


"Background"

 Each of Tim's tags introduces a technique, and this one uses pink & blue coloured distress inks & clear embossing to make the snowflake background, which is then inked in various blues and overstamped with a script stamp in brown.

"Swallow charm"

Not having any of Tim's adornments, I made my own little silver bird from a small, metal brass charm coloured with Adirondack silver mixative and adhered to the topper with Pinflair.

"Christmas Tree"

The tree and sentiment are stamped from an old Papermania stamp set and decorated with glitter glue for a bit of extra sparkle.

Friday, 25 November 2011

A Tribute to Tim Holtz - 12 Cards of Christmas - Card 1

The Stamp Man's current challenge is to make a card based on one of Tim Holt's "12 Tags of Christmas" designs (of which there are currently 48!). I had a look at Tim's tags from last year and had a go, then got a bit carried away. So far I have made five! Well, here's the first card based on Tag 1 from 2010.


"12 Cards of Christmas - Card 1"

Of course, I don't have access to the same huge array of equipment and consumables, so made do with what I could find. The house is cut from the Sizzix 3d pop-up house, instead of a fence we have an iron gate, and the die-cut tree was a present from a friend of mine, Linda (thank you!). The house and gate were cut from empty cat food boxes (no grungepaper available here).

"House die-cut from an empty cat food box"

A brick embossing folder was used to dry emboss the house, before painting with Picket Fence distress stain, leaving to dry, then going over with Brushed Corduroy distress ink to bring out the raised areas. The door was painted with Barn Door distress ink. The back of the door and behind the door were covered in scraps of V&A paper, and the window lined from behind with acetate. (If you're going to do this, learn from my mistake and do any heat embossing first!!). I used liquid pearls to add dimension to the frosting on the roof and windows, then heat-embossed alternately with hi-puff and bright white embossing powders to get a snowy effect. A small red pearl makes a good door knob.

"Inhabitant"

Behind the door lurks a little boy (from the Graphics Fairy of course), he's just turning to the others in the room with something in his hands. Did you give him a present?

"Iron fence and tree"

The fence was also die cut from an empty cat food box, and both the fence and gate repeatedly embossed with alternate layers of hi-puff and bright white embossing powders to build up the snow.

"Sentiment"

The "Let it Snow" stamp (from a Crafty Individuals set) was stamped in green distress ink and heat-embossed in clear, then punched into a circle and mounted on a die-cut circle of silver mirri card. The holly sprig is made up from a couple of holly-shaped sequins (thanks again Linda!) and some small red pearls. You can see the background quite well here - made using the technique in Tim Holtz's tag with inks, stamps and Perfect Pearls for shimmer.

Entered for the following challenge:
The Stamp Man

Thursday, 24 November 2011

Alice and The Blue Caterpillar

Making my card for the Altered Alice Challenge earlier in the month, I came across this fabulous original illustration by John Tenniel of Alice and the Blue Caterpillar, and couldn't resist colouring it for a second Autumn-themed Alice card.

"You're Smokin'"

The image was printed onto cream card and coloured with promarkers. The background branches were punched from various cardstocks using a Martha Stewart Deep Edge punch, then adhered with PVA to a distress-inked background. The lettering was double die-cut in blue and black using a Tim Holtz strip die. Hubby says "it's not very PC...", but I couldn't resist the sentiment (say it like Jim Carey would). :)

Entered for the following challenge:
Altered Alice

Tuesday, 22 November 2011

Robin Redbreast and Tim Holtz' birdcage die

Yesterday we had swallows; today features a bird more traditionally associated with Christmas cards, the robin. My good friend Lee sent me these Tim Holtz' caged bird die cuts (thank you!). This die will definitely be going on my Christmas list this year!

"Robin"

The background paper was matted onto red card before sticking to an A5 card blank.

"Bird cage"

The bird cage has been heat embossed with verdigris embossing powder (basically a mixture of copper and green). The cage was then gently bent into shape and decorated with lace & roses before adhering to the card with Pinflair. The lace was carefully chosen to look like vines, and I thought the red roses could be mistaken for tiny poinsettias on a Christmas card, at least they match with the backing paper quite well.

"Robin die cut"

Mr Robin is coloured with various brown promarkers. The red breast is covered with red glitter using a Sakura Quickie glue pen and ultrafine glitter, and the rest of the bird is covered with a thin layer of holographic glitter glue using a finger to spread it all over. After careful shaping, the wing is attached using Pinflair dimensional glue.

"Robin cameo"

This is my favourite part of the card - the robin cameo. I printed a Graphics Fairy image of two robins very small, then cut out an oval and adhered it to the cameo with Glossy Accents. The recess was then filled with Glossy Accents. The overall effect once stuck to the card is supposed to be of a picture frame on the wall featuring the robin and his wife.

"Alternative Robin card"

I thought you might like to see this alternative version of the card with decoupaged robins and a pretty sentiment. This birdcage was heat embossed with a couple of layers of Antique gold to achieve a gritty, gilded effect.

Entered for the following challenges:
Creative Craft Challenge - Free for all
Everybody Art Challenge - Christmas card
The Crafty Pad - Festive Cheer, Let's see some traditional Christmas colours: red & green & gold or silver

Monday, 21 November 2011

Christmas swallows

First, let me apologise for the dark pictures - it can be hard to find a bright day in Northern Ireland at this time of year! The theme today is swallows at Christmas. I love this picture and it is so typical of the Victorians. Of course, there aren't any swallows around now, they've all flown South for the Winter, so what on Earth are they doing on a Christmas card? LOL! Just a little memory of the Summer and of the next Summer to come. We have swallows nesting here and I love to see them returning year after year from their long journeys.

Christmas Swallows"

This gorgeous image is of course from The Graphics Fairy's blog - thank you Karen for all these lovely free graphics. I printed a couple of copies and cut out various bits for extra layers to add some depth. That telegraph pole looks very like a cross to me and I love the moody, Winter sky.

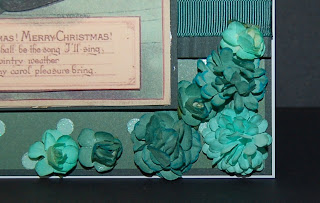
"Flowers"

The large flowers are handmade from flat white paper flowers coloured with promarkers and layered. The smaller ones are from a bargain shop and were orginally cream, but were also coloured to match.

"Charm"

I love this little bird!

Entered for the following challenges:

Whoopsi Daisy - anything goes at Christmas
Sir Stampalot - Blue & Green
My Craft Spot - Handmade Flower Power