Saturday, 30 June 2012

Medicine Cabinet

There has been some fun had in the Izzwizz household this week culminating in another book card for your delectation:

"Olde Curiosity Shoppe Medicine Cabinet Book Card"

The basic construction has 300gsm brown card for an outer cover, with 200gsm white card interleaved concertina-style to provide an inner frame resembling the pages of a book.

"Sideview Showing Closure"

The closure is provided by two short lengths of chain attached inside the card with Glossy Accents and joined via two jump rings with a jewellery closure. A diecut padlock and key are threaded onto the chain.
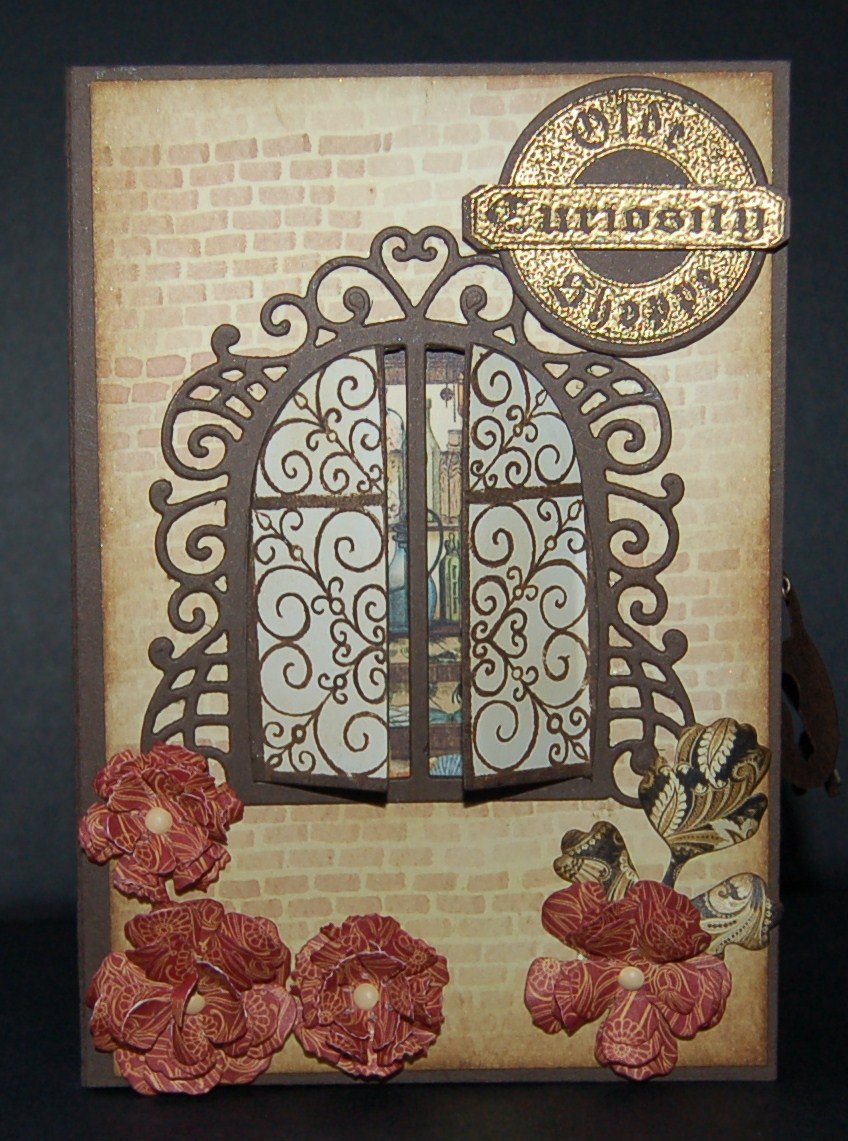
"Shop Front"

The brickwork for the shopfront is handpainted on watercolour paper using distress inks, water and paintbrushes. This was my first attempt at brickwork and I'm quite pleased with the results. The window is diecut from 300gsm brown card. The window panes are made from white card stained & stamped with distress ink, then diecut and adhered to the base window with PVA.

"Olde Curiosity Shoppe"

"Olde Curiosity Shoppe" is stamped twice on brown card and heat-embossed in gold. One of the stamped images is diecut into a circle, the other has the word "Curiosity" trimmed separately and attached on top of the circle using Pinflair for dimension.

"Flower"

The flowers are leaves are diecut from Graphic45 "Le Cirque" paper offcuts using Spellbinders Rose Creations, Carnation Creations & Foliage dies. The flowers edges are inked and shaped before assembling with brads and fixing to the card with Pinflair.

"Window Scene"

A square of paper showing the inside of a cabinet is cut from the paper pad and fixed to the inside front cover of the card with Pinflair.

Let's move onto the inside...

"Inside"

The back of the square used to make the window scene has a lovely harlequin pattern which makes an ideal background pattern to show off one of the frames from the paper pad. Some glitter glue is added to the boot's wings and distress stickles added to the frame for a little sparkle.The wings and boot are shaped before adhering with Pinflair.

"Medicine Cabinet"
It is hard to see the stamped background behind all the bottles, but it is made by stamping images in antique linen onto a background stained with the same colour, then overstamping more images with walnut stain. The book aperture is filled with bottles made by stamping bottles and labels onto white card in archival inks, colouring with distress inks, and glazing with a glaze pen. Each of the bottle is cut out and shaped before adhering with Pinflair dimensional glue. The raven & sign are stamped in black archival and heat-embossed in clear. The key is cut from patterned paper and some glossy accents used to highlight the watch face. Lots of lace is used to decorate the edge. Those little liver pills are something I could do with LOL!

Ingredients:
Graphic45 Olde Curiosity Shoppe Stamp Sets 1, 2 and 3
Graphic45 Old Curiosity Shoppe 8x8" paper pad
Spellbinders dies: Heartfelt Creations Chateau Gate, Carnation Creations, Rose Creations, Foliage
Sizzix Framelits: Circles
Cardstock: brown 300gsm, white 160gsm
Watercolour paper
Distress ink pads, markers, reinkers: Walnut Stain, Fired Brick, Antique Linen, Brushed Corduroy, Bundled Sage, Peeled Paint, Faded Jeans
Versamark clear ink pad
Archival inks: Jet Black, Olive, Crimson, Cobalt, Sepia
Embossing powder: Cosmic Shimmer Gold
Sakura Glaze Pens: Clear, Green
Clear Glitter Glue
Distress Stickles: Antique Bronze
Brads: pale pink
Lace
Adhesives: PVA, Glossy Accents, Pinflair Dimensional Glue


Entered for the following challenges:
Simon Says Stamp and Show - Depth of Distress (loads of distress here with layers of ink & stamps, painting with distress inks, distressing edges, staining, etc., but also lots of depth with the dimensional card and extra dimension from the opening window & scene on the front.
Hotshot Crafts - distress inks
Allsorts - In Bloom
Try it on Tuesday - Anything Goes

Monday, 25 June 2012

Triple Stepper Card Tutorial

Well it's been a while since I wrote a tutorial, so I thought you might like the details for an oldie but goodie: the triple stepper card. This one is adapted from the Hougie technique to make a large centre panel.

"Scores and cut marks"

To start, take an A4 sheet of good cardstock, something like 300gsm, and cut it down to a nice even 28cm in length. Next on the wrong side, mark two pencil lines parallel to the longest side, at 5cm from each edge. Using the pencil marks, score crease marks from each edge to the line at the following measurements from the shortest edge: 3cm, 6cm, 10cm and 21cm. Then score the halfway fold at 14cm all the way across. It's easy to score crease marks using a scoring board, but this can also be done using a ruler and a blunt instrument like an embossing tool or short knitting needle. Finally, you need to cut along the two pencil lines with a craft knife between the 3cm and 21cm score marks.

"Folded card blank"

Making alternate mountain and valley folds along the crease lines, you should end up with a card blank like the one above.

"Card blank with patterned paper panels"

I like to add patterned paper to all the front-facing panels. Cut the paper leaving a 2mm border all the way around the edge.

Here are a couple of stepper cards I made using the Heartfelt Creations Chateau Gate die & matching stamps. We had some rare sunshine here in Northern Ireland when I was taking the photos. As you can see from the reflections, I am much more used to taking pictures in the rain :-)

"Banish those birthday blues"

The flowers for the birthday blues card are all handmade and coloured with distress inks to match. Most are paper, but the grey ones are fabric and were made following the instructions from one of craftyloops fabulous tutorials.


"An Englishwoman's home is her castle"

The flowers for this card are made from cream organza (a present from Lee - thank you sweetie :-), diecut and the edges singed with a heat tool before binding together with natural-coloured brads and fixing in place on the fence railings with pinflair.You can see a couple of feathers peeping out from behind the flowers. They were kindly left in the nestboxes for me by our Barnevelder hens!

"Window scene"

For both cards, the window scene is painted with distress inks and mounted behind the window with Pinflair to add some extra dimension. The legs for the iron gate are cut out with scissors after diecutting the decorative edge. Two fences are diecut and mounted each side of the iron gate using Pinflair. Extra embellishments are added to the side panels.

Ingredients:
Hougie Board & scoring tool
A4 300gsm cardstock & 160gsm smooth, white card
Heartfelt Creations Chateau Gate die & matching stamp sets: Grand Portal & Doorway Trimmings
Sizzix Tim Holtz On The Edge Die: Iron Gate
Sizzix Tim Holtz Bigz: Tattered Florals
Marianne die: fence
Spellbinders: Carnation Creations
Patterned paper: Tim Holtz Vintage Shabby pad
Sentiments: Papermania
Distress inks: Walnut Stain, Tumbled Glass, Chipped Sapphire
Perfect Pearls: biscotti, blue patina
Distress marker set, paint brush, water & non-stick craft sheet for watercolouring background scenes
Handmade flowers & feathers
Brads
Adhesives: PVA, glossy accents, pinflair dimensional glue

Entered for the following challenge:
Joanna Sheen - Summer Daze
Let's Ink it Up - Use your favourite embellsihments (handmade organza flowers!)
Stampin' For the Weekend - Show us your style (vintage)
Frosted Designs - Make Your Own Embellishment (handmade flowers)
Charisma Cardz - Summer
Crafts and Me - Anything Goes
Crafty Cardmakers - Make Your Own Flowers
Love to Create - Anything Goes

Friday, 22 June 2012

Let Your Soul and Spirit Fly

Goodness, doesn't time fly when you're having fun? Here's a card I made for this week's Simon Says Stamp and Show... challenge, which is "a bit of brown".

"Let Your Soul and Spirit Fly"

I love the IndigoBlu stamp sets; all the stamps on this card are from IndigoBlu. The wording comes from a fabulous sheet of sentiment stamps titled "Discover Your Passion". They are all so original and different. "Let Your Soul & Spirit Fly" is stamped in Tumbled Glass Distress ink and heat-embossed in clear, then overinked in Walnut Stain. This panel is matted and layered onto hammered gold and pearlised pale blue cardstock, before adhering to the background. The background panel is decorated with Tumbled Glass ink, and overstamped and edged with Walnut Stain.

The diecuts are all cut from pearlised blue cardstock.


Ingredients:
Marianne Creatables dies: Butterfly 3, Tree, Fence
IndigoBlu stamp sets: Discover Your Passion DYP, Nature I NI, Wild Meadow WM1
Distress Inks: Tumbled Glass, Walnut Stain
cardstock: white 300gsm, 160gsm, hammered gold 200gsm, pearlised blue 200gsm
ribbon
adhesives: PVA, glossy accents, Pinflair dimensional glue

Entered for the following challenges:
Simon Says Stamp and Show - A Bit of Brown
Crafts and Me - Anything Goes
Divas by Design - to "Die" for
Hotshot Craft - Distress Inks

Tuesday, 5 June 2012

Nature

One of my favourite card themes is "Nature", and the gorgeous Indigo Blu stamp sets are perfect for a lovely nature card. That indigo blue is also my favourite colour is pure serendipity :-)

"Nature Card"

The stamping for the main panel is in different colours of distress inks over a blended, distress-inked background. Second and third stampings were used for extra depth.

"Butterfly with acetate wings"

Butterfly wings were stamped onto acetate using archival inks and cut out before adhering over the stamped images with a little glossy accents. Bending the acetate slightly on each side of the thorax lifts the wings and provides a narrow, flat area for the glue.

"Crackle butterfly"

The larger butterfly is stamped and coloured on thick watercolour paper before coating with rock candy crackle paint and rubbing some chipped sapphire into the cracks once dried for a lovely antique effect.

"Sentiment"

Distress markers were used to stamp the sentiment in different colours before heat embossing in clear.

"Flower stalk"

These dried sage flower stalks make a pretty embellishment with a short length of ribbon wrapped around the stems to hold them together and attach to the base card.

Ingredients:
Indigo Blu stamp sets: Nature I, Wild Meadow, Discover Your Passion
Distress Inks, various blue & green colours
Distress Markers, various colours
Archival ink, cobalt
Enbossing powder, clear
Dried sage flower stalks
cardstock: white 300gsm, white 160gsm, black 160gsm, blue pearlised & patterned 120gsm
dark blue lace (thanks Lee!)
adhesives: glossy accents, PVA

Entered for the following challenges:
Bunny Zoe's Crafts - Anything Goes

Wednesday, 30 May 2012

Decorating buttons with patterned papers and a card for Mum

I love weird & vintage buttons, but they can be very expensive to buy, so when I came across some packets of mixed black plastic buttons at 10p a throw, I set about decorating them myself. This tutorial describes the results of my experiments with covering them in patterned papers.

"Gluing the paper to the button"

Choose some patterned paper with tiny images that will sit neatly on a button - scraps are ideal. Using a soft brush, coat the flat side of the button and the reverse of your patterned paper with a thin layer of matte multi-medium. Using the matte version saves any splashes from showing if you accidentally get some of the multi-medium where it's not wanted. Set these aside for a couple of hours to dry, and remember to wash up your brush in water.
"Paper trimmed and sanded"

Next take each button in turn, trim off the excess paper with scissors and holding the button with the paper facing up, sand the edges with short downward strokes of a small piece of fine grade sandpaper. This will ensure the paper doesn't rip into the surface of the button.

"Punching the holes"

Following the 4 buttons in the picture above from left to right, take a thin sewing needle and push the tip through the centre of each of the holes in the button from the back (1), then flip the button over (2) and push the needle all the way through from the front (3). This will push any rough edges through into the hole and leave a neat finish. Finally, open up the hole completely by poking it through from the front with a pokey tool or similar (4). I use a small embossing tool for this job.

"Finished buttons"

To finish them off, rub some distress ink around the edges using a piece of cut 'n' dry foam, working in the ink especially where there are any bits of white showing, add any stamping in a waterproof ink, then give the buttons a coating of glossy accents. Try not to get the glossy accents in the holes, but if you do then use the pokey tool to free each hole, cleaning it on kitchen roll after each poke.

"Postage Stamp Buttons"

Postage stamp buttons are made in exactly the same way, just use old stamps instead of patterned papers. To remove postage stamps from their backing paper (e.g. the corner of an envelope), fill a tray with water and float the stamp face up on top of the water, then leave for an hour. The water soaks in to the backing paper and the stamp will peel easily from the front without the dye running. Place the stamp face down on a sheet of kitchen roll overnight to dry, then use as any other paper.

"Dylusions Sprays buttons"

These buttons are decorated with papers made from spraying pearlescent card with various colours of Dylusions inks.

"Distress Ink Buttons"

The papers for these buttons have been decorated with distress inks and overstamped using the Technique Tuesday "Get in Gear" stamp set.

OK, enough with the buttons - what can we do with them? Here's a card I made for my Mum, thanks Mum.

"Thank You card with buttons"

The basic construction is a standard 6" x 6" easel card using patterned papers. There is a foamboard diecut birdcage (see previous posts) decorated with Adirondack gold mixative and fixed via a length of chain set into an eyelet at the top of the card.

"Buttons and charms"


Charms hang from jump rings in the bird cage, and buttons decorated with matching papers are used for embellishments. Each of the buttons has some gold thread threaded through the buttonholes.

"Butterfly cameo"

This charm has a butterfly cut from patterned papers embedded in glossy accents and attached via a chain to the sentiment panel.

"Sentiment panel"

The sentiment is heat-embossed in gold onto a diecut from the patterned paper pack; the panel is raised with foam tape for extra dimension and the end of the cameo chain adhered in behind.

"Thank you"

The background for the top panel is patterned paper matted onto gold hammered card. The bottom panel has been stamped onto a plainer patterned paper and brushed over with Perfect Pearls for matching gold glimmer.

Ingredients:
plastic buttons with one flat side
patterned papers (I used Kaisercraft Secret Bird Society)
7Gypsies Stamp set Conservatory
Papermania stamp set Birdsong
160gsm white cardstock
Dylusions spray inks
Distress Inks
Stamps
Claudine Hellmuth Studio multi-medium matte
soft brush
small piece of fine-grade sandpaper
stamps and Archival ink
Distress inks
Glossy Accents
old postage stamps
Cosmic Shimmer gold embossing powder
Perfect Pearls Heirloom Gold

Entered for the following challenges:
Die Cuttin' Divas - Anything Goes
Oldie But Goodie - Anything Goes
Party Time Tuesdays - Anything Goes
Bunny Zoes Crafts - Anything Goes
Incy Wincy Designs - Vintage
Lawnscaping - Embossing
Cutie Pie - Die Cuts and Punches


Friday, 25 May 2012

Foambird :-)

Here's another card using foamboard diecuts (see my tutorial for diecutting details)

"Foambird Card"

The background for this card uses my favourite inking with various colours of distress inks, overstamping with the same colours, and brushing a couple of the stamped images with Perfect Pearls for a little glamour.

"Decorated Foamboard Birdhouse Diecut"

The diecut was separated with a craft knife, the roof and floor decorated by dabbing with gold and the main body of the house embossed with a wood folder, then decorated with distress inks and alcohol inks, first white stripes, then other colours to complement the background. The foamboard picks up the embossing patterns brilliantly. The bird and butterfly were cut from patterned paper, shaped and all the pieces stuck with Pinflair dimensional glue to add to the dimension.

"Sentiment"

This lovely Chocolate Baroque sentiment was stamped in olive archival ink and heat-embossed in clear. This image also shows part of the background stamping.

"Dimension"

The beauty of the foamboard is all the wonderful dimension!

Ingredients:
Chocolate Baroque stamp sets: Live Out Loud, Fly Away With Me
Sizzix Bigz dies
foamboard
cardstock: white, 300gsm for card blank & 160gsm for stamping; hammered gold, 200gsm for matting
Kaisercraft Secret Bird Society 6" paper pad
Distress inks and markers: Scattered Straw, Tumbled Glass, Bundled Sage, Antique Linen, Tattered Rose, Brushed Corduroy, Walnut Stain, Picket Fence
Archival ink: Olive
Alcohol inks: Cranberry, Citrus, Butterscotch, gold mixative
Perfect Pearls: Gold Heirloom
Embossing powder: Stampendous Clear

Entered for the following challenge:
Hot Shot Crafts - die cuts

Sunday, 20 May 2012

Foamboard die-cuts & Steampunk Card

I found a huge A1 sheet of foamboard for £2.99 in "The Works" this week, and have had some fun playing with it. It's hard to cut with scissors, but easy with a craft knife. The first thing I tried was to slice off a 6" strip. Just the right width for a die-cutting machine, and trying it out I found I was able to cut it pretty successfully using the Sizzix Bigz dies. The great thing about foamboard is that it squashes nearly flat in the machine, then springs out to full thickness once it's passed through, so once you've got the die started in the machine it goes through easily.

"Foamboard diecuts"

These are a good 4mm thick and make a great, cheap alternative to chipboard. You can either cut thin paper diecuts to decorate and stick them on top, or decorate them directly using alcohol inks or picket fence distress ink plus colours on top, or in any number of ways. The gears and weathered clock diecuts above have been dabbed with Adirondack gold mixative, the globe & bird were decorated with distress inks. So, once you have your diecuts, what do you do with them?

"Steampunk Parallel World"

These foamboard Townscape & Gadget Gear diecuts were used to add some dimension to a steampunk card. The background is inked with distress inks and overstamped in the same colours with a couple of the stamped images brushed with Perfect Pearls for a little added shine.

"Foamboard Townscape"

The townscape diecut was first dabbed with Pearl mixative to lighten the background colour and give a metallic sheen, then different colours of alcohol inks were dabbed onto each house. The black foamboard background makes the colours quite dark and leaves the houses looking brilliantly grimy and grungy. Mixed colours were dabbed onto the bottom edge.

"Sentiment"

The sentiment and main image were stamped in black archival ink and heat embossed in clear.

"Main image"

The mad professor was decorated with distress markers and watch parts adhered to add some dimension to the transportation contraption. My big thanks to my very talented friend Lee aka Craftyloops for the brilliant bag of watch parts she sent me, they are fabulous! Apologies for the reflection in the photographs, the light is sadly lacking today.

"Dimension"

This side-on view shows all that yummy dimension from the foamboard diecuts.

Ingredients:
Sizzix Bigz Dies, including Tim Holtz' Gadget Gears
Sizzix On the Edge Dies, including Tim Holtz' Townscape
Sizzix Originals Dies
Paper Artsy Hot Picks stamp set HP1106
Technique Tuesday stamp set: Get in Gear
Distress Inks & Markers: various colours
Adirondack Alcohol Inks and Pearl & Gold Mixatives
Archival Ink: Jet Black
embossing powder: Stampendous Detail Clear
watch parts
Adhesives: Pinflair dimensional glue, glossy accents, PVA

Entered for the following challenge:
Hotshot Crafts - Diecuts
Stempelssone - Headgear
Do You Stack Up? - Landscapes
Paperplay challenges - Destruction
Just Keep on Creating - Anything Goes
Truly Scrumptious - Anything Goes
Simon Says Stamp and Show - Anything Goes