Saturday, 22 June 2013

Simon Says Stamp and Show... Kraft!

Surprisingly for a vintage lover, I'm not a big fan of kraft card. It's because I love my colours and of course, they are always somewhat muted on kraft card. I do, however, use a lot of recycled packaging. Often, as with the notebook covers from last month, the card is covered with patterned papers. But another way I like to use it is with diecutting.


In this card, the weathered clock, gears and hands are all diecut from recycled cat food box before decorating with metallic distress stains. The clock is stuck onto the card using Claudine Hellmuth matt multi medium, whilst the gears and clock hands are adhered with a decorative screw brad through the centre. This is attached to the panel before sticking to the rest of the card, so the hands of the brad are hidden.


This card started out with the egg timer which is a Hunkydory topper. I chose some inks to match (Pumice Stone and Milled Lavender), and set about making an inky background on A4 stamping card. Plenty of picket fence distress stain was used to mute the colours and also for some of the ghost stamping to add interest. Once dried, the master sheet is cut into an A5 piece for the main card background, and an A6 piece for the top panel, and each of these is matted onto grey card along with the topper. The washers came from Tom's toolbox. I asked if he had any washers and he made the mistake of saying "help yourself", so I did :-)

Ingredients:
Sizzix Bigz Tim Holtz dies: Weathered Clock, Gadget Gears
Tim Holtz stamp set Time
recycled cat food box
metallic distress stain
screw brad
adhesives: Claudine Hellmuth matt multi medium, PVA
distress inks: Milled Lavender, Pumice Stone
distress stain: Picket Fence
archival ink: Jet Black
Hunkydory vintage topper & tickets
washers
cardstock: grey 200gsm, white 160gsm & 300gsm

Entered for the following challenge:
Simon Says Stamp and Show - Kraft

Tuesday, 11 June 2013

Tuesday Technique - the Button Garden and how to make Button Flowers

First of all, I want to share my good news with you. I won the Craft Stamper magazine challenge 2 with my "Feather Your Nest" card, and one of the prizes is for the winning entry to be published in the magazine - woohoo!! Luckily, I kept the card lol!

Second, my dear other half has entered a photo in the Raspberry Pi competition and you can see me crafting away in the background! No, I'm not naked, it's just a skimpy summer top :-)) I really like the little Cartman peeping over his keyboard.


"The Button Garden Book Card"

OK, on to today's project. This week, Simon Says Stamp and Show...buttons! Oh, I love buttons!! I inherited the button boxes in my family, and save buttons from every old garment before it gets thrown away, but do I have enough buttons? Oh no, I still have to buy more. So this time last year, I was wandering around a craft shop and came across a packet of gorgeous mother of pearl buttons in the shape of flowers and there they have been in my button box, looking at me ever since. So when I saw the challenge was buttons, I decided to put them to use and came up with an idea to make a button garden. Of course, I also had to make a book card to house it.

"Left Inside Panel"

The sentiment stamp is from a set that came free with a magazine. They were meant to be used with card candi, but I think they work well with buttons too. The background for both inside panels was made using my new pan pastels with versamark + pan pastel stamping and a little masking (for the sun and horizon). I wanted the edges to be hazy, so smudged them all slightly after lifting the masks.

"The Button Garden"

The button garden is built into the aperture by gluing each of the button flowers in place between folds using glossy accents.

"Button flowers and leaves"

Each of the flowers and leaves in the garden is a button. Some of the buttons, like the flower-shaped mother-of-pearl buttons, are as they were bought, and others have been decorated using various techniques that I shared in an earlier tutorial. The "leaf" buttons have been decorated with scraps of patterned paper from Kaisercraft and Graphic45. The blue centres of the organza flowers started out life as cheap, plastic black buttons and have been decorated by dabbing with silver and blue alcohol inks.

"Cover of Book Card"

With such an intricate inside, I prefer my book cards to have fairly clean & simple covers. This one has a flower and sentiment stamped & heat-embossed in gold. I cheated a little since the stalk and leaves are from a different stamp set, I just covered up the flower that was originally on the stamp. A small mother-of-pearl button is added to the centre of the flower with a dab of Pinflair. The closure is made from a good length of lace coloured with pan pastels in sections to match the inside of the card.

Ingredients:
Artemio stamp sets: Hedgerow Plants, Silhouette Foliage
Candi stamp set, free with Simply Cards and Papercraft magazine
buttons!!
pan pastels & sofft tools
versamark ink pad
stampendous embossing powder, Pirate Gold
florist wire
paper-covered wire
distressinks: Victorian velvet, Bundled Sage
Tim Holtz paper stash: Vintage Shabby
Cardstock: white 160gsm & 220gsm, brown 300gsm
lace

Entered for the following challenge:
Simon Says Stamp and Show... Buttons!

Tuesday Technique - How To Make Button Flowers


1. Start off with a flower button (here I've used an organza flower with a button centre), a leaf button (anything green will do!), and a length of florist wire.

 
2. Poke the wire through the button from back to front and bend it to form a loop.


3. Poke the end of the wire back through the opposite button hole from front to back


4. Pull the wire through until tight against the front of the button.


5. Turn the button over and twist the wire around itself to lock in place at the back of the button.


6. Trim the end of the short length of wire flush with the stem using a pair of wire cutters.


7. Poke the other end of the wire through the leaf button from back to front, bend as before and poke back through the opposite button hole from front to back.


8. Tighten the wire against the front of the button as in step 4, then bend the wire into a loop and attach the end to the stem to make a leaf shape.


9. Here's some I made earlier :-) The mother-of-pearl buttons had fairly large button holes, so instead of florist wire I used paper-covered wire coloured with Bundled Sage distress ink. You can add more than one leaf to a stem as in the flower at the top right, and bend the leaves in either direction away from the stem for a little variety.


Friday, 7 June 2013

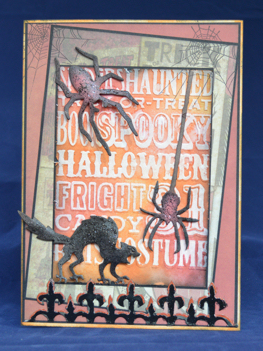
Spooky Spiders

This week's Simon Says Stamp and Show challenge is brought to you by the letter "S". The idea is to be inspired by the letter "s" or to use a product that starts with the letter "s". As you have probably guessed from the title of this post, I've gone for a Hallowe'en theme with Spooky Spiders :-)

"Spooky Spiders"

I know, I know, the sun is shining and it's Summer and there are all sorts of other esses I could have chosen, but "Spooky Spiders" it is! Oh, and there's the Scary cat, the distress Stickles, the Stamping with Stampers anonymous Stamps, the black Soot distress ink edging, Stampendous embossing powder, Sizzix diecuts and Seasonal paper Stash too :-). Plus, I love that the background stamp has "spooky" written in it (does anyone else think "spooky Mulder" from the X-Files when they hear that word?) :-)

"Stamped and Embossed Panel"

The main panel is coloured with various red and orange distress inks, then overstamped with white brilliance ink. You could get a similar result with a resist technique if you preferred, but I like the grungy matt effect of the white stamping over an inked background. After stamping, I lined up the words with the matching embossing folder and embossed to raise the lettering, making the letters pop even more. The panel is matted and layered onto black, and placed onto a card blank decorated with patterned papers and more matting and layering. Then the whole thing is overstamped using the spiders' web stamp from the IndigoBlu stamp set to tie all the panels together.

"Spider diecut"

The scary cat and spooky spiders are diecut, coloured with distress inks and decorated with a good rubbing of black soot distress stickles. The eyes are added with white pen. The diecuts are shaped and adhered to the card with Pinflair for some added dimension.

"Sizzix Iron Gate diecut"

 This iron gate from Tim Holtz is one of my all time favourite dies, it's so versatile and can be used on cards with lots of different themes. Decorated all over with black embossing powder as it is here, it reminds me of the black iron railings that used to surround our school. They used to get the odd new coat of black gloss, but the rust would always come through. I've made as rough a job as possible of the black embossing so it would look like the paint was chipping off. The edges were gone over with a versamark pen before adding some rust-coloured embossing powder and heating again. The railings outside our school always used to bring to my mind impalings so they are quite appropriate for a Hallowe'en card. I blame it on all those gothic novels I read as a teenager, I never really saw anyone impaled  :-)

Well, the Sun is continuing to shine here in Sunny Northern Ireland and long may it continue. It was actually warm enough for shorts today - woohoo!!

Ingredients:
Stampers Anonymous Tim Holtz stamp set Halloween Silhouettes CMS115
IndigoBlu stamp set Hocus Pocus HP1
Sizzix Texture Fades Tim Holtz Halloween Background and Borders Set
Sizzix Bigz Tim Holtz Candlelight Fright
Sizzix Originals: Cat, Scary and Spider #2
Sizzix Tim Holtz On The Edge Iron Gate
Tim Holtz Seasonal 12" x 12" paper stash
Brilliance ink pad Moonlight White
Distress Ink pads (various oranges and reds plus Black Soot)
Versamark Ink pad
Versamark pen
Inkssentials pen White Opaque
Distress Stickles Black Soot
Stampendous embossing powder, black
Cheap embossing powder, earth colour
cardstock: 300gsm white (for card blank), 160gsm black (for matting & layering)
adhesives: PVA, Pinflair

Entered for the following challenge:
Simon Says Stamp and Show - brought to you by the letter S

Tuesday, 4 June 2013

Tuesday Technique - A Simple Gift Box to hold A6 Cards

Like most cardmakers, I make lots more cards than I could ever use and one of the things I like to do with them is give them as gifts. This tutorial shows you how to make a simple box to hold half a dozen A6 cards and envelopes. It will accommodate cards with lots of embellishments, or if you prefer making flatter cards you could just put more in.

All you need is two sheets of strong A4 coloured card, glossy accents or PVA, a scoring board, a guillotine (or ruler and craft knife) and a pair of scissors. You can use the handle from a pair of scissors with a ruler to make score lines, but if you make a lot of boxes it's definitely worth investing in a good scoring board to get accurate lines more easily.

1. Start off with two pieces of A4 300gsm card. Cut one 8 " x 10" and the other slightly larger at 8 3/16" x 10 3/16".


2. Score both pieces all the way around 1 3/4 " in from each edge as in the photo above.


3. At each corner, cut a tab by cutting one score line and trimming one edge as above. You can see the cut lines better in the next shot.


4. Use a scoring tool to give a good, sharp crease to all the edges and bend into place.


5. Glue all the tabs inside the corners with glossy accents for nearly instant stick, or use PVA and hold in place with paperclips overnight until properly dry.


6. Finally, decorate with patterned papers and tie your cards and envelopes together with a generous length of satin ribbon. Here's a few I made earlier!

This simple box design is easily adapted to make different sized boxes, just make one sheet of card slightly larger than the other before scoring.

I leave you with some photos of the basic A6 cards I make. When I'm stuck for inspiration for a special card, I'll pull out my stash and make a pile of cards like these. It usually sparks some ideas.

stamped & coloured image, gilding wax on the diecut frames

flower moulded from Martha Stewart paper clay

string and wooden embellishments go with gardening theme

shrink plastic butterfly & fairy coloured with Derwent inktense pencils

alcohol ink background with tyre tread stamp and orange string recycled from clothes tag

handmade stickpins match the topper & ribbon

old lace and bits of broken jewellery make great embellishments for vintage cards

Friday, 31 May 2013

Happiness

One of the things that never fails to make me happy is covering old boxes in pretty papers. Simon Says Stamp and Show's challenge this week is "Into the Woods", and what better than to show you one of my altered boxes? One of my husband's great grandfathers was a cabinet maker, and my husband rescued this old box from being thrown out some time ago. I came across it in the loft last week and begged it for my desk - it's just the perfect size to hold all my distress ink pads (it's a BIG box lol!).

"Old Wooden Box"

As you can see, the box has seen better days. Bits of it were coming apart and needed repairing with plenty of PVA.

"It has a lid..."

Also, I don't think they could have discovered the right angle in those days lol!

"...and a drawer!"

So I didn't feel too guilty about losing the wooden look :-)

"Finished box - the outside"

Since the box will be living on my desk, and I share an office with my husband, I had to pick some papers we both like. Luckily for me, he loves the Graphic45 Birdsong collection.

"Front"

My best friend Lee aka craftyloops sent me this fabulous "diamond" knob, so I got Tom to drill a hole in the drawer for it (he's got all those "man" tools for jobs like this lol!). Thanks Lee, it is just perfect :-)

"Front corner showing side"

The "twiddly bits" are all painted with black acrylic paint.

"Inside"

Yes, the inside is decorated too! Well, I had to do something to cover all the cracks :-)

Entered for the following challenge:
Simon Says Stamp and Show... Into the Woods

Saturday, 25 May 2013

Tim Holtz Tags of 2013 - May

That's weird, there's a strange golden orb in the sky. What? The Sun you say? Here in Northern Ireland? Surely not. But could it be...well, apparently we are having our one day of Summer today when the temperature struggles into double figures and the world and his wife get their barbecues out. So, a good day to share my entry for Tim Holtz gallery of tags. This month we are playing with rub-ons. I dug out a couple of sheets of old Papermania rub-ons I've had for ages and then played with my distress inks and came up with this tag.

"Sun"

There's nothing I like better than sitting in the garden on a warm, sunny day with a book. OK, so I don't actually own a hammock (or any pink wellies for that matter), and it isn't really warm enough to sit outside either (this is Northern Ireland, didn't I mention that lol!), but I can dream as well as the next woman.

"Tag"

This was a little metal tag from a dog collar that I painted with distress paint and added some rub-on letters to.

Ingredients:
Papermania Summer Bloom and Honey & Hugs rub-ons
Distress Inks & Paints
Olive Archival ink pad
Tim Holtz stamp sets
Spellbinders Just Swingin' die
Paper flowers
 
I liked the design from the tag and thought I'd see what it looked like as a card. Trouble is that I didn't have any more rub-ons, so here are the results of an experiment with stickers and stamps.
 
"Stickers"
 
This card uses the same images from a sticker sheet. I've added one of my favourite Crafty Individuals stamps to the background to give a little bird sitting in the branches.
 
"Stamps"
 
 
...and here it is again, this time stamped with crimson archival and heat-embossed in clear before inking as before.
 
The inked background for all three of these creations is my favourite combination of Tumbled Glass and Bundled Sage applied with bits of Cut 'n' Dry foam. Simon Says Stamp and Show are challenging us to use our favourite ink pad this week. Hopefully they'll let me get away with two favourites :-)
 
Just before I go, a quick hello to May from Gemini Crafts at Gracehill in Ballymena. We had a great afternoon getting all inky with distress inks and perfect pearls yesterday. She has some fab stuff in her shop and it's well worth a visit. Have a great weekend everyone! Maddy xx
 
Entered for the following challenges:
Simon Says Stamp and Show - Favourite Ink
Tim Holtz May Tags

Tuesday, 21 May 2013

Tuesday Technique - A note on my favourite adhesives

Lots of people have been asking about adhesives lately, so I thought you might like a note on my favourites.

PVA

You may have noticed that I like to make cards that are a bit different to the norm and often need to glue pieces of card together to make dimensional shapes. My favourite glue for this sort of construction is PVA. Once set, it is not going to come apart. I just use a cheap 99p for 118ml pot from Dunelm Mill branded "Craft Factory" which has a great spreader and stand so you can store it with the nozzle at the bottom of the pot.

"PVA"

Many of the more expensive branded glues are just PVA diluted with water to a greater or lesser extent. I also use PVA for matting and layering, taking care not to spread too much glue (you just want a thin smear).

Ranger Inkssentials Glossy Accents

Occasionally, for example when constructing the "pages" in a book card, I want a glue that sets more quickly. Then I will reach for my bottle of Glossy Accents. Glossy accents would suffice for most of the times when PVA is used above, but it is a lot more expensive at approx £5 for 68ml.

Pinflair Dimensional Glue Gel

When a bit of dimension is required, for example if you want to raise an image from a background, little blobs of Pinflair dimensional glue are ideal. I also use Pinflair for attaching bulky embellishments such as charms to cards, and for constructing some paper flowers. Pinflair can take a good while to set, especially if you are using large quantities, so set aside projects to dry overnight. I use Pinflair rather than a cheaper silicone glue mostly because it doesn't smell bad. You can also get a syringe to use with the glue making finer applications possible.

Claudine Hellmuth Matt Multi-Medium

This is fabulous when you know you are going to end up with glue everywhere and you don't want it to show! I use it a lot for sticking detailed diecuts to collages, and also for tissue paper. Any excess glue dries matt so it doesn't notice. You can also use matt multi medium for transfer techniques (transferring laser-printed images onto canvas for example). The glue dries very quickly and is best applied with an old paintbrush (I keep one just for use with glue).

Speciality glues

You need a speciality glue for certain techniques such as for use with gilding flakes (something like IndigoBlu's "FlitterGlu" for example). This type of glue stays sticky for a long time. I also use a speciality glue for stamping and adhering glitter. There are various types, such as embossing powder glues, but my favourite is a glue pad.

Foam Tape

Foam tape is useful for raising large areas such as images when matting and layering, and is also invaluable for frame cards and shaker card frames. Be aware though that the adhesive on tapes can dry out, so it may not be a permanent bond.

Double-sided (ds) tape

Many people use ds tape and swear by it, but in my experience it dries out and can cause your cards to fall apart. It may be the case that I have just been unlucky with the brands I've used, but I never risk it any more.