Sunday, 11 November 2012

Lest We Forget

"Poppy Field"
 
If I Should Die
by Rupert Brooke
If I should die, think only this of me:
That there's some corner of a foreign field
That is for ever England. There shall be
In that rich earth a richer dust concealed;
A dust whom England bore, shaped, made aware,
Gave, once, her flowers to love, her ways to roam,
A body of England's, breathing English air,
Washed by the rivers, blest by suns of home.
And think, this heart, all evil shed away,
A pulse in the eternal mind, no less
Gives somewhere back the thoughts by England given;
Her sights and sounds; dreams happy as her day;
And laughter, learnt of friends; and gentleness,
In hearts at peace, under an English heaven.
 
Ingredients:
Indigo Blu stamp set: Poppy Meadow
Spellbinders Decorative Labels One, Labels One
distress ink pads & markers
archival ink: Jet Black
Stampendous embossing powder: clear
red grosgrain ribbon
cardstock: red 300gsm, black 300gsm, white 200gsm
 
Entered for the following challenges:
Card Crafter's Circle - Remembrance / Poppies
Crafts and Me - Reds
Try it on Tuesday - Memories
That Craft Place - Red for Remembrance

Saturday, 3 November 2012

Traditional Christmas Book Card & Charms

Today I can finally share my secret with you, that this month I have been chosen as Guest Designer for Stampalot. Also, they have changed the name of their blog to Stamping Sensations! This month's challenge is "Traditional Christmas" so why not pop along and have a go or even just have a nosey at the design team's wonderful creations? There's a great prize too! Well here we go with today's card. It's one of my book cards, and we'll jump straight to the inside.

"Traditional Christmas Book Card inside"

I've worked in the traditional Christmas colours of red, green and gold, and with a vintage thing going on. The basic construction is the same as for the tutorial with the cover made from 300gsm red card and the closures using red/gold woven ribbon. More of the ribbon was used to decorate the border of the book on the right hand panel, along with a fussy-cut border from a free vintage image. I used up scraps from last year's Christmas papers making a collage background for the left hand panel with a layered sentiment.

"Right hand panel"

On the right hand panel, the book aperture, there is more depth to play with and a number of items are glued in place, including decorated buttons and diecut flowers. Snowflakes are diecut from vintage paper scraps and added around the edges, sticking them into the book leaves. I love the big, jovial Father Christmas that is used as the background image, together with the "Jolly Old St Nicholas" sentiment.

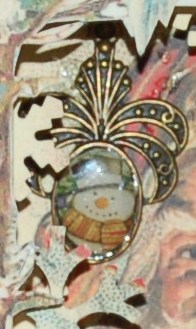
"Snowman Pendant"

The snowman is cut from a scrap of patterned paper, glued into a blank cameo with glossy accents, then the cameo is filled with glossy accents and left to dry before gluing into the project with Pinflair.

"Father Christmas"

The "Father Christmas" charm is made in a similar manner.

"Robin"

Did you spot the robin in the top right-hand corner? He is a Kars wooden embellishment coloured with distress markers.

"Front Cover"

I like to make the book covers look realistic, so often use gold heat-embossing to make them resemble old leather-bound volumes. Also, a plain outside leaves more room for a wow factor when you open the card!. The background is stamped in one go using a fab Kanban stamp, and a diecut reindeer is layered red on gold for a shadow effect before sticking to the front.

"Traditional Christmas Book Card"

Ingredients:
Graphic45 8" x 8" paper pad scraps: Christmas Emporium
other patterned paper scraps
Spellbinders: Layered Poinsettia, Frosty Forms
Kanban stamp: Winter trees with stag and deer
versamark clear ink pad
Stampendous embossing powder: Pirate Gold
Kars wooden embellishment
charms
decorated buttons
tiny yellow gems for flower centres
red & gold ribbon lace
cardstock: red 300gsm, antique gold 200gsm, white 200gsm
adhesives: PVA, Pinflair, glossy accents

Eighties Poinsettia Christmas

I just loved that red, white and black colour combo in the 80s and have used it on a few Christmas cards this year.

"Poinsettia Christmas Card"

The Botanical Swirls die is cut & embossed from white pearlised card leaving a neat border. The fab, swirly Justrite "Merry Christmas" stamped in black archival ink in the lower right hand corner and the corners rounded. The whole piece is mounted onto sparkly black card using lengths of foam tape around the frame to give some depth.

"Poinsettia Dimension"

The poinsettia is die cut in lots of layers from red and black glittery card, then each layer shaped by hand before sticking together with glossy accents. Some tiny black gems are added to the centre. The whole flower is mounted onto the card with a big dollop of Pinflair, which gives a little flexibility.

Ingredients:
Justrite clear stamps:  Large Christmas Sentiments
Spellbinders: Botanical Swirls, Poinsettia
cardstock: white pearlised, black sparkly, red sparkly, A5 white 300gsm card blank
small black gems
archival ink: Jet Black
adhesives: glossy accents, Pinflair

Entered for the following challenge:
Justrite Friday Challenges - Happy Holidays

Friday, 2 November 2012

Sparkly Christmas

It can be hard to take photographs at this time of year with those dark days meaning that a flash is required, and this is particularly so with sparkly holographic card, so I must apologise for today's photo's.

"Sparkly Christmas"

There are layers of sparkly holographic card and black & silver holographic card, and diecuts of black glittery card stuck onto the silver card for extra background interest.

"Justrite Bauble"

This is the same bauble stamp that I used on the vintage Christmas card posted on 17th October, sorry that it's so hard to see the stamping against all that sparkle from the camera flash! It's amazing how different the Christmas cards are just from the difference in background papers.

"Diecuts"

This view shows the background diecuts and the glittery black poinsettia layered up with some silver ball gems in the centre. A string of gems makes a fab hanging for the bauble.

Ingredients:
Justrite stamp set: Merry and Bright
Spellbinders: Holiday Ornaments 2010, Poinsettia, Holiday Tree, Botanical Swirl, Create-A-Flake Four, Labels 28
cardstock: "Merry Christmas black & silver, other black & silver for matting, silver holographic stars, A5 300gsm card blank
foam tape for mounting label & ornament
PVA

Entered for the following challenge:
Justrite Friday Challenge - Happy Holidays

Wednesday, 31 October 2012

Merry Hallowe'en

This is a two card post!

"woooooooooo"

For the first card, the background sentiment is stamped on patterned paper and coloured with distress markers, then matted and layered onto more patterned paper and purple cardstock. The leaves are those wooden elements from Kars coloured with distress inks and stuck onto the card with Pinflair. Little kitty is a smaller version of the free image I use a couple of days ago, and the spider is just diecut from black card.

Ingredients:
Tim Holtz Seasonal Paper Stash
Stampers Anonymous Tim Holtz Stamp set: Hallowe'en Silhouettes
Sizzix Original - Spider
Free vintage image from Magic Moonlight Studios
Kars wooden embellishments: leaves & mushrooms
Archival ink pad: Jet Black
distress ink pads
distress markers
Inkssential white pen
adhesives: PVA, Pinflair, glossy accents (for kitty's eyes)

This scarier card has a triple stepper design:

"mwahahahaha"

The hanging sign is diecut from foamboard and covered with patterned paper cut to size by hand to leave a border of foamboard showing. The card panels are covered in similar patterned paper and all the surfaces are overstamped with Hallowe'en images using black archival ink. The sign is positioned to cover the skeleton's modesty :-)

Ingredients:
Tim Holtz paper pad - Lost and Found
Stampers Anonymous Tim Holtz stamp set: Mini Hallowe'en
Sizzix Tim Holtz Bigz - Hanging Sign
foamboard
Archival ink: jet black
Distress ink pad - Walnut Stain
cardstock: grey 300gsm

As they said in Victorian times, "Merry Hallowe'en!".

Tuesday, 30 October 2012

Oriental Box and Frames Set

Here's the first of this year's Christmas presents, a dressing table set.

"Oriental Box and Frames Set"

These upcycled wooden items are all covered in papers from Graphic45's BirdSong collection using glossy accents. The edges are sanded then gone over with a gold aquamarker.

"Box"

The top of the box has diecut concentric layers of patterned papers and antique gold cardstock with an acetate frame in the centre. The edges are adhered with foam tape, but the top is left open to slide a picture or photo inside. I've added an image from one of the patterned papers. Some diecut flowers and a tiny butterfly are added, cut from scraps of the patterned papers.


The sides of the box are covered in antique gold cardstock and decorated with gold twigs and cherry blossoms diecut from the patterned papers, with tiny pale pink gems in their centres.

"Inside box"

Inside the box, the base is left fairly plain, with a lining of antique gold cardstock and just a couple of diecut papers adhered with mat multi medium. It needs to be left very flat so as not to catch on any of the contents.

"Inside lid"


The inside of the lid can have more decoration, and is layered with images cut from the patterned papers, with some diecut flowers edged in gold aquamarker and shaped with an embossing tool for extra dimension.

"Larger frame"

Both frames were charity shop finds that I paid £1 each for. The front of both frames has a base layer of patterned paper; the edges sanded and coloured to match the box.

"View showing sides"

The sides are coloured with gold aquamarker and rubbed to give a distressed effect..

"Swallows"

Images are cut from the patterned paper, shaped with an embossing tool, and stuck onto the items using Pinflair for added dimension.

"Hanging Frame"

The other frame is decorated in a similar way, but has a little butterfly in place of the swallows. The ribbon is coloureed with gold aquamarker to match the frame. Both frames have matching pictures inserted from the patterned papers.

I'm not sure who is going to receive this present yet. Of the ladies, I have older women, 40 something women, a 22 year old woman and teenage girls to make for. Who do you think??

Ingredients
Empty crystallised ginger wooden box
two old small picture frames from charity shop
Graphic45 8x8" paper pad - Birdsong
Spellbinders: Cherry Blossom, Decorative Labels One
antique gold cardstock
adhesives: glossy accents, Pinflair, Matt Multi Medium
small pale pink gems
gold aquamarker

Sunday, 28 October 2012

Scary Kitty... mwahahaha...

It's nearly Hallowe'en folks, so I need to squeeze a couple of Hallowe'en cards in before Wednesday.

"Scary Kitty"

The free "cat in a pumpkin" image is printed out four times and different parts cut out for decoupage. I especially like to cut out the eyes and teeth in the pumpkin in the top layer.  The background paper is cut to size with plenty of pumpkins on, then overstamped with more scary images in black archival ink. A couple of little blobs of glossy accents make those eyes really stand out. MIAOW!

"view showing layers of decoupage"


Ingredients:
free vintage image from Magic Moonlight Studios
free pumpkin images from the Graphics Fairy
Stampers Anonymous Tim Holtz stamp set: Hallowe'en Mini
Tim Holtz paper stash pad: Seasonal
ric rac
archival ink: Jet Black
orange & black cardstock for matting
adhesives: PVA, Pinflair
glossy accents