Saturday, 22 September 2012

Homemade Washi Tape & Alice Box

Woohoo, I'm so chuffed, I won a top three spot over at Simon Says Stamp and Show for my "Hero" card :-) This week, their theme is "Tape it Up" and I thought I'd share a technique for making your own Washi tape, but first I want to show you the finished box I used the tape on:

"Alice in Wonderland Playing Cards & Dice Box"

I found this fab, plain box with a couple of packs of playing cards and five wooden dice in "The Works" for £1.99 and thought it would make a fab Christmas Present if I jazzed it up a bit (for those of you not in the UK, "The Works" is a bargain bookshop chain here that sells a few craft materials).

"Box end view"

The original box had a couple of fab playing card and dice images on the top that I didn't want to lose, so I decided not to use paint or paper to cover it. Instead, the box is coloured using Tumbled Glass Distress Stain, then the Alice images stamped in Archival ink, masking in places so that the you could read the sentiments. The edges are decorated with Gold Aquamarker. A layer of Claudine Hellmuth's Mat Multi Medium is applied with a brush and the tape stuck on, then the box set aside to dry.

To make the tape, first choose some preprinted images. I've tried using colour images printed using an inkjet printer and it didn't work, so I tend to stick to bought images. I bought a fab sheet of "Creative Scraps" from Simon Says Stamp called "Wonderland Tea" and cut a strip from the bottom.

"Strip of images"

Take some strips of clear sticky tape and cover your image. I used Scotch brand, but any good quality trape should work. You can just make out the strips of tape in the photo above if you look at the part where the camera flash is reflected! Don't overlap the strips.

Next, use a scoring tool (or something else flat and blunt like the edge of a coin) and rub it all over the tape to make sure it is well stuck to the images.

Now this is the fun bit, you'll make a mess but don't worry it will all work out OK :-) Take your taped image to the sink, run the tap luke warm on a gentle stream, hold the card side of the image underneath the water and gently rub with your finger or thumb, rubbing away the card. Keep going working on one piece of tape at a time until all the paper has been removed. You will find that the image is miraculously stuck to the tape - how cool is that?

Put the bits of tape to one side and leave to dry, sticky side up (although they won't feel sticky at this point, they will be a bit sticky again once they are dry!). Once dry, the tape is ready to use on your project. I like to glue it on using Multi Medium to make it extra secure.

"Box with tape"

The tape supplies the fun colour, and the joy of using it is that you can add images and also see all the detail coming through underneath! I love Tweedledum and Tweedledee at the top left, the Mad Hatter on the right, and all the legs on the other bits of tape, but that you can still read all the nonsense sayings underneath.

Ingredients:
plain box for decorating
preprinted images: Creative Scraps Wonderland Tea
IndigoBlu stamp sets: Alice I & Alice II
sticky tape
Distress Stain: Tumbled Glass
Archival Ink: Jet Black
Clauding Hellmuth Mat Multi Medium
Aquamarker: Gold

Entered for the following challenge:
Simon Says Stamp and Show - Tape it Up!
Craft Room Challenge - Childhood Memories

Saturday, 15 September 2012

Hero

Ever since discovering that Simon Says Stamp and Show's theme this week is "Hero", I've had that old 80s Bonnie Tyler song playing in my head. Aaargghhh. :-) I like a good, old-fashioned hero myself, so here's "The Professor"...

"Inside"

The basic construction is a book card. The background panels are made using the resist technique, and the "stamps" are a bit unusual since all the "stamping" was actually done with parts salvaged from an old tape dispenser!

"Background stamps are parts from an old ds tape dispenser"

There were some great cog & gear shapes and odd circles, and I also used some straight edges. Each part was pressed onto a clear versamark inkpad, stamped onto white card, then heat-embossed in white embossing powder. After embossing, the card is inked using Tumbled Glass and Milled Lavender distress inks with some Chipped Sapphire and Dusty Concord around the edges. You can see the background quite well on the front cover.

"Front cover"


The sentiment is stamped in black archival and heat-embossed in clear. The professor himself is stamped in black archival, then a paintbrush dipped in water used to "faux bleach"his face and the front of his shirt for some highlighting.

The balloon is stamped separately onto scrap white card and heat-embossed with blue glass embossing powder, then inked with Milled Lavender and Dusty Concord before carefully cutting out with scissors and craft knife, shaping, and mounting with Pinflair onto the front of the card for some added dimension. The struts are quite hard work to cut without breaking them - you need a good, sharp knife. An alternative method would be to stamp the balloon straight onto the front of the card, and just cut the balloon and basket to place over the top.

A few watch parts are added to the background with Matt Multi Medium (this stuff is great for adding tiny bits since it doesn't leave any glossy smears on your work!)

"Inside left panel"

I just love this Paper Artsy stamp set! I wanted the whole project to look really industrial, so have used a ribbon that resembles a silver chain for the binding, to hang the sign from (together with some metal eyelets from an old 1970s fabric set), and as a "road surface" under the tyres.

"The car"

Every self-respecting hero needs a car and a pretty heroine to scream and feint whenever trouble beckons (or kick ass, whatever takes your fancy :-).

"The car, dimensional view"

The car is stamped and heat-embossed a few times using black and blue glass embossing powders, then cut, shaped and decoupaged using Pinflair to separate the layers. The windscreen area is filled with glossy accents, and I found two hemispherical glass shapes that make fabulous 3d headlamps.


"Man and Machine"

 So this is the machine with which the Professor transports himself to that parallel dimension. It was stamped onto the background using black archival ink, then stamped again onto scrap card and various pieces cut out and decoupaged for extra dimension. Lengths of silver thread are used for the balloon struts and chains around the pulleys; lots of watch parts are added as gears and cogs; all the parts are stuck with matt multi medium. A gold aquamarker was used to add a little colour to parts of the machine.That chap really reminds me of my Dad - is that weird? lol! I've left him pale and mysterious like all the best heros should be :-)

"Inside right panel"

The back panel is fitted behind the book construction before gluing into the book card, then a length of clock spring is coiled amongst the book "pages". The top border is decorated with more of that chain-like ribbon and some washers and watch parts.

"Parallel World"

This "parallel world" features purple grass (eyelash ribbon) and a weird industrial landscape (Tim Holtz Townscape die cut with wire chimney emissons). The distress ink on the houses is graduated light to dark from right to left for shadowing, and some extra highlights added with white ink pen.

"Box"

I don't often blog this, but I usually make a box for the dimensional cards using the same cardstock. The top is decorated with card left over from the background sheet, and the box is lined with tissue paper stamped with matching stamps in black archival. A bit of matching ribbon finishes the whole thing off. I didn't make this card with anyone in mind, so have left the label blank for now.

Ingredients:
stamp set: Paper Artsy Hot Picks HP1106
Sizzix Tim Holtz On The Edge Townscape
parts from ds tape dispenser
versamark ink pad
embossing powders: white, black, blue glass, clear
archival ink: jet black
distress ink pads: Tumbled Glass, Chipped Sapphire, Milled Lavender, Dusty Concord
cardstock: purple 300gsm, white 160gsm, white 300gsm, silver holographic
Letraset Aquamarkers: gold, silver
2 glass hemispheres
watch parts & washers
eyelets from an old 1970s fabric set
ribbon: silver chain, purple eyelash
thin wire
silver thread
adhesives: glossy accents, Pinflair, PVA, matt multi-medium

Entered for the following challenges:
Simon Says Stamp and Show - Hero
Top Tip Tuesday - Recycle it (washers, watch parts & stamps from old ds tape dispenser)
Sweet Stamps - for the guys
Dream Valley - Something Old (washers, watch parts, stamps from old ds tape dispenser, inks), Something New (Paper Artsy stamps)
By The Cute & Girly - Boys / Men September Challenge

Tuesday, 11 September 2012

Congratulations in red, white and black

In the 80s when going out, I had two favourite colour combos. One was deep blue & black, and the other was red, white and black. I woke up this morning and just had this card in my head and that colour combo is sooo 1980s :-)

"Congratulations in red, white and black"


The background is white card misted with homemade antique linen distress spray and overstamped in antique linen, barn door and black. The cherry blossoms are diecut from spare inked card and edged in barn door distress ink before shaping with a large embossing tool and mounting with self-adhesive gems for flower centres.


"Justrite Sentiment"


I love the Justrite Large Fancy Sentiments set of stamps and the "Congratulations" is just perfect for a focal point, stamped in archival and clear embossed onto some spare inked card, then diecut using one of the new Spellbinders Fancy Labels Tags and mounted on another Justrite stamped & diecut label. Did you notice all the background stamping was done with the same set of stamps too? The "Congratulations" is repeatedly stamped in antique linen and I just "ghosted" the little red and black swirls so as not to make them too overpowering. Both labels are inked with some barn door highlights using pad & marker, mounted using foam tape, and finished off with a couple of large self-adhesive gems to match the flower centres.

Some red seam-binding was tied around the card with a big, floppy triple bow, matting & layering onto red & black card and a couple of homemade stickpins finished off the whole thing. My good friend Lee gave me this fab kit of stuff to make the stiockpins from and this is the first time I've dipped into it, so a great big thank you to Lee aka Craftyloops. :-)

Ingredients:
Justrite clear stamp set: Large Fancy Sentiments
Justrite cling stamp set: Thankyou Labels Twenty
Spellbinders dies: Labels 20, Fancy Labels Two, Cherry Blossoms
Distress ink pads: Antique Linen, Barn Door
Distress marker: Barn Door
Archival Ink pad: Jet Black
Stampendous embossing powder: clear
cardstock: black 300gsm, red 300gsm, white 300gsm & 160gsm
self-adhesive gems
adhesives: PVA, glossy accents
foam tape

Entered for the following challenge:
Justrite Friday Challenge #81- Charm Me (I got my box of stickpin stuff out just for you lol!)
Bunny Zoe's Crafts - Distressing (lots of inky distressing here :-)
Creative Stamp Friends - Distressen

Tuesday, 4 September 2012

Buzzzzin' Bees

Tom has been harvesting honey in the last couple of weeks, so I thought this card would be an apt one to share with you:

"Buzzin Bees"
Lots of stamps and inks used to create this one.

"Bzzzz"

I stamped an extra bee in archival ink on acetate to cut out a sweet pair of wings.

Ingredients:
Chocolate Baroque & IndigoBlu stamps
distress inks & markers
archival ink
Spellbinders: Carnation Creations, Rose Creations, labels one
cardstock: white 300gsm
acetate
adhesives: PVA, glossy accents, Pinflair dimensional glue

Entered for the following challenge:
Deep Ocean Challenge - Things with Wings
Papertake Weekly - Anything Goes, non-square project
Crafty Cardmakers - Winged Things
Simon says stamp - put a stamp on it

On a different note, I thought you might like to see a couple of pictures I took in the back garden. This is one of our wild rabbits:
"Thumper"

And these are some of our band of swallows getting ready to fly back South for the Winter. Not a bad Summer for them, all that rain meant plenty of midges for them to eat and they've more than doubled in number this year.

"Swallows"

Toodlepip, Maddy x

Sunday, 2 September 2012

Summer Distress

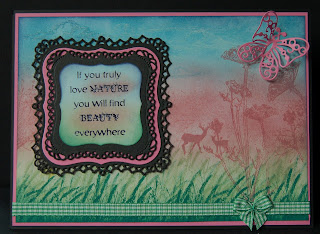
I must admit, I'm not very keen on the Summer seasonal distress ink colours (too garish and girly for me), so when I saw this week's Simon Says Stamp and Show challenge, my heart sank. Still, I like to show willing, so made this quickie:

"Summer Distress"

Since I haven't bought the Summer distress inks, I used Broken China, Victorian Velvet and Bundled Sage / Pine Needles to approximate the colours, with some white acrylic paint stamping for the clouds. There are odd bits I like, for instance the gingham ribbon reminds me of summer picnics, and I'm pleased with the way the deer are hiding in the background, but the pink card really jars with me. So I'm not pleased with this effort and promise to try harder next time. Hope you are having a good weekend :-)

Ingredients:
Spellbinders: Labels one, decorative labels one, papillons
stamps: IndigoBlu & Kanban
distress ink pads
white acrylic paint
black archival ink + clear embossing powder (for sentiment)
cardstock: black, pink
Papermania capsule collection ribbon + bow

Entered for the following challenge:
Simon Says Stamp and Show... Summer Distress