Wednesday, 29 August 2012

Steampunk Debutante

Here's a real steampunk debutante:

"Boy George lookalike"

Is it me or does that Graphic45 image look just like Boy George??

"Steampunk Debutante"

Oysterstamps have a summer sale on some of their spellbinders dies, and I just had to get the Mix'd Media sets. The pieces are cut from scraps of patterned paper and the arms, neck and legs joined onto the body with little brads. Just the body piece is stuck with some pinflair dimensional glue, so all the limbs move and you can make the doll dance :-) A few watch parts (thanks again Lee!) make a great face and a jaunty hat.

Ingredients:
Graphic45 8" x 8" paper pad Steampunk Debutante
Spellbinders S5-087 Mix'd Media Playtime
Technique Tuesday stamp set: Get it in Gear
Distress Ink: Pine Needles
Archival Ink: Jet Black
Embossing powder: clear
adhesives: PVA, glossy accents, Pinflair
watch parts
A5 white card blank

Entered for the following challenges:
Dream Valley Challenges - Steampunk
Blessings Ink Amusing Challenges - anything goes
Craft Your Days Away - Anything Goes
Card Makin' Mamas - Try Something New
Moving Along with the times - Anything but square

Friday, 24 August 2012

Late Summer and there's food aplenty!

Do you remember me telling you about the thistles in the back garden and how I love them for the wildlife they sustain? Well, the flowers are nearly over now and looking out of the kitchen window yesterday there were two bullfinches perched on the seedheads pulling out fluffy seeds and having a great feast. I stood and watched them for ten minutes and it really made my day. I thought this card was a good one to share with you, that sentiment is wonderful.

"Late Summer Food Aplenty"

I just love getting loads of inks and stamps and having a play, don't you? There are so many different stamps on this card I don't think I can remember them all! I wanted to get that late summer meadow look with lots of different seedheads and the lovely birdie has so much food he's spoilt for choice. The background is inked with distress inks, then the same colour pads were used to stamp all the different meadow flowers and grasses, with a few swirls added. The bird is from a set that my very good friend Lee sent me a while ago (thanks Lee!)  I stamped in memento onto scrap card and coloured with promarkers for a complete contrast from the background before cutting and adhering with Pinflair for some extra dimension. The poppy is stamped and coloured with distress markers to match the background.The sentiment is stamped onto a distress inked background and diecut with a Spellbinders petite oval before edging in a darker colour. That corner flourish is trimmed down from an Elegant Post diecut.

It all puts me in mind of that poem:

"What is this life if full of care
We have no time to stand and stare..."

I think that's how it goes, well you could always google it :-) Have fun, Maddy xx

Ingredients:
Spellbinders die sets: petite oval, elegant posts
stamp sets: Martha Stewart birds, Artemio nature, Tim Holtz papillon & sentiment, IndigoBlu poppy
Distress inks & markers
Promarkers
Memento black ink pad
Adhesives: PVA, Pinflair

Entered for the following challenges:
Bunny Zoe's Crafts - Summer
Lawnscaping - make your own patterned paper with stamps
Simon Says Stamp and Show - No Rules
Creative Craft World - smaller than 12" x 12" using summery colours
Mishelflo - long hot summer
Sparkles - Nature
My Mojo Monthly - Your Style
Joanna Sheen - Sentimental
That Craft Place - Vintage
Craft Your Days Away - Anything Goes

Monday, 13 August 2012

Steampunk, Hot Air Balloons and Resist Technique

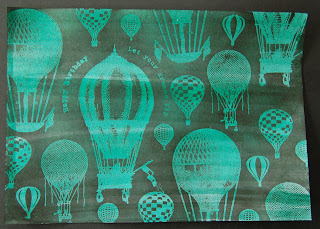
It's about time we had another steampunk card. Another Graphic45 patterned paper pad I fell in love with is Graphic45's Steampunk Debutante. I've nearly used all my patterned papers, but one of them inspired this homemade version using every hot air balloon stamp I could find in my collection and my favourite resist technique:

"Up, Up & Away Resist Background"

Pine Needles Distress Stain is swiped across an A5 sheet of white card until completely covered and left to dry completely. I use distress stain to get a stripy effect, but using ink pads with foam gives a more even look to the colouring, or you could use coloured cardstock if you have the right colour to start with.

Next, each of the stamps is used to stamp clear versamark ink onto the inked card and the stamped images are sprinkled in turn with clear embossing powder before heat-embossing. I normally stamp a couple of images at a time, sprinkle & heat-emboss, then stamp some more so that the ink doesn't dry out between applications. Turning the card to the light helps you to see where the previous stampings are.

When finished, apply Black Soot Distress Ink from a pad with cut 'n' dry foam to get into all the nooks and crannies, colouring the background black and leaving the balloons in that glorious Pine Needles greeny blue.

This sheet of coloured card was used as the background for the following steampunk card. There is a tutorial for the stepper card construction, which is made from black card.

"Steampunk Stepper Card"

Another of my favourite techniques is to diecut embellishments from patterned papers and distress the edges with inks. With such a detailed background, I didn't want to cover too much of it with layers so opted instead for the addition of some diecuts along the "flight" theme.

"The birdie king"

All the embellishments on this card are diecut from scraps of Steampunk Debutante papers. The bird here is edged with metallic aquamarkers and decorated with a self-adhesive gem for an eye. Matching gems are used on the diecut butterflies.

"Happy Birthday Banners"

The diecut banners are stamped in black archival then heat-embossed in clear. This gives a cleaner embossing than using black embossing powders, which often leave little spots where you don't want them!

Ingredients:
Graphic45 8" x 8" paper pad: Steampunk Debutante
Kaisercraft clear stamp set: Up, Up & Away
Creative Expressions unmounted stamp set: Vintage Aviation
Craft Stamper free stamp: Hot air balloon
Paper Artsy Hot Picks stamp set: HP1106
IndigoBlu stamp set: Grand Tour III
Spellbinders Donna Salazar: Mix'd Media Elements
Papermania Hampstead stamp set
Marianne dies: Butterflies
Distress stain: Pine Needles
Distress ink pads: Black Soot, Walnut Stain
Versamark ink pad
embossing powder: Stampendous clear
yellow self-adhesive gems
adhesives: PVA, Pinflair
cardstock: black 300gsm

Entered for the following challenge:
Simon Says Stamp and Show - Favourite Technique
Dream Valley - Diecuts and Punches
Penny Black and More - Whiskers and/or Wings
Stamptacular Sunday - Shape it Up
Sweet Stampin' - Things with Wings


Saturday, 11 August 2012

Drink the Wild Air

Here's a seaside themed card for you today.


"Drink the Wild Air"

These stepper cards are becoming a bit of a habit. The background paper for this one was created by covering white card in Tumbled Glass Distress Stain and spraying & dripping water to get a watery effect. The edges are inked in Broken China and a tiny amount of Chipped Sapphire.

"She's a Lady"

"She's a lady". You have to say that in the style of David Walliams. :-). The fab sepia photo is cut from patterned paper and fixed to the background with dabs of Pinflair to make it stand out a little. I love this sentiment from Chocolate Baroque. It goes so well with the wild times of the twenties which I'm guessing is when this photo stems from.

"Seagulls"

These Chocolate Baroque seagulls are just fabulous, as is the lighthouse used on the other side of the card! All are stamped with archival ink onto white cardstock, coloured with distress inks & promarkers and shaped before adhering to the front of the card with some Pinflair. You can just make out some more panels from that fabulous Graphic45 patterned paper in the background. Aren't those old costumes wonderful? I'd love one like that - covers up all manner of sins :-)

"Crab"

The crab is my favourite part of this card. The expression on his face is priceless!

"Full Frontal"

Well, here's the full frontal. Enjoy.

Ingredients:
Graphic45 8"x8" paper pad: On The Boardwalk
Chocolate Baroque stamp sets: Seashore Scenes, Seashell Collection
Distress Inks , Stains & Markers
Promarkers
Archival Ink: Jet Black
Stampendous embossing powder: clear
cardstock: brown 300gsm, white 200gsm
adhesives: PVA, glossy accents, Pinflair
charms: crab and starfish from Craftime set

Entered for the following challenges:
Craft Punked - Beside the Seaside
I Love Promarkers - Vintage
Divas by Design - For a Female
Ladybug Crafts Ink - Summer Fun
Papertake Weekly - Anything Goes
Passion for Promarkers - At the Beach
Try it On Tuesday - Anything Goes
Fashionable Stamping Challenges - Anything Goes
That Craft Place - Things with Wings


Monday, 6 August 2012

Live Out Loud - make a frame from cardboard

This is one of my weird and wonderful experimental cards trying out new techniques and some fun products. I hope you like it!

"Live Out Loud - front cover"

The background for all three panels is cut from a masterboard made by spraying pearlescent cardstock with various colours of Dylusions ink sprays and blotting. This allows the gorgeous, pearlescent sheen to come through those brilliant colours. Once dry, the background is overstamped using black archival ink.

The three birds on the front of the card are diecut and each of the bird panels is heavily embossed with thick layers of UTEE. After setting, the embossed panels are flexed to induce cracks in a roughly horizontal direction and a gold aquamarker used to frame the pictures. Gold thread is wrapped around the front panel emphasising the cracks in the panels, and the whole thing mounted on gold cardstock.

"Inside panels"

Inside, the cardstock is decorated with that fabulous Chocolate Baroque tree branch stamp by repeated heat-embossing in gold. Some of the gold thread used on the front of the card is braided to make the thicker string used for the closure and glued behind the panels. Two ornamental panels are diecut from the masterboard sheet and decorated with stamping in archival ink.

"Two little birds - inside left panel"

Spare card is stamped, cut out and mounted over the main stamping in the left hand panel to provide some extra colour and dimension. Some glitter was added to the moon using a quickie glue pen. The birds are shaped and mounted with Pinflair dimensional glue, and the diecut panel is adhered to the background with Pinflair to help it stand out.

"Birdie closeup"

The closeup of this pearlescent bird also shows some of the detail in the background layering and stamping. Some tiny self-adhesive gems are used for eyes.

"Let your mind wander and your imagination fly"

The sentiment reads "Even the wildest dreams have to start somewhere. Allow yourself the time and space to let your mind wander and your imagination fly". Oprah Winfrey (!).

I'm really pleased with how the frame turned out. Start by diecutting five frames from waste cardboard (I use empty cat food boxes) using Tim Holtz' Ornamental and mini ornamental dies. Stick them all together with plenty of PVA glue and set aside overnight to dry thoroughly. Then apply a good layer of Viva Decor Croco Gold paint, allow to dry and watch those wonderful cracks appear.

"Embossed bird"

The birds are made using the same technique as the bird panels on the front of the card, flexing after embossing to produce some cracks, and going over the edges with a gold pen.

Ingredients:
Chocolate Baroque stamp sets: Live Out Loud, Fly Away With Me
Sizzix Tim Holtz Movers & Shapers dies: Ornamental, Mini Ornamental
Dylusions spray inks
Archival Ink: Jet Black
Versamark clear ink
aquamarker: gold
Sakura quickie glue pen
fine glitter
 Viva Decor Croco Gold
embossing powders: UTEE clear, Stampendous Pirate Gold
gold thread
cardstock: white pearlescent 200gsm, gold 160 gsm, brown 300gsm
self-adhesive gems
adhesives: PVA, Pinflair dimensional glue

Entered for the following challenges:
Sir Stampalot - Take Flight
Simon Says Stamp and Show - Paint it Up
Joanna Sheen - Try Something New
Penny Black and More - Whiskers and/or Wings

Saturday, 4 August 2012

Ladies' Diary Stepper Card 7

This is the last card in the series, so time to say goodbye to the ladies as they toddle off to the sales...


"Cheerio Ladies!"

Tim Holtz' Old Jalopy cut in foamboard makes the perfect vehicle to transport the lovely ladies. A couple of the buttons seen in previous cards are used for wheels here, and the diecut and shaped flowers have black and brown brad centres.

Ingredients
Graphic45 8" x 8" Paper Pad Ladies' Diary Collection
Sizzix Bigz Tim Holtz Old Jalopy 
Spellbinders Carnation Creations
Brads
Foamboard
Cardstock: black 300gsm
Buttons
Adhesives: glossy accents, PVA, Pinflair

Entered for the following challenge:
Simon Says Stamp - inspiration
Cupcake Craft - the great outdoors
Challenge Up Your Life - Everything Goes

Friday, 3 August 2012

Ladies' Diary Stepper Card 6

Isn't she gorgeous? Another day, another stepper card...

"ta daa"

I wore lots of hats like these in the 80s - just loved those wide brims. Very Audrey Hepburn (the hat, not me LOL!)

"Button"

There are more patterned buttons...

"Flower"

...and more of those pretty handmade flowers. All the diecuts are scraps of patterned papers from the same pad.

Ingredients:
Graphic45 8"x8" paper pad Ladies' Diary Collection
Spellbinders: Carnation Creations, Foliage
Sizzix / Hero Arts die cut & stamp set: Floral
distress ink pads: Victorian Velvet, Tumbled Sage
Brads: pink, jewel
buttons
foamboard
cardstock: brown 300gsm
adhesives: PVA, glossy accents, Pinflair

Entered for the following challenge:
Charisma Cardz - pink plus one other colour

Wednesday, 1 August 2012

Ladies' Diary Stepper Card 5

Well folks, here's another card in the Ladies' Diary Collection Stepper Card series.

"Who, me?"

I just love that lady with the brolly and as luck would have it she is the perfect size for the front panel. I love to cut out accents from patterned papers, shape them with fingers or embossing tools, and adhere them onto my cards with plenty of Pinflair dimensional glue to bring out features such as waists, legs, even umbrellas in this case.

This card has lots of the features in the rest of the series with the foamboard sentiment this time heat-embossed in verdigris, and the large button on the centre panel featuring a couple of ladies' middles / waists, which is quite fun. There's plenty of gossip going on too.The tall lady's hat has been given some feathering with a pair of scissors which helps the realism of the feather. Notice when fixing the patterned papers and cutouts that the edges are coloured with distress inks. I normally use a brown colour, but for these papers Victorian Velvet distress ink works very well and adds to the girly feel without making things too grungy.


Ingredients:
Graphic45 8"x8" paper pad: Ladies' Diary Collection
Sizzix / Hero Arts diecut & stamp set Floral
Spellbinders: Carnation Creations
buttons
distress ink: Victorian Velvet
versamark: clear
embossing powder: verdigris
foamboard
cardstock: brown 300gsm
adhesives: PVA, glossy accents, pinflair

Entered for the following challenges:
Creative Craft Challenges - Summertime
Party Time Tuesdays - Anything Goes
Try it on Tuesday - Anything Goes
Simon Says Stamp - What Do You Say?
The Shabby Tea Room - Sweet Summertime colours, flowers and a stamped element