Showing posts with label birthday card. Show all posts

Monday, 5 March 2012

Glorious Green

This time of year, you really start to notice the green everywhere, and I'm sure that's truer here in Ireland than anywhere else in the world. Today's card is for a man in his 80s who has spent his life as a farmer. I've used my current favourite Crafty Individuals stamps (yes, again!), which gives me the excuse to tell you that one of my cards was picked as a winner on the Crafty Individuals blog this month - woohoo and thank you!

"Happy Birthday Bobby"

As you can see from the shadows in the photograph, we have sunshine again today :-). The background & main panel were created by applying distress inks to white card with cut 'n' dry foam. After drying, both panels were stamped and brushed with Perfect Pearls, before matting and layering.

"Bottom border"

Lots of texture & dimension was added with layers of dark green angel hair, inked lace, and diecut & stamped images (these are from the Hero Arts set).

"Birdcage Charm"

This charm is covered in melted UTEE. When cooled and set, the back is inked to match the project using alcohol inks, and the charm is glued using Pinflair.

"Sentiment"

The diecut dragonfly is inked with distress inks and dried. A versamark pen is run around the edge and Perfect Pearls brushed on to give some shimmer. The sentiment is stamped and heat-embossed in clear, and gems are added along the body for a bit of added sparkle.

Ingredients:
Crafty Individuals unmounted stamp set: CI-234
Hero Arts Stamp & diecut set 657774
Dovecraft Sentiment stamps
Spellbinders dies Fanciful Flight
Distress Inks: Tumbled Glass, Pine Needles
Perfect Pearls: Green Patina, Blue Patina
Versamark Ink: Charcoal
Stampendous Embossing Powder: clear
self-adhesive gems
Cardstock: white for stamping & diecutting, dark green for matting & layering
bird charm
UTEE, clear
Adirondack alcohol ink: Stream
Lace, various & dark green angel hair
Adhesives: PVA, Pinflair dimensional glue

Entered for the following challenge:
Joanna Sheen - Spring / Easter
Paper Sundaes - Green or Good Luck
Penny Black and More - Springtime
Crafty Calendar - Spring Clean
Secret Crafter - Green for Go
The Pink Elephant - Let's See Those Layers

Tuesday, 31 January 2012

Birthday Screen

This card is for a neighbour in her eighties.

"Box"

When you see a box on this blog, you know the card is going to be a bit different.

"Front"

When you open the box, all you can see at first sight is the front of the card.

"Standing in a square"

You need to open it right out for the full effect.


"Side 1 flat"

Each panel is cut with an ornamental die, and the bottom cut flat to allow the card to stand up properly.

"Side 1 standing"

I know that my neighbour likes to set her cards in the window with the good side looking out at the passers by.

"Side 2"

I thought it would be good to make her a card with two pretty sides, so she would still have something to look at on the inside. The blank panel is to write on.

Recipe:
Tim Holtz Sizzix Bigz "Ornamental"
Tim Holtz Sizzix M&S die "Mini Ornamental"
Spellbinders Nestabilities Labels dies
Distress Inks "Milled Lavendar", "Dusty Concord", "Stormy Sky"
Card white & dark brown
Perfect Pearls "blue patina"
Sizzix / Hero Arts stamp & die set
Book Rings
lace & ribbon, various
verse from freebie website
sentiment stamp from set that came free with a magazine
butterfly embellishments from "The Works"

Entered for the following challenges:
Make my Monday - Nature - Butterflies and Dragonflies
Truly Madly Crafty - anything goes
Creative Craft Challenge - bingo (flowers, lace, blue)
Gingersnap Creations - Spicy Supply Challenge - Ribbon

Saturday, 28 January 2012

A birdie birthday.

There are celebrations in the Izzwizz house today - our very first little baby chick has hatched! We have kept hens for ten years, but this year we are breeding our own for the first time and we have little tweeting noises coming from the spare room. My husband, Tom, has just started his very first blog here to write about our hens and will be posting some pictures later on. In the meantime, here's a birdie birthday card to be going on with:

"Happy birthday little chicken"

The stamps are from Crafty Individuals and all the colouring is with three distress inks (Dusty Concorde, Milled Lavendar and Stormy Sky). The background is made much lighter by rubbing all the stamped images with silver Perfect Pearls. This also gives a lovely shimmer effect. The main panel is stamped in black archival ink for contrast.

"Embellishments"

There are lots of embellishments, so the colour scheme has been kept very simple. The row of flowers was sent to me by my very good friend Lee aka CraftyLoops (thanks Lee!). They come as a sheet that you can cut into blocks or strips and she did tell me where to get some more, but I've forgotten (d'oh!). The flowers were originally white, but I coloured them with two colours of distress ink to match the card.

"Bird in branch"

The bird in branch is a Marianne die-cut and has been cut & embossed in silver mirror card. The embossing really gives some texture to the leaves, as well as adding a little eye & wing to the bird. It is fixed on the card with Pinflair glue to raise it up and add a little dimension. The branches at the bottom of the card are also from this die-cut, with the bird removed. The silver butterfly is die-cut from a Marianne butterfly set.

"Sentiment"

The sentiment was stamped in black archival ink and heat embossed with clear embossing powder. The stamp was in a set that came free with one of the cardmaking magazines. The sentiment was diecut from a labels Nestie and coloured with matching distress inks before layering onto a Silver mirror card diecut, embossed and edged with black promarker pen.

Both panels were matted and layered onto silver mirror card and black card before arranging together with some purple and silver lace (the purple lace started out white and was coloured with Dusty Concorde distress ink to match).

So, happy 0th birthday little chickie!

Entered for the following challenges:
The Stamp Man - Embellish It
Joanna Sheen - Celebrations
Mark's Finest Papers - at least 4 layers (there are 8!!)

Friday, 6 January 2012

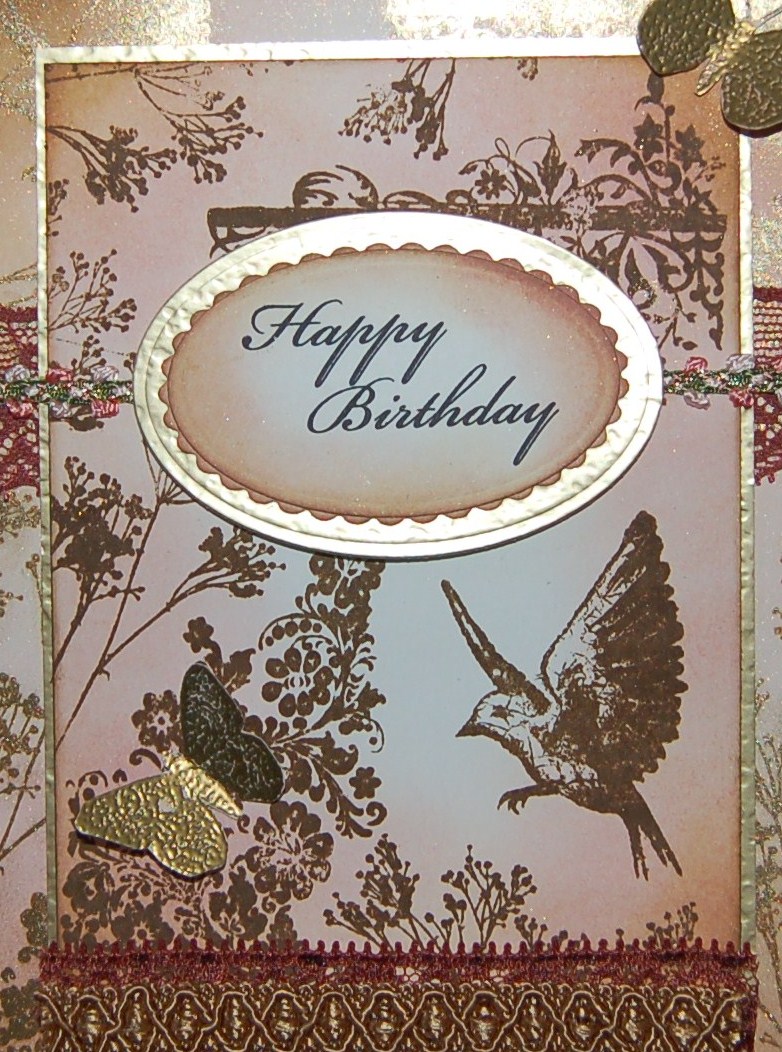
Vintage birthday card

A big thankyou to Kathy from Docrafts who was my Christmas swap partner this year, and sent me some absolutely gorgeous lace. Some of it is used on this card and I hope she approves.

"Vintage birthday card"

The design is mostly achieved with distress inks & Tim Holtz stamps. The background has gold Perfect Pearls rubbed into the stamping for lots of shine.

"Closeup of main panel"

The stamping from the background is repeated on the main panel in a darker colour. The sentiment is stamped in black archival ink, distressed, and diecut in layered ovals before fixing to the main panel with Pinflair.

"Butterfly"

A couple of butterflies are stamped and heat-embossed in gold onto white card before colouring with distress inks, cutting out and fixing to the card with the wings raised to add a little dimension. This design folds neatly flat for posting at the standard letter rate :-)

Entered for the following challenge:
Samuel Taylors January Blog Challenge - Distress (fab prize of 4 distress reinkers - woohoo!!)
Simon Says Stamp...NEW something (new lace)
Crop Stop Challenge - Go for the Gold

Friday, 18 November 2011

Girly Steampunk - an 18th Birthday Card for a Female Science student!

I've seen a few half-hearted attempts at girly steampunk in the mags lately, but feel if you're going to do it you might as well go for it!

"Girly Steampunk - card front"

Unfortunately, the person who asked me to make the card isn't quite as into steampunk as me, so I had to tone it down a bit anyway! I wanted to put "SOAR" in Vintage Market lettering at the top left and ended up with a boring "Celebrate Today" sentiment ("in case they wouldn't understand it"!!). Oh the sacrifices we make for our art :))) Still, I got my way with the inside - you'll see that later. First here's a little detail...

"18"

The silver mirri card used for all the diecuts was first decorated with alcohol inks, mostly with the "swooshing about on a craft sheet" method and partly with a bit of dripping straight from the bottle. Here, the numbers were double-cut from inked mirri card and deep purple cardstock and the two adhered together for extra depth on the lettering.

"Card front"

The wings were cut using a Spellbinders set and adhered to the Tim Holtz dress form. A couple of dress forms were cut from lilac cotton and attached to the front of the dress with glossy accents before decorating with lilac ribbon & lace.

"Necklace"

A "necklace" was formed from a row of tiny self-adhesive lilac gems. The rest of the front of the card was kept quite simple to contrast with the complexity of the inside:

"Card inside - Clock"

The main part of the card has my favourite concertina-card construction with layers of die-cut cogs and gears (all cut from inked mirri card) positioned on layers of mirri card with concentric apertures cut into them. The back layer is mirri card embossed with clocks and gears. On top of all the gears sits a Tim Holtz' weathered clock die cut. The hands are set to "18 hundred hours" and the centre of the hands is decorated with a large jewel brad.

"View of clock showing the layers of gears in behind the clock face"

Some of the drip-decorated card was used to cut gears, the extra colour helping the eye to distinguish the layers behind the clock-face.

"Top-view of card showing construction"

The real beauty of these concertina cards is that they squash nearly flat for posting, and are easily accomodated in a standard expandable envelope.

Entered for the following challenge:

Delightful Challenges bingo - add dimension, ribbon / lace, glitter/sparkle