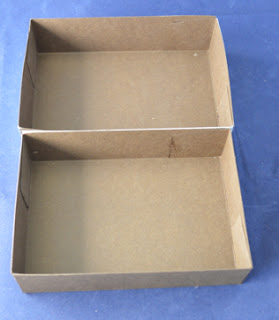
All you need is two sheets of strong A4 coloured card, glossy accents or PVA, a scoring board, a guillotine (or ruler and craft knife) and a pair of scissors. You can use the handle from a pair of scissors with a ruler to make score lines, but if you make a lot of boxes it's definitely worth investing in a good scoring board to get accurate lines more easily.
1. Start off with two pieces of A4 300gsm card. Cut one 8 " x 10" and the other slightly larger at 8 3/16" x 10 3/16".
2. Score both pieces all the way around 1 3/4 " in from each edge as in the photo above.
3. At each corner, cut a tab by cutting one score line and trimming one edge as above. You can see the cut lines better in the next shot.
4. Use a scoring tool to give a good, sharp crease to all the edges and bend into place.
5. Glue all the tabs inside the corners with glossy accents for nearly instant stick, or use PVA and hold in place with paperclips overnight until properly dry.
6. Finally, decorate with patterned papers and tie your cards and envelopes together with a generous length of satin ribbon. Here's a few I made earlier!
This simple box design is easily adapted to make different sized boxes, just make one sheet of card slightly larger than the other before scoring.
I leave you with some photos of the basic A6 cards I make. When I'm stuck for inspiration for a special card, I'll pull out my stash and make a pile of cards like these. It usually sparks some ideas.
stamped & coloured image, gilding wax on the diecut frames
flower moulded from Martha Stewart paper clay
string and wooden embellishments go with gardening theme
shrink plastic butterfly & fairy coloured with Derwent inktense pencils
alcohol ink background with tyre tread stamp and orange string recycled from clothes tag
handmade stickpins match the topper & ribbon
old lace and bits of broken jewellery make great embellishments for vintage cards


A super collection of cards Maddy and lovely little gift boxes as well.
ReplyDeleteMight give the idea a try, I donate lots of cards to the AHT at Newmarket to sell in their visitor centre so wondering if some boxed ones, perhaps thank you cards might go down well.
B x
Wow, you've been very creative - wonderful project.
ReplyDeleteBrilliant gift, love the cards they are gorgeous. Love Alison xx
ReplyDeleteBrilliant, Maddy - I'll be making these! I hope you're keeping well and enjoying this beautiful weather. Ruth x
ReplyDeletefab tutorial Maddy and a lovely gift idea, and despite what you say, none of your cards are basic! Fi xx
ReplyDeletewow what a great tutorial maddy ... very easy to understand and what a good idea to put a few little cards in it for a gift ... my dear mum is in hospital at the moment and it would be great to make a few little cards for her to send out to friends to thank them for visiting ... happy crafting and love sandy xx
ReplyDelete